|
<< Click to Display Table of Contents >> Suppliers |
  
|
|
<< Click to Display Table of Contents >> Suppliers |
|
•Suppliers
Before creating new Supplier default settings need to be set up. These are outlined in the Admin Section of the Help Manual under the following subsections:
Defaults
- Manage Supplier Defaults
Settings / Suppliers
- Manage Supplier Groups
- Manage Supplier Types
- Manage Supplier Label Sizes
- Supplier Control Bar
A number of actions can be performed from the Supplier Control bar
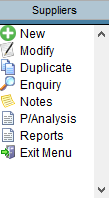
•New allows creation of a new Supplier Account.
•Modify allows modification of details for the Supplier Account currently selected in the Manage Supplier screen.
•Duplicate allows a Supplier Account to be duplicated.
•Enquiry allows viewing of the current Supplier’s details, contacts and transaction information.
•Notes display any notes added to the Notes tab in the Supplier’s details.
•P/Analysis displays a window listing all of the Supplier Purchase Analysis Reports. Chose the required report then Select to bring up the report window.
•Reports brings up a window listing all Supplier Reports. Select the required report then Select to bring up the report window.
•Exit Menu closes the Supplier Control Bar Menu and the Manage Supplier screen.
- Creating a New Supplier
To create a new Supplier, select New from the left hand control bar.
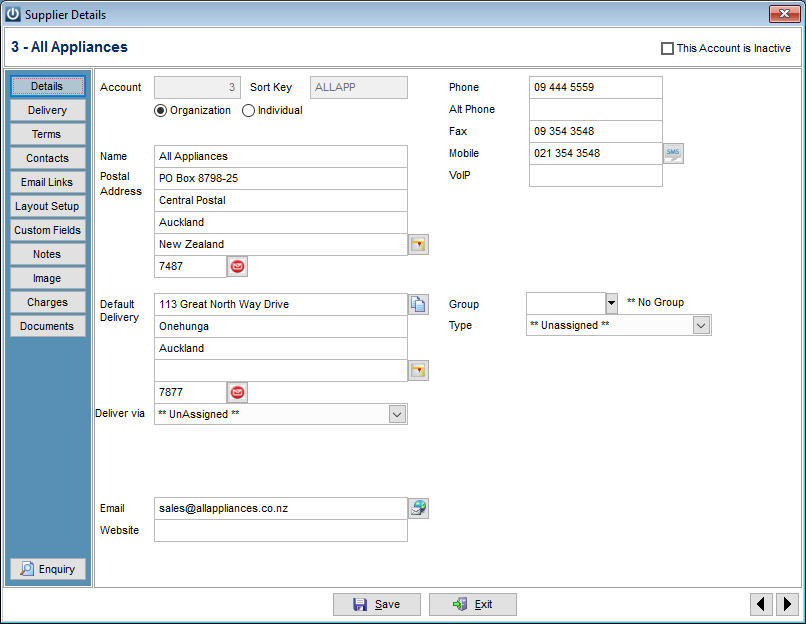
Details Tab
If the Automatic Sort Key creation hasn’t been selected under Manage Supplier Defaults / Preferences enter a Sort Key and the Supplier’s Contact Details. For Individuals a Title, First Name and Surname can be entered.
Group and Type are set up under the Admin / Settings Menu
The Copy Postal tab allows the Postal Address details to be copied to the Default Delivery details.
Selecting a Map button will display through Google Maps the location of this address. This requires internet access.
Accounts can be set to Inactive (Tick box in the top right corner). If this is selected, all history is kept but the Supplier will no longer appear in the Manage Suppliers screen or on any reports.
Selecting the NZ Post logo will take the user to the Postcode Finder page of the NZ Post website. After finding out what the Customer’s Postcode is it can be entered in to the Postcode field of the details screen.
The address entered in the E-mail field is used as the main email address for emailing documents to. Selecting the Email button will open the default email application on the computer ready to send an email to this address.
Selecting the Website button will open the default web browser to the entered address.
Delivery Tab
Infusion allows for an unlimited number of Delivery Addresses to be loaded against each Supplier. To add a Delivery Address, select Add New Delivery Address from the drop down menu, enter the information and click the Save button within this window. Selecting the Show Map button will display through Google Maps the location of this Delivery address. This requires internet access.
Terms Tab
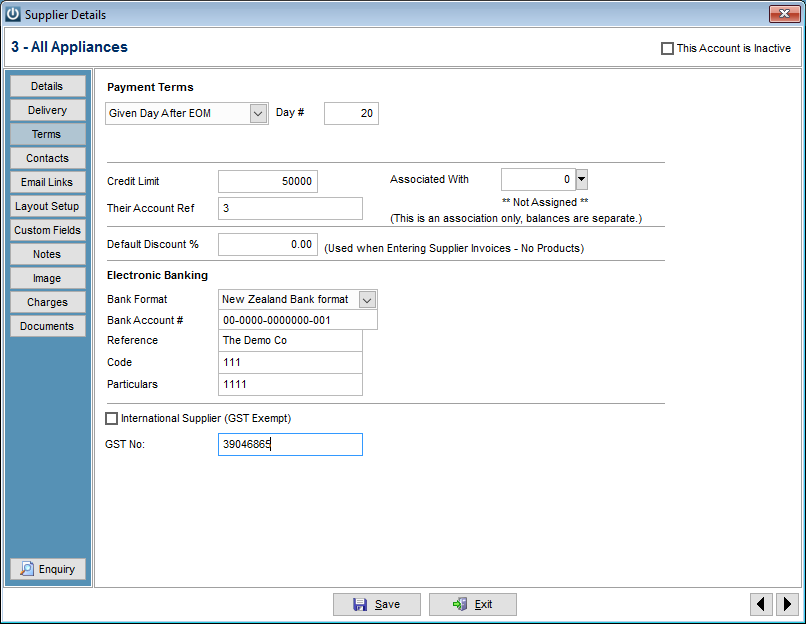
Payment Terms can be set to Number of Days, Cash Sale or Number of days (after EOM). If Number of Days or Number of Days (after EOM) is selected a box will appear for you to enter the number of days. E.g. if the number of days (after EOM) is selected and 20 entered as the number of days, the payment due date will be 20th of the following month.
Enter a Credit Limit if you have a limit on how much you can charge to the account with the Supplier.
You can enter the Supplier’s Account Ref in the Their Account Ref box. This is important for Invoice scanning.
An Associated With Supplier can be assigned to this Supplier. These associated Suppliers can be reported on using the Associated Suppliers Listing report.
Electronic Banking details can be stored for the Supplier. Select the Bank Format (i.e. New Zealand or Australian) and enter account details.
Tick the International Supplier (GST Zero Rated) box if this is an International Supplier who will be GST exempt.
The Suppliers GST / ABN number should also be loaded.
Contacts Tab
Infusion allows for an unlimited number of Contacts to be loaded against each Supplier. To add a Contact, select Add New Contact from the drop down menu, enter the information and click the Save button within this window.
Selecting a Map button will display through Google Maps the location of this address. This requires internet access.
E-Mail Links Tab
Infusion allows for up to three email addresses to be selected to email Purchase Orders and Remittance Advices to Suppliers.
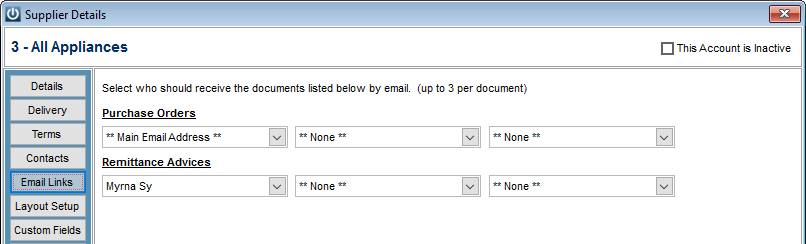
To assign an Email Address, click on the drop-down arrow and select the Email Address from the list. The Main Email Address (set on the Details screen) and all Email Addresses set against Contacts will be displayed.
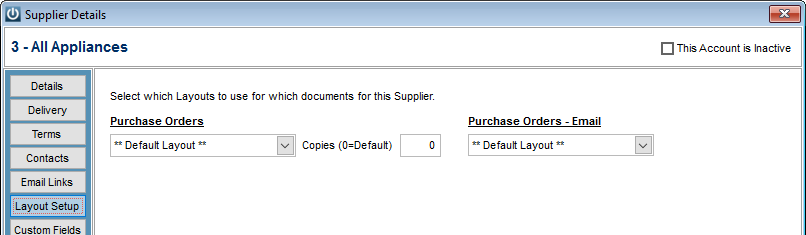
Layout Setup Tab
Allows setup for specific layouts for Purchase Orders for this Supplier, different from the default Purchase Order set under Admin / Layouts. A layout for specifically emailing can be set.
Custom Fields Tab
30 custom fields are available to store additional information against a Supplier. Titles for these fields are set up under Admin / Defaults / Manage Supplier Defaults / Custom fields
Notes Tab
Allows for additional Notes to be recorded against the Supplier. Custom Text can be inserted into the Notes section. A Supplier Prompt Note can also be added from this screen. These notes will pop up each time the Supplier account is used.
Image Tab
The Supplier’s logo or any other related image can be stored against the Supplier.
Charges Tab
Allows set up of Periodic Charges against the Supplier. These are charged straight to a General Ledger ID.
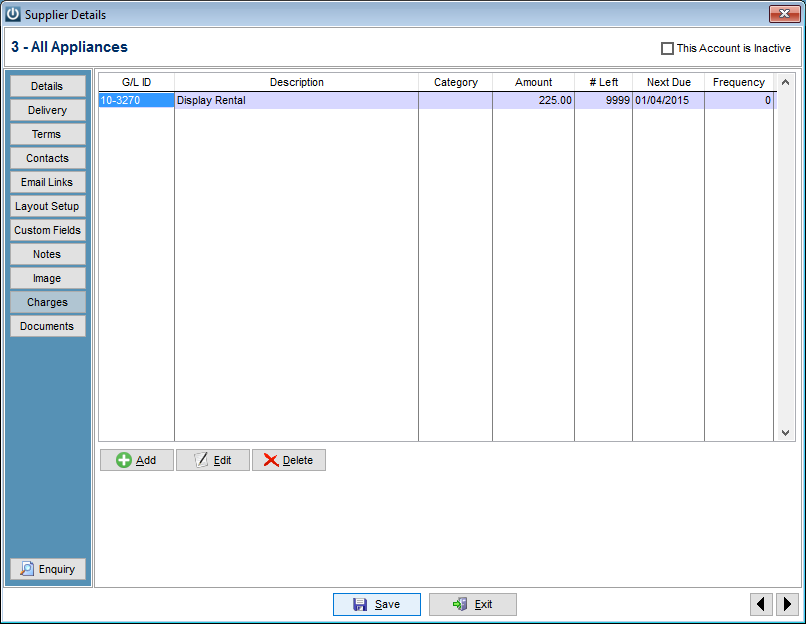
To add a Charge, click Add at the bottom of the screen. Enter a G/L ID and any Details.
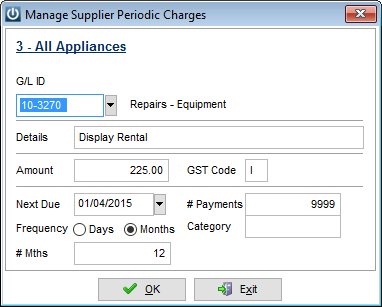
Enter the Amount, GST Code and the Next Due Date. Leave # Payments at 9999 if the charges are indefinite. If there is a limit to the number of Payments, enter the number here.
Choose the Frequency, either Days or Months. Enter how often the charges will be charged. E.g. If they are to be monthly then # Mths will be 1, if they are to be weekly then the # Days will be 7. Click OK.
To edit a charge, highlight it in the list and click Edit at the bottom of the screen.
Documents Tab
Allows links to be created to Supplier related files residing on the User’s computer / network.
Enquiry Tab
Allows access to the Supplier Enquiry screen.
- Supplier Right Click Menu
Right mouse clicking on a Supplier in the Manage Supplier Screen will display the following menu:
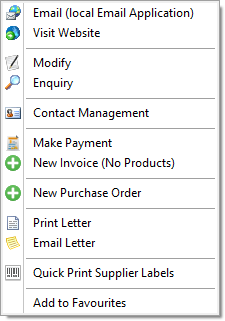
Email (local Email Application) – Opens the default email application to send an email to this Supplier’s default email address. This option will only be available if there is a Main Email Address.
Visit Website – Opens the default web browser application to the Supplier’s website address.
Modify – Opens the Supplier Details window.
Enquiry – Opens the Supplier Enquiry window.
Contact Management – Opens the Supplier Contact Management window.
Make Payment – Allows Payment to be made to the Supplier.
New Invoice (No Products) – Allows a G/L Invoice from the Supplier to be entered.
New Purchase Order – Allows a Purchase Order to be created against this Supplier.
Print Letter – Allows one of the standard letters to be printed for this Supplier
Email Letter – Allows one of the standard letters to be emailed to this Supplier. This option will only be available if there is a Main Email Address.
Quick Print Supplier Labels – Allows printing of Supplier Postal or Delivery labels for this Supplier.
Add to Favourites – Makes the Supplier available in the Favourites list within the right click menu on transactions.
- Suppliers Dropdown Menu
Access the Suppliers menu from the drop-down menu at the top of the screen.

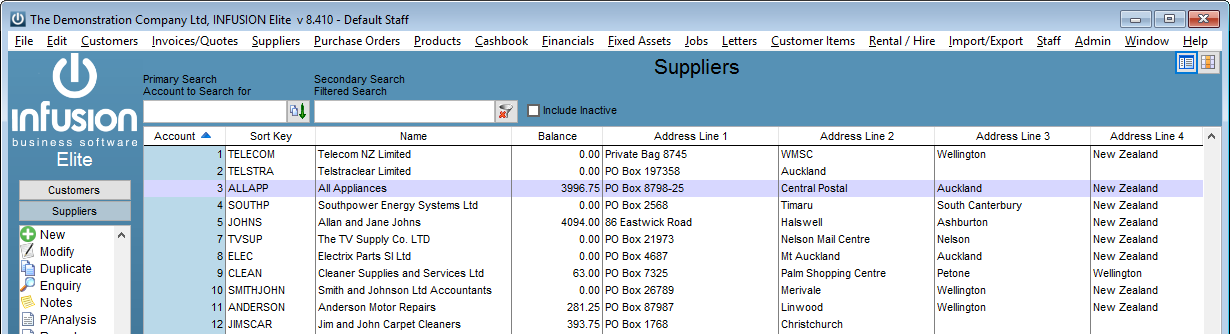
- Manage Suppliers
Displays the Manage Suppliers List on the front screen. By default, the list excludes inactive accounts, these can be made visible by selecting the Include Inactive option.
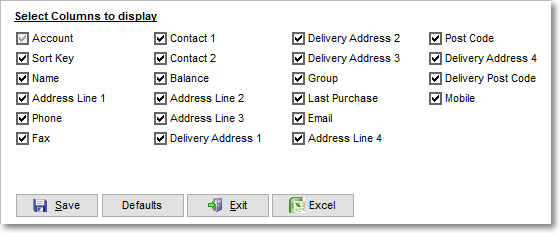
On the top right corner are the icons for Details Panel and Change Columns.
The Change Columns icon allows the user to see which fields are available to display on the list and these can be enabled or disabled as preferred. Clicking Save will save these preferences for the user. Defaults will enable the default selection. Clicking Excel will export the list to an excel spreadsheet using the selected columns and respecting any filter applied on the list. Exit takes the user back to the list.
The Details Panel icon opens a panel on the right hand side of the list for a quick glance at the information on a supplier account (select account by highlighting on the list).
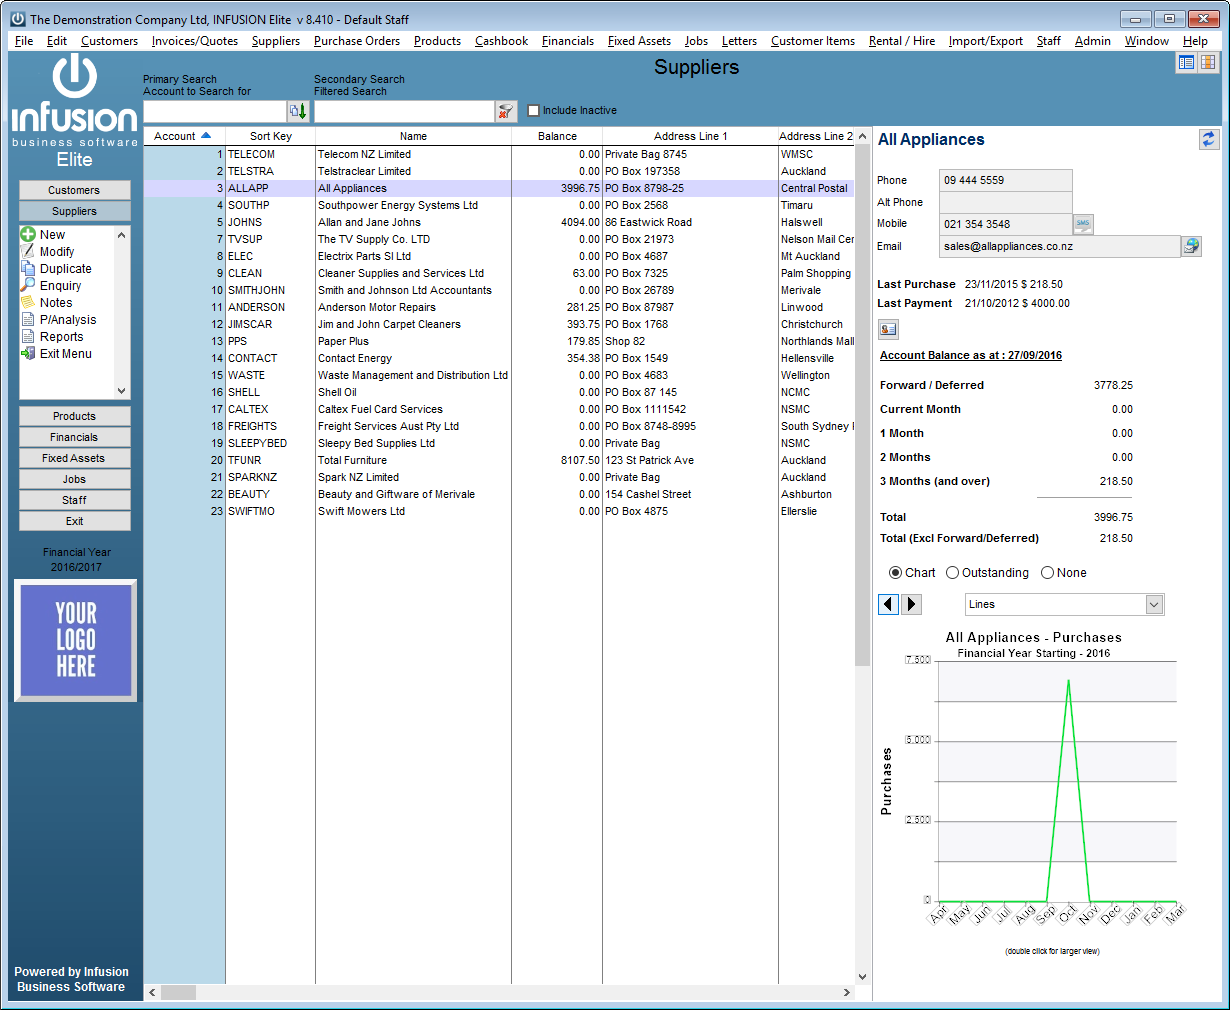
The Panel has three sections. The top section displays the main Phone Numbers and Email of the account (with action buttons allowing quick sending of SMS or email, if enabled), along with dates and amounts of Last Purchase and Last Payment.
The middle section displays Account Balance. There is also an icon at the top of this area that allows switching from balances to Contact Management Logs, if available.
The bottom section has three options to display: Chart, Outstanding and None. The Chart option shows the current financial year by default, the user can navigate to previous periods using the arrows on top of the chart. The format of the chart can also be changed, and double clicking on the chart will pop up a zoomed in version of it that can be moved to a different monitor if required.
The Outstanding option displays the list of outstanding invoices.
The None option will just leave the section empty. Having always the Chart or Outstanding options showing may be slow when navigating from one account to another on slow networks/computers.
- Supplier Enquiry
Enter the Supplier Number or Sort Key to view the Supplier enquiry window.
Details Tab
Allows for viewing of the main contact details for the Supplier. These cannot be edited from here.
Selecting a Map button will display through Google Maps the location of this address. This requires internet access.
An email can be sent to the address entered in the Email field by selecting the Email button. The default email application on the computer this is being done from will be used.
If SMS Defaults have been set up (under Admin / Defaults / Manage SMS Defaults) an SMS message can be sent to the mobile number entered by selecting the SMS button.
Contacts Tab
Allows Contact details set up against the Supplier to be viewed. These cannot be edited from here.
Selecting a Map button will display through Google Maps the location of this address. This requires internet access.
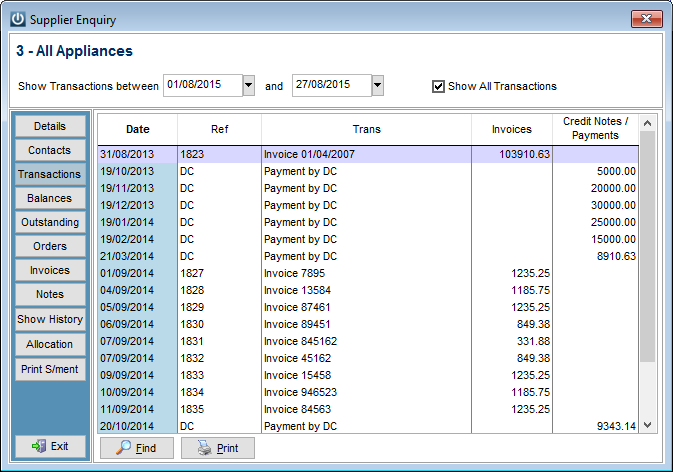
Transactions Tab
Displays Transactions against the Supplier. By default, only Transactions within the current month are shown. Changing the date range at the top of the window will allow more transactions to be displayed. To view all Transactions, select the Show All Transactions tick box.
Right click with the mouse on a transaction will give the option to preview the Original Document, which will output it on the screen or View Audit, which will show the drill down of the transaction.
For Payments, there are also three options to email the remittance advice (if an email address is set up under Email Links for Remittance Advices):
Email (Queue) will put a copy of the document in the Email Queue from where it can be sent later.
Email Now (via Queue) will put a copy of the document in the Email Queue first, but then it will automatically send it without having to open the Queued Emails screen under the Admin menu.
Email (local Email Application) will copy the document to your computer’s clipboard and open an email screen from your email application where it can be pasted. This option bypasses the Email Queue in Infusion.
The Find button can be used to locate transactions by searching for specific data in the Date, Ref or Transaction column.
The Print button will generate a Supplier Transaction Report which will include all the transactions on the enquiry screen as per the selected date range.
Balances Tab
Displays the Current, Outstanding and Forward Dated account balances against the Supplier.
Outstanding Tab
Displays all Supplier Invoices not yet paid. If Automatically Authorise Invoices from the Manage Supplier Defaults screen has not been set up, Invoices will need to be authorised for payment from this screen by selecting the tick box at the end of each transaction line.
Invoices will not show on the Supplier Payment screen until they have been authorised from here.

Orders Tab
Displays the current Purchase Orders relating to this Supplier.
The Find button can be used to locate Orders by searching for specific data in the Date, Order #, Status or Supplier Name column.
Invoices Tab
Displays all Invoices relating to this Supplier.
The Find button can be used to locate transactions by searching for specific data in the Date, Invoice #, Order # or Supplier Name column.
Notes Tab
Displays the Supplier Notes. These can be Edited or Added to from this screen including adding Custom Texts.
Show History Tab
Displays the Purchase history against the Supplier by month for the previous two and current years.
Allocation Tab
To see which Invoices a Payment was allocated to, select the Payment from the Transaction tab list then select the Allocation Tab.
Print Statement Tab
Allows a Statement as at a specified date to be printed for the Supplier.
- Contact Management
Opens the Contact Management screen (once a Supplier has been selected). See the Contact Management Help manual for more details.
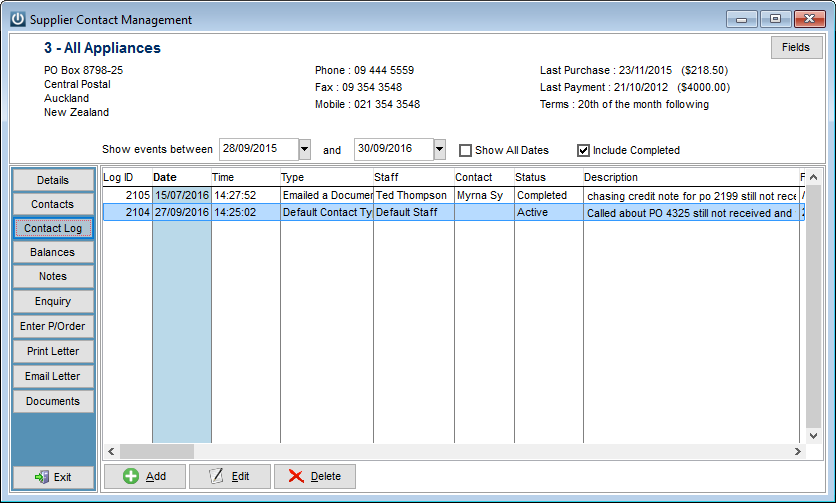
The Contact Management functionality has been designed to track all communications from within your system to your Supplier. The system keeps a log entry of all SMS messages, Emails and letters sent.
Whenever a phone call is made or received then an entry should be added by selecting the Add button at the bottom of the screen.
The Contact History screen opens when adding a new entry, or when double clicking on an existing entry, and will display a list of all previous events down the left hand side of the screen while on the right hand side giving you the ability to add the details of the new event.
The system will automatically create the date and time, you can then select a Contact Type (Email, phone, letter, SMS, etc.)
From here you now select the Contact group (Sales, Accounts, Other)
Select and set a Priority.
The event Staff member will default to the user logged in, but this can be changed.
Select the Supplier Contact.
The Contact log title should be used to briefly describe the reason for the contact – Overdue Order call, or Monthly Purchase call.
The Contact Log Notes will provide extra space for a more detailed description.
At this point here the event can be marked as complete, or you can set a follow up event selecting a Follow Up Date and Type and who the event is to be Assigned To for the follow up.
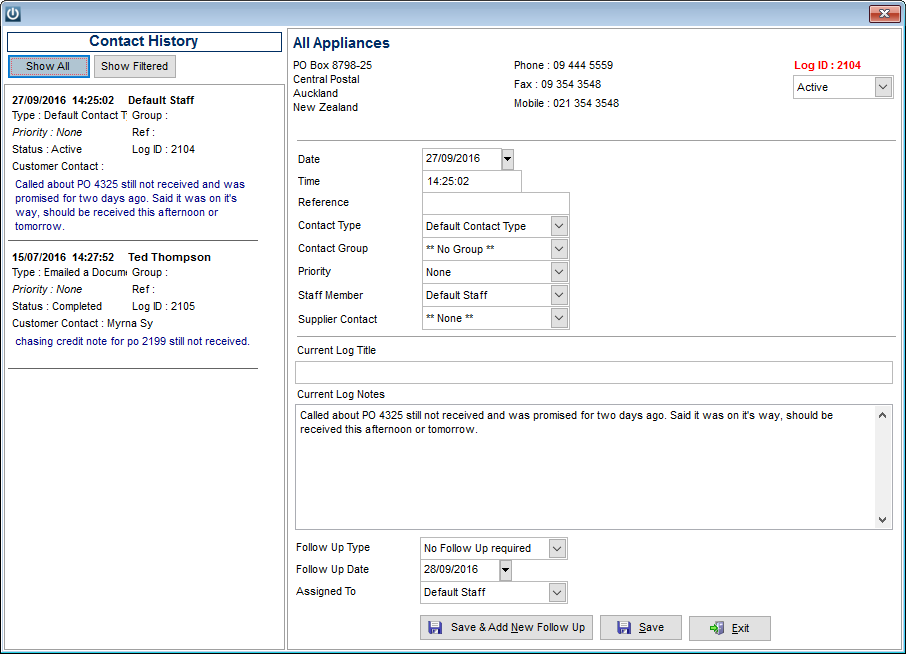
Selecting the Save & Add New Follow Up will give you an option to mark the current event as complete and then prompt you to confirm the details of the new event.
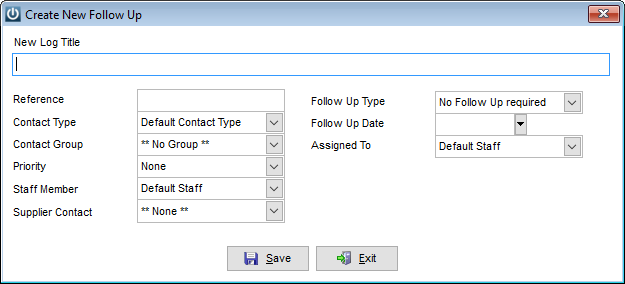
The follow up event will appear in the staff member’s To Do list. The event can be actioned from here or opened by double clicking on it.
- New Invoice (No Products)
Allows entry of a Supplier Invoice that doesn’t require a product code and without having to create a Purchase Order. The expense will be charged directly to a G/L ID. This option also allows for entering of Costs against a Job without using a Product code.
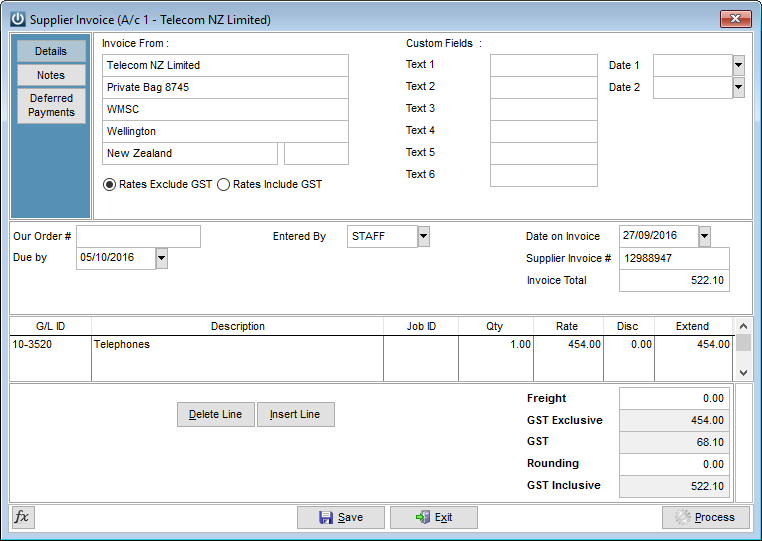
The Invoice Total must be entered into the top of the screen; this must then balance with the Invoice Total once all lines have been entered before the invoice can be posted.

Enter the G/L ID the cost will need to be assigned to, the Job ID, Quantity and Rate. A Job ID can be set for each line.
The Function Key List lists all of the function keys available when creating a Supplier Invoice along with the column in the Invoice screen the cursor needs to be in for them to work.
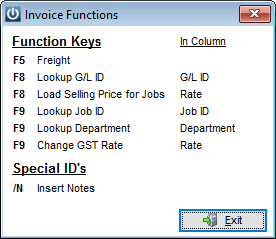
If the Invoice has been put onto a Job, it will show in the Costs section in the Job. A Sell Rate will need to be added to the Cost unless the Job is set with a Price Level of Latest or Average Cost. To do this select F8 while in the Rate column and either enter a Mark-up % or Sell rate for the charge.
The Force Old GST Rate option allows for the Primary GST rate prior to 01/10/2010 set under Manage GST Defaults to be used when Posting an Invoice.
Once all information has been entered select Process.
Notes Tab
Allows Notes to be added against the Supplier Invoice.
Deferred Payments
Deferred Payments can be set up for the payment of the Invoice from under the Deferred Payments Tab. Ten payments can be set up. All payments must be dated ahead of the Invoice date.
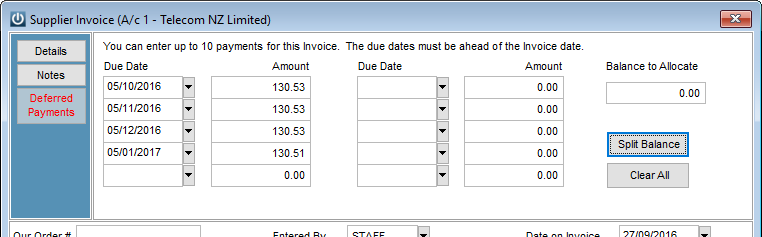
The Split Balance option allows payments to be split over a set number of months. When selected a First Payment Date will be asked for then the number of months the payments are to be over. This can range from 2 to 10.
The Clear All tab in the payments section allows all information set up for the Deferred payment to be cleared.
The Balance to Allocate must be zero before the payment schedule is accepted.
When Deferred Payments have been set up the text on this tab will display in red.
- Pending Supplier Invoices
Lists all Pending Supplier Invoices. Highlight the specific Pending Supplier Invoice then use the button options appearing on the left hand side of the screen to action changes.
The Post 1 and Post All options will Post the requested Invoices (if they are not on Hold). Double click on an Invoice or highlight the Invoice and select Edit to open the invoice.
Use the Hold button to Hold / Unhold transactions individually. Selecting the Hold All and Unhold All buttons will hold or unhold all Invoices. The Search function allows for Searching of specific data on the Date, Invoice #, Name, Account and Entered By columns. To use the search option, select the Header of the appropriate column, select Search then enter the data to search for.
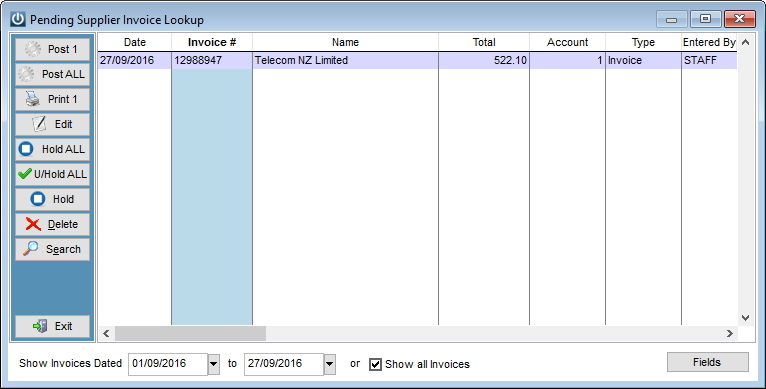
Use the Delete option to delete the highlighted saved Invoice.
To use the search option, select the Header of the appropriate column, select Search then enter the data to search for.
- Digital Invoice Import / Process
Infusion in conjunction with Xtracta have worked very closely to provide users of Infusion with a very tight solution allowing Supplier Invoices to be scanned from PDF, MS Word, Jpeg or Tiff files. These are automatically converted and imported into Infusion for End User approval or automatically processed. This service allows users to process Supplier Invoices more efficiently and accurately saving time and cost of data entry.
For more information, please read the following Knowledge Base Article:
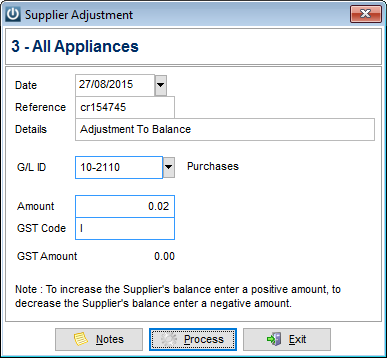
- Enter Adjustment
Allows an adjustment to be made to the Supplier account. Adjustments are coded directly to G/L Ids.
- Supplier Payment
Allows entry of Payment to a Supplier.
If there are multiple bank accounts set up, select the Bank Account the payment will be made from then select the Supplier.
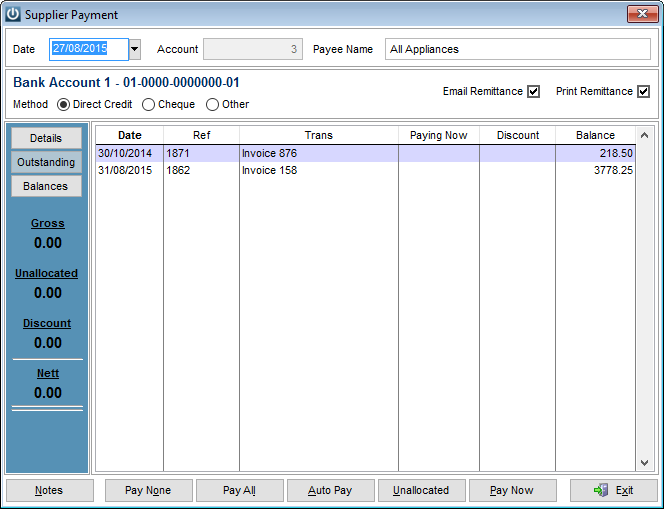
Details Tab
Displays the main contact details for the Supplier. These cannot be edited from here.
Outstanding Tab
Displays all outstanding Invoices for this Supplier.
Balances Tab
Shows the current and outstanding balances with the Supplier.
Payments are made through the Outstanding Tab. Enter the Date the payment is being made on. Select the Method being used for the payment. Enter the Payee Name to match the name on a cheque. The Direct Credit option will be disabled unless there is a Bank Account setup under the Terms Tab in the Supplier’s details. If Cheque is selected, a box will appear to enter the cheque number and a tick box for printing the cheque.
Double clicking in the Paying Now column beside the Invoice to pay will bring the full amount due across in to this field.
The Notes button displays the Supplier notes.
The Pay None button will move any payments currently showing in the Paying Now column back into the Balance column.
Selecting the Pay All button will move all balances currently showing in the balance column into the Paying Now column.
Auto Pay will display a box to enter the full amount being paid in to. This will allocate payments to the oldest Invoice first. The last Invoice may be partially paid if there isn’t enough to pay the full balance and set up to do so under Admin / Defaults / Manage Supplier Defaults / Preferences Auto Pay can partially pay Invoices.
The Unallocated option allows a payment to be made to the Supplier account and not have it allocated to any outstanding Invoices.
Remittance Advices can be printed and / or emailed once the payment is made. An email address needs to be set up under Email Links for the Supplier for the email option to be available.
Once all details for the Supplier Payment have been entered select Pay Now.
- Bulk Supplier Payment by Direct Credit
The Bulk Supplier Payments screen allows you to pay a number of Suppliers all at the same time. This is accessed from Suppliers \ Bulk Supplier Payments by Direct Credits.
In order for the Suppliers to appear in this screen their Terms need to be set up with Electronic Banking details.
After choosing the Bank Account the Payment is to be made from, the screen below appears:
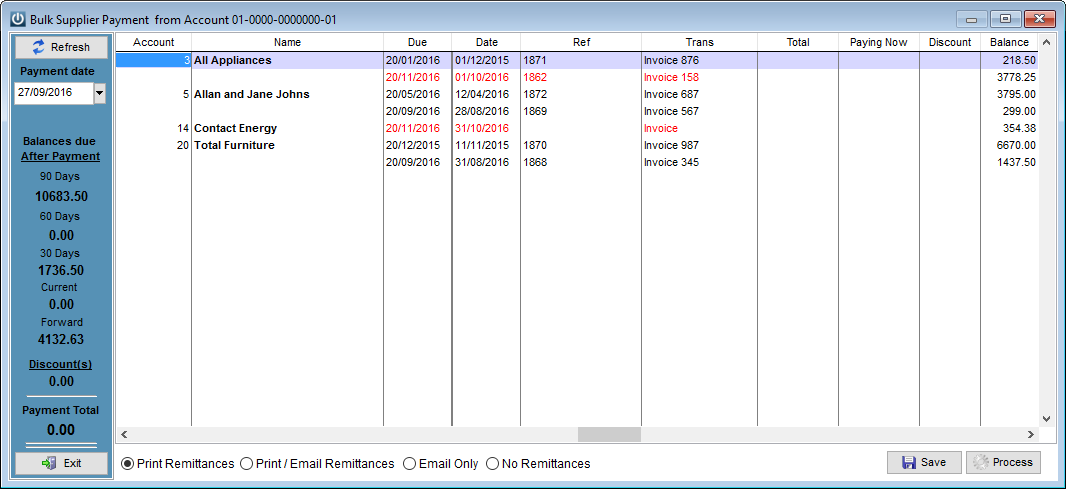
To Pay a Supplier you can double click on the Supplier Name or the individual invoice. Clicking at the top of the Balance column will select all Suppliers.
To unselect an Invoice double click on the Supplier Name or the individual invoice. Clicking at the top of the Paying Now column will deselect all Suppliers.
The Invoices with a red Due Date are not yet due for payment.
Remittances will be sent depending on the Radio button option selected at the bottom of the screen.
Select Save to save any changes in the screen. These will be recalled when going back into the screen. Select Process when finished.
Once processed from this screen, a direct credit batch needs to be created through Cashbook / Prepare Direct Credit Export.
- Process Periodic Charges
Allows processing of Periodic Charges setup against Suppliers.
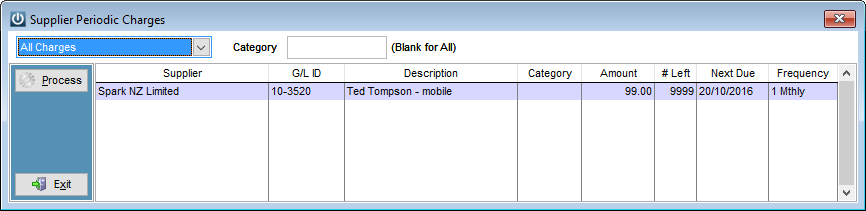
Select either Current Charges Only or All Charges from the drop down menu. All charges to be charged will be displayed. To process the charges, select Process. Limiting the processing to a certain category can be done by entering the appropriate details into the Category box.
- Schedule Address Labels
Allows scheduling of Address labels for Suppliers. A range of Suppliers can be loaded by entering the appropriate ranges then selecting the Load Suppliers tab.
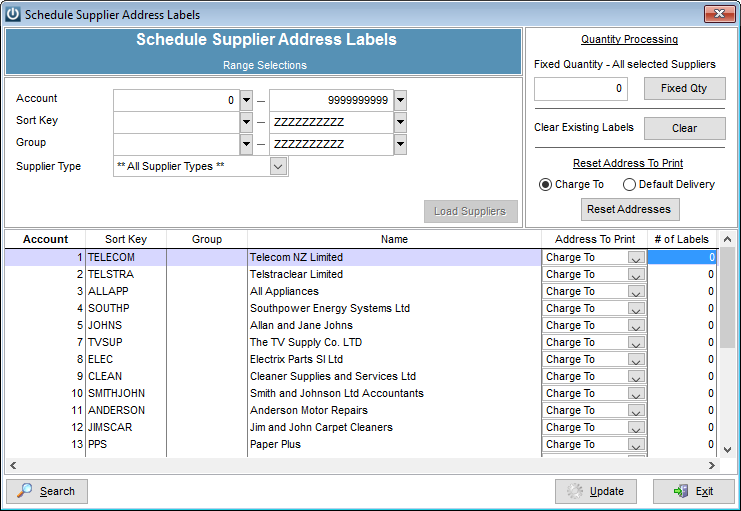
A fixed quantity of labels for all selected Suppliers can be scheduled by entering a quantity in to the field under the Fixed Quantity – All Selected Suppliers heading then selecting the Fixed Qty button. The required number of labels will display in the # of Labels column.
Selecting the Clear button will zero all scheduled labels.
The Address used for the labels can be set to “Charge To” or “Default Delivery” as set up under the Supplier. These can be reset using the Reset Addresses button. The address used for each Supplier can also be changed in the Address To Print column.
The Search button locates a Supplier in the list of loaded Suppliers.
Selecting the Update button will schedule all labels for printing.
- Print Address Labels
Allows printing of scheduled Supplier Address labels.
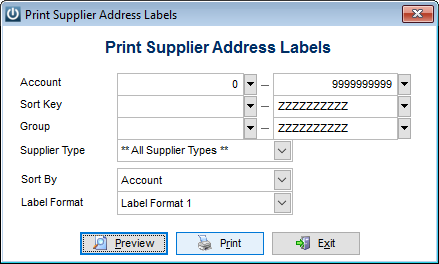
Select the range of Suppliers labels are to be printed for.
The Sort By option will allow the print order to be set for the labels. This can be set to Account, Sort Key or Name.
There are five Label Formats to choose from. These are set up under Admin / Settings / Suppliers / Manage Supplier Label Size.
Select the Preview button to view how the labels will print.
Select Print to print the labels.
- Quick Print Supplier Labels
Allows for printing of Address Labels for a single Supplier.
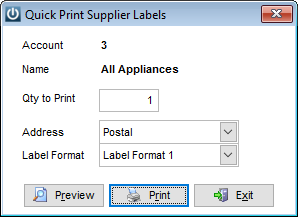
The Postal or Delivery address can be printed on the label. Five label formats are available. The sizing of each label is set up under Admin / Settings / Suppliers / Manage Supplier Label Size.
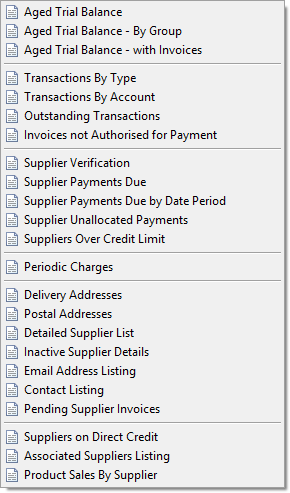
- Reports
Lists the range of Supplier Reports available.
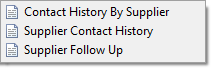
- Contact Management Reports
Lists the range of Supplier Contact Management reports available.
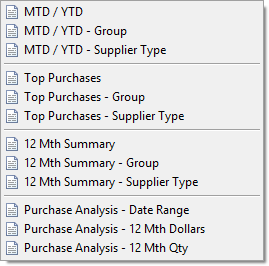
- Purchase Analysis
Lists the range of Supplier Purchase Analysis Reports available.
- Utilities
A selection of utilities is available from the Suppliers menu:
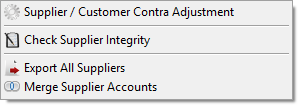
Supplier / Customer Contra Adjustment
Allows transfer of funds between a Supplier and Customer account with the balance of each account being adjusted by the entered amount.

For this utility to work the Customer account used must have a Supplier Contra Account setup under the Terms/Pricing section of their account. To transfer an amount out of the Customer account and into the Supplier account select the Transfer amount from Customer to Supplier option. To transfer an amount out of the Supplier account and into the Customer account select the Transfer amount from Supplier to Customer option.
Notes can be entered against the Customer and Supplier accounts by selecting the Cust Notes and Supp Notes options respectively. Select the Process option to action the transfer.
Check Supplier Integrity
Recalculates the Supplier history values.
Export All Suppliers
Creates a CSV export file (default name - supplier) containing all Suppliers data.
Merge Supplier Accounts
Allows two Supplier accounts to be merged into one while retaining the transaction history. The Account to Merge will be removed from the Manage Supplier screen and the Destination Account will display all of the transactions associated with the two accounts. Charges, Documents and Contacts are brought over to the Destination account.