|
<< Click to Display Table of Contents >> Customers |
  
|
|
<< Click to Display Table of Contents >> Customers |
|
•Customers
Before creating new Customers, default settings need to be chosen. These are outlined in the Admin Section of the User Manual under the following subsections:
Defaults
- Manage Customer Defaults
Settings / Customers
- Manage Customer Types
- Manage Customer Groups
- Manage Industry Types
- Manage Customer Regions
- Manage Delivery Methods
- Manage Marketing Types
- Manage Customer Label size
- Manage Quote Status
- Manage Quote Type
- Customer Control Bar
A number of actions can be performed from the Customer Control Bar.
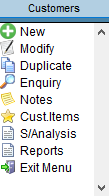
•New allows a new Customer Account to be created.
•Modify allows details of the Customer Account currently selected in the Manage Customer screen to be modified.
•Duplicate allows duplication of a current Customer Account.
•Enquiry allows account information e.g.. account details, transaction history for the Customer to be viewed.
•Notes displays any notes added to the Notes tab in the Customer’s details.
•Items allows maintenance of Customer Items.
•S/Analysis displays a list of all of the Customer Sales Analysis Reports. Select the required report then Select to bring up the report window.
•Reports displays a window listing all of the Customer Reports. Select the required report then Select to bring up the report window.
•Exit Menu closes the Customer Control Bar Menu and the Manage Customer screen.
Creating a New Customer
Select the Create tab from the left hand Control bar. If Automatic Account Numbering has not been set up (Admin / Settings / Manage Customer Defaults/Preferences) then a screen will pop up requiring the entry of the “Account # to Create”, otherwise an account number will be assigned to the new Customer and the Customer Details screen will display.
Required fields will display with a coloured fill.
These can be set from the Admin / Settings / Manage Customer Defaults / Preferences screen.
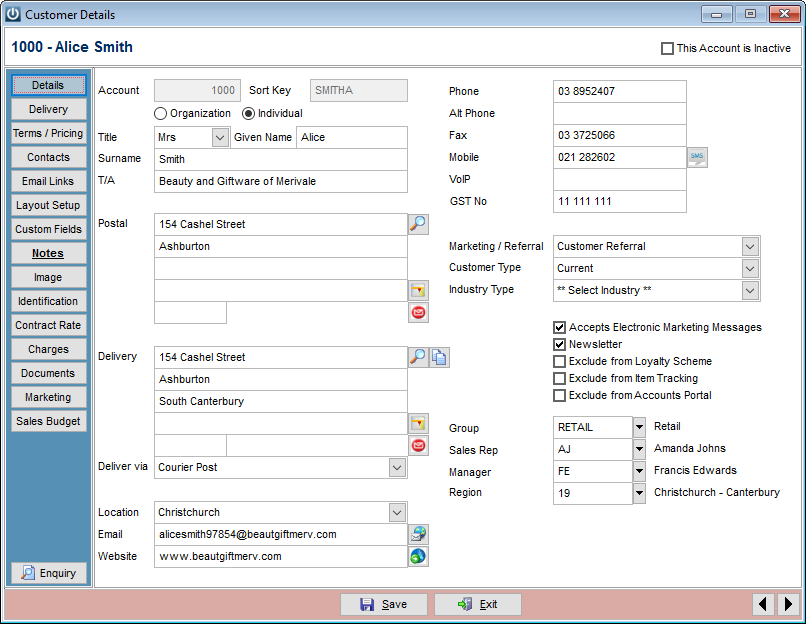
Details Tab
If the Automatic Sort Key creation hasn’t been selected under Manage Customer Defaults / Preferences enter a Sort Key and the Customer’s Contact Details.
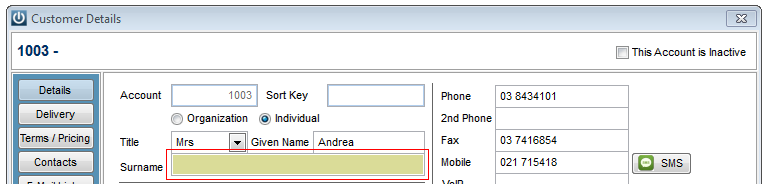
The Customer can be set up as either an Organization or an Individual. For an Individual the Title, Given Name and Surname can be entered.
The Trading As (T/A) name will allow you to store the name a business trades under.
The Customer’s phone numbers should be stored taking care to place the mobile number in the mobile field otherwise it will not be picked up for texting. The mobile number may be entered with spaces, and dashes as these are stripped out when searching or texting.
Marketing/Referral, Customer Type, Industry Type and Group are all set up under the Admin / Settings / Customers menu. Sales Rep and Manager can be selected if Staff are set up in the Staff menu.
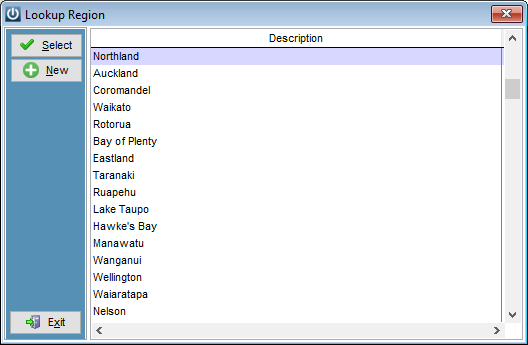
The Region field allows Customers to be assigned to pre-defined areas or regions. This can then be selected for sales analysis and Customer reporting purposes.
Accounts can be set to Inactive (Tick box in the top right corner). If this is selected, all history will still be kept but the Customer can be filtered out of the Manage Customer screen and won’t be shown on reports.
The Address Verification Service is a solution allowing the user to enter part of an address and then select the magnifying glass icon at the end of address line 1. The system will then search the New Zealand and or Australian Post sites and return the full correct address.
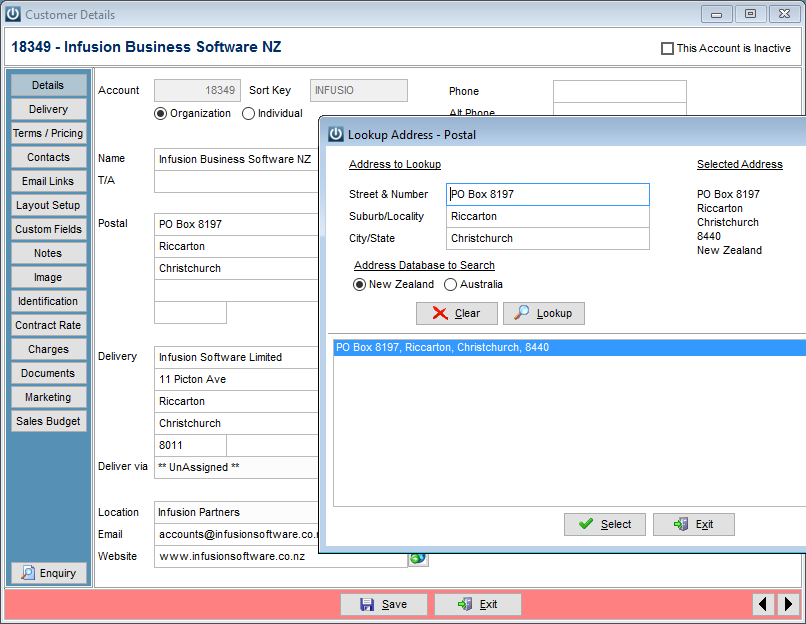
Note: the Address Verification on Postal Addresses will only locate valid addresses to which the postal service delivers.
The Delivery Address will pick up valid physical locations.
Use the Copy Postal button to copy the details form the Postal Address section in to the Defaults Delivery section.
Selecting a Google Map button will display through Google Maps the location of this address. This requires internet access.
Selecting the NZ Post logo will take the user to the Postcode Finder page of the NZ Post website. After finding out what the Customer’s Postcode is it can be enter in the Postcode field of their details screen.
The address entered in the Email field is used as the main email address for emailing documents to. Selecting the Email button will open the default email application on the computer ready to send an email to this address.
Selecting the Website button will open the default web browser to the entered address.
If SMS messaging (Texting) is set up under the Admin / Defaults / Manage SMS Defaults the Customer can be texted a message using the Send SMS button.
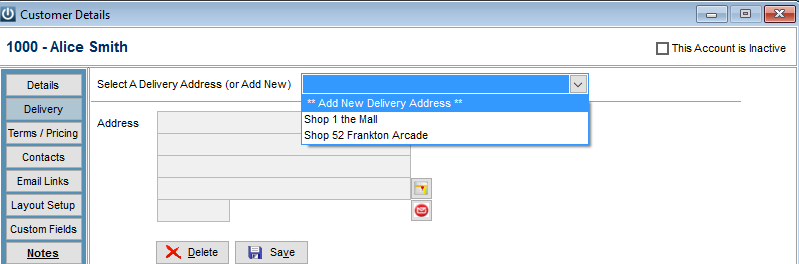
Delivery Tab
Infusion allows for an unlimited number of Delivery Addresses to be loaded against each Customer. To add a Delivery Address, select Add New Delivery Address from the drop down menu, enter the information and click the Save button within this window. Selecting the Show Map button will display through Google Maps the location of this Delivery address. This requires internet access.
Term/Pricing Tab
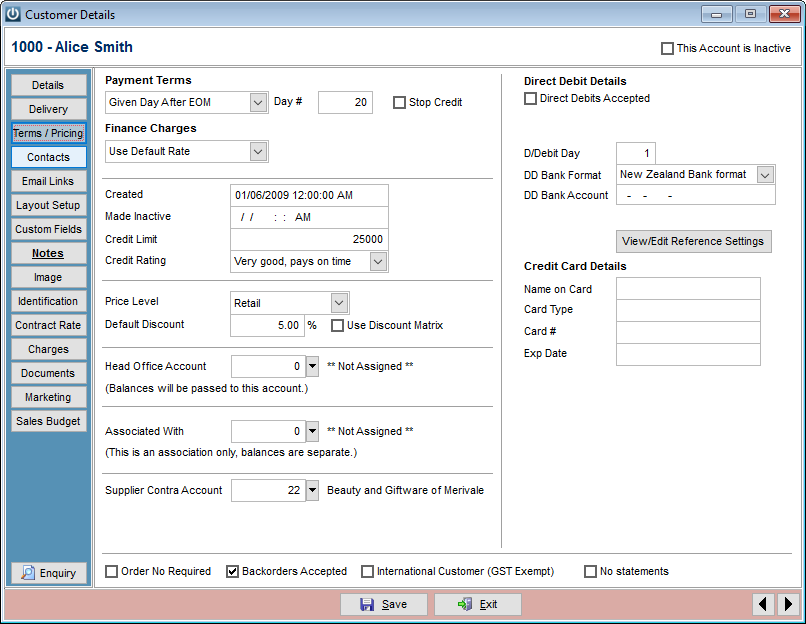
Payment Terms can be set to either Number of days, Cash sale, Given Day After EOM. If Number of Days or Given Day After EOM is selected a box will appear for entry of the number of days. E.g. if Given Day After EOM is selected and 20 is entered in the Day # field, payment due date will be 20th of the following month.
Customers can manually be placed on stop credit by selecting the Stop Credit option.
Finance Charges can be assigned to the Customer for overdue amounts on their account. Selecting the Use Default Rate will use the Finance Charge rate set under Admin / Defaults / Manage Customer Defaults. Selecting Use Specific Rate requires entry of a Rate specific to this Customer. If a specific rate is selected a box will appear to enter the % rate. Finance Charges are processed through Customers / Finance Charges. Charges are flat rate on the overdue amount, not per annum.
The Date Created will indicate the date and time the account was created.
On Inactive accounts, the Made Inactive field will display the time stamp of when the customer account was made inactive.
Enter a Credit Limit if the Customer is to have a limit to the amount their account can be charged. Recalling or Creating an invoice will check if the Customer's balance is over its Credit Limit. It does not include any unposted Invoices or the Invoice being recalled in this calculation. When creating an Invoice from a Quote a check is done to see if creating that Invoice will place the account over the Credit Limit. When posting an Invoice from the Invoice screen a check is done to see if posting will place the account over the Credit Limit. When posting from the Pending Invoice screen, Post All will not post Invoices which will place the account over its limit. A warning is displayed at the end of all posting of how many Invoices were NOT posted. Post 1 on the Pending Invoice screen will warn you if posting will place the account over its limit. These are all only warnings and require selecting Yes or No as to whether Posting should continue.
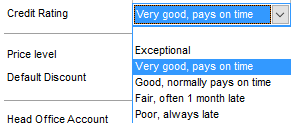
Customers can be assigned a Credit Rating
Select the Price Level for the Customer to set the pricing they will get for items purchased. These are setup under Admin / Settings / Customers / Manage Customer Groups.
If a Default Discount is entered, each time the Customer is invoiced this discount will apply on all Products.
Tick Use Discount Matrix to activate the discount matrix for this Customer. The Discount Matrix can be setup under Admin / Settings / Products / Manage Product Groups. While in a Group select Edit then Discount Matrix. Enter the Discount against the appropriate Group. It can also be setup through Admin / Settings / Customers / Manage Customer Groups, then Editing a Group.
A Head Office Account can be assigned to a Customer. All Invoices balances for this Customer will show against the Head Office account.
An Associated With Customer can be assigned. These Customers will then be associated with an account for reporting purposes (e.g.. Customers / Reports / Associated Customers Listing). Each account will retain their own balances.
The Supplier Contra Account is part of the set up for the Customer / Supplier Contra Adjustment, under the Customer / Utilities and Supplier Utilities menus.
The Direct Debit Details section is where details of the Customer’s bank account for Direct Debits are stored (see Direct Debits Knowledge Base Article).
Credit Card details can also be stored for the Customer. Infusion will check to make sure they account number entered is a valid account.
If Order Number Required is ticked, an Invoice will not be able to be processed without an order number being entered.
If Backorders Accepted is ticked, backorders will be created for this Customer if the required stock is not on hand. This also requires back orders to be activated under Admin / Defaults / Manage Customer Defaults / Invoices.
Tick the International Customer (GST Zero Rated) tick box if this is an overseas Customer who will not be charged GST.
To exclude the Customer from having Statements sent out for their account select the No statements option.
Contacts Tab
Infusion allows for an unlimited number of Contacts to be loaded against each Customer.
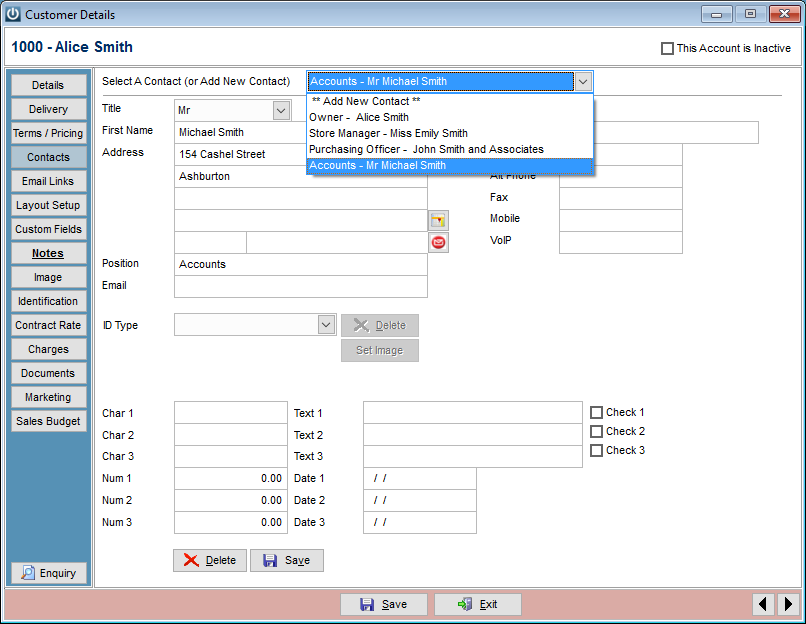
To add a Contact, select Add New Contact from the drop down menu, enter the information and click the Save button within this window. The new contact address details can be set to the main Customer address details by selecting the Customer Details button, then any adjustments made.
Selecting a Map button will display through Google Maps the location of this address. This requires internet access.
Emails and SMS can be sent from this screen to the Contact person.
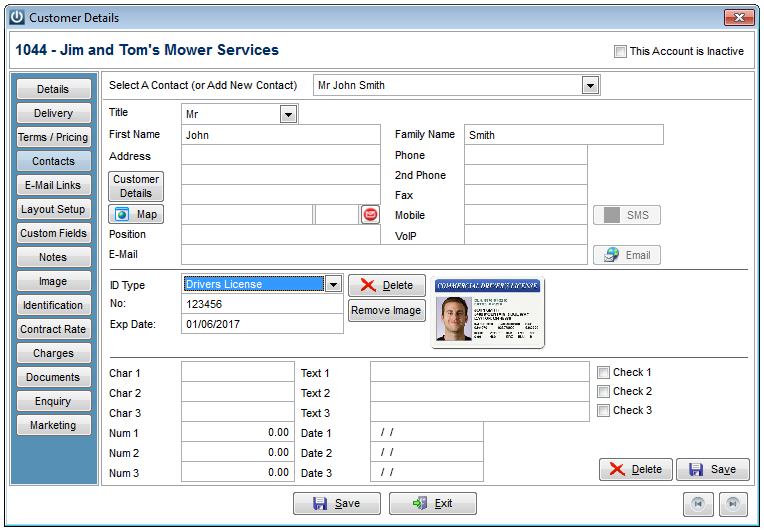
Ids can be added against a Contact by selecting the **Add ID** option in the ID Type field. Options set up under Admin / Settings / Other Manage ID Types will display. Details relating to the ID can be added and an image associated with it using the Set Image option.
Custom field details for Customer’s are set up under the Admin / Defaults / Manage Customer Defaults / Contacts menu.
E-Mail Links Tab
Infusion allows set up of three addresses for emailing out of Invoices, Packing Slips, Quotes, Statements and Receipts to Customers.
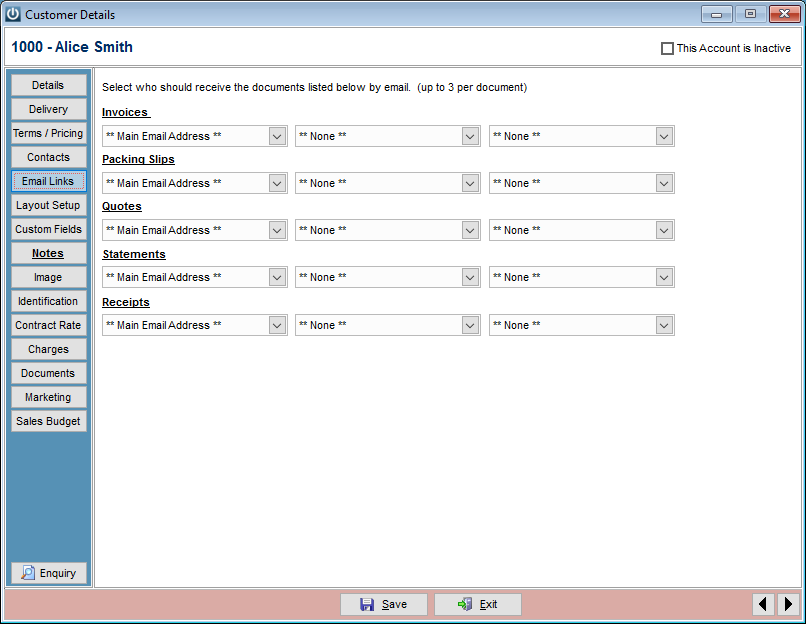
To assign an email address, click on the drop-down arrow and select the email address. The list consists of the email addresses set on the details screen and all email addresses entered against Contacts for this Customer.
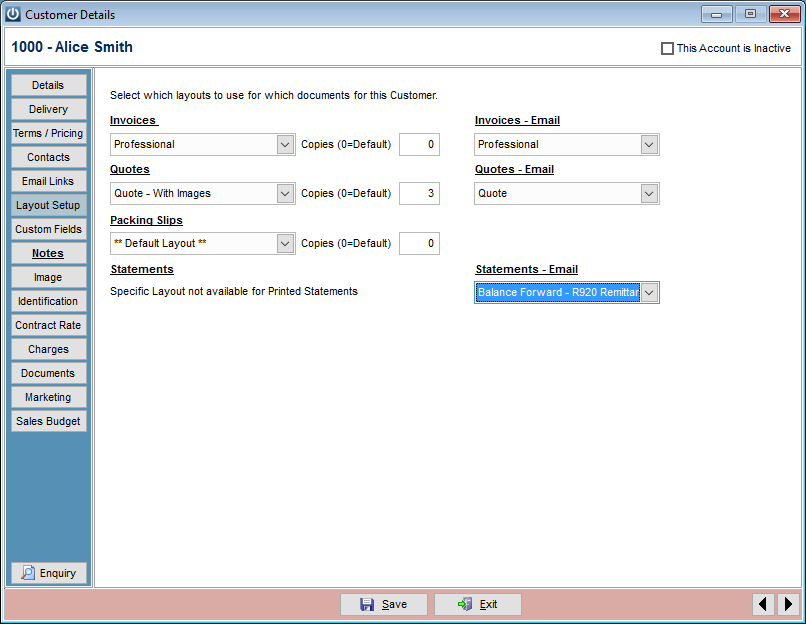
Layout Setup Tab
Allows setup of specific layouts (both Printed and Emailed) for this Customer, different from the default layout for Invoices, Quotes and Packing Slips set up under Admin / Layouts.
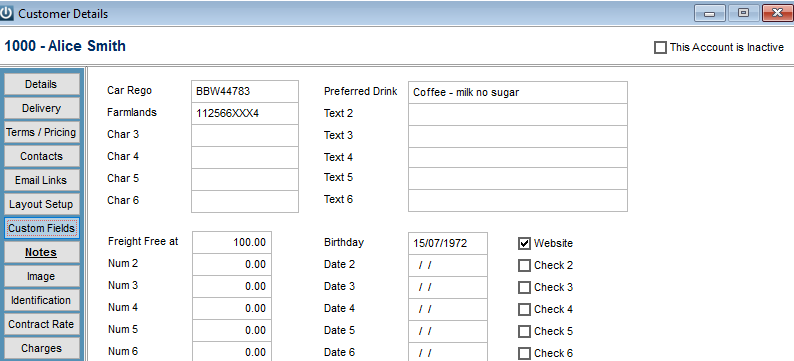
Custom Fields Tab
30 custom fields are available to store additional information for Customers.
Notes Tab
Allows additional Notes to be stored against the Customer. Standard Description text can be inserted in to the Notes section. A Customer Prompt Note can be added in from this screen; these notes will pop up each time the account is used. If there is text in either of these fields the title on the Notes button will display bold and underlined.
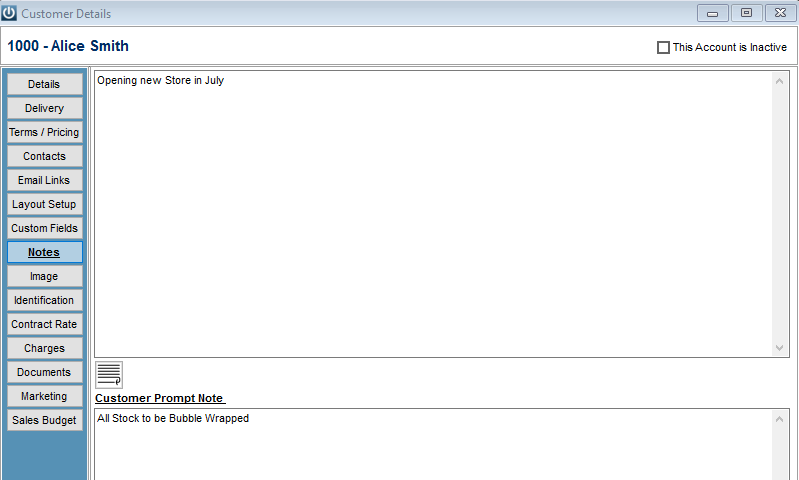
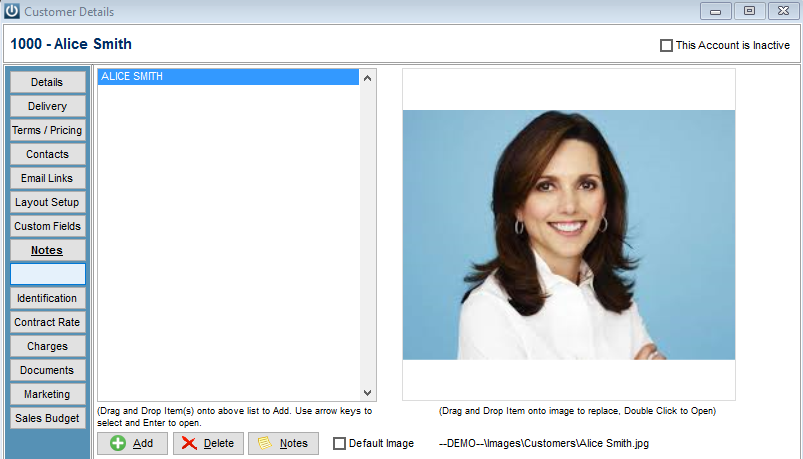
Image Tab
The Customer’s logo or any other related image can be stored against the Customer. There is no limit to the number of images which can be stored. The image files can be loaded individually or dragged and dropped from another file location.
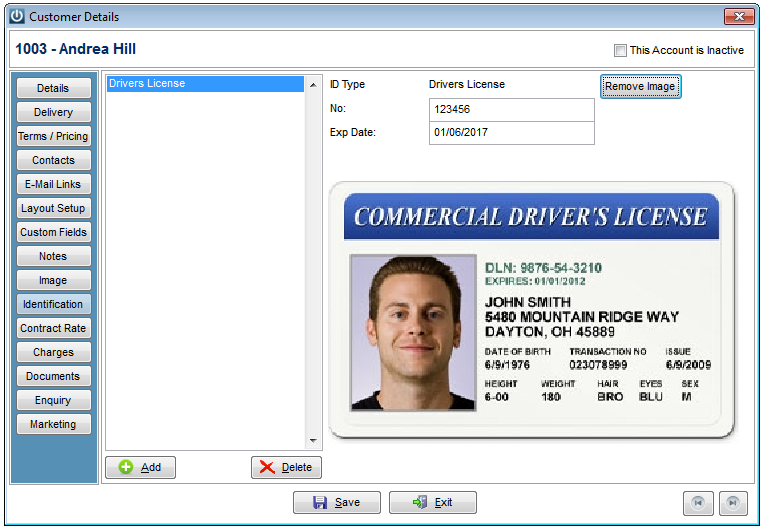
Identification Tab
Identifications can be set against Customer accounts (as opposed to Contacts from the Contacts tab). This will typically be done if the Customer is set as an Individual account.
Set Add then the ID Type. Options set up under Admin / Settings / Other Manage ID Types will display as options. Details relating to the ID can be added and an image associated with it using the Set Image option
Contract Rates Tab
Contract Rates for Products can be set per Customer.
To add a Contract Rate, click Add at the bottom of the screen. Three options are available for setup of the Rate. Either for a Product, for a Product Group or for a Rental / Hire Group.
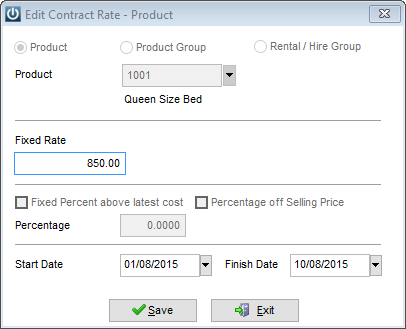
For each of these selections three options are available for specifying the actual rate - Fixed Rate, Fixed Percent above latest cost or Percentage off Selling Price.
Fixed Rate – Enter a fixed price the Customer will pay. This option is not available for Product Groups
Fixed Percent above latest cost – To use this option tick the box and enter the Percentage the Customer will pay above Latest Cost.
Percentage off Selling Price – To use this option, tick the box and enter a Percentage the Customer will pay below the Selling Price for the Price Level they are on.
Start and Finish dates can be set if the Contract Rate is only for a certain period of time. The Rate will not be used if there is just a start date - all other combinations will use the date settings entered.
Click OK
Contract rates for Products will display with a P in the first column, a G for Product Groups and H for Rental / Hire.
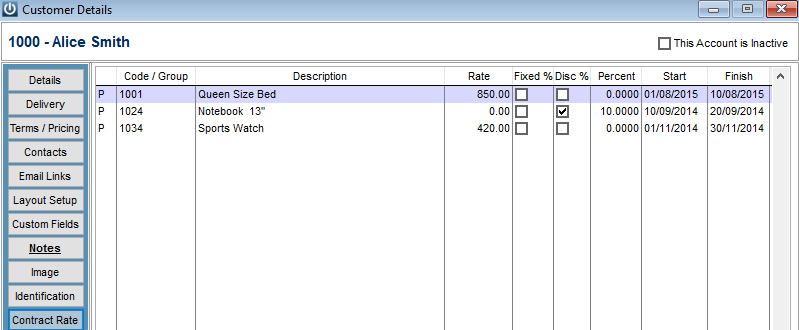
To edit a Contract Rate, highlight it in the list and click Edit at the bottom of the screen.
Charges Tab
Allows entry of Periodic Charges against the Customer. These are charged straight to a General Ledger ID.

To add a charge, click Add at the bottom of the screen. Enter a G/L ID and any Details.
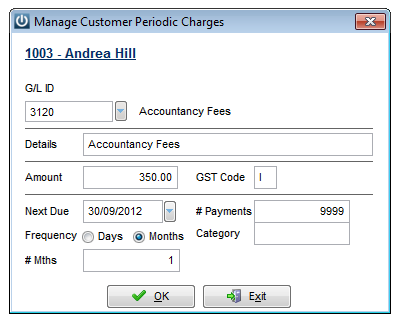
Enter the Amount, GST Code and the Next Due Date. Leave # Payments at 9999 if the charges are for an indefinite term. If there is a limit to the number of payments, enter the number here.
Choose the Frequency, either days or months. Enter how often the charges will be charged. E.g. If they are to be monthly then # mths will be 1, if they are to be weekly then the # days will be 7.
Click OK.
To edit a charge, highlight it in the list and click Edit at the bottom of the screen.
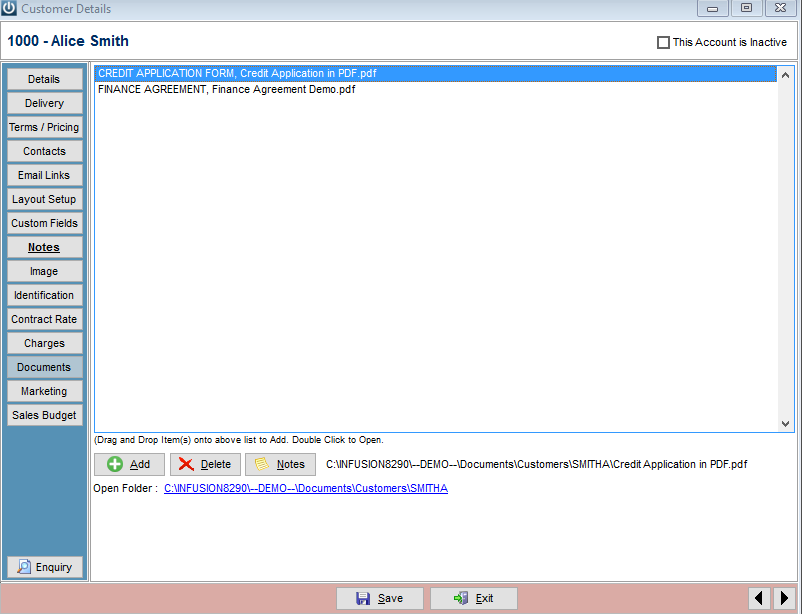
Documents
Allows links to be created to Customer related files residing on the User’s computer / network.
The system will allow links to be created to existing file locations or for documents to be located in their own separate folder under e.g.
data\Documents\Customers\SmithA folder
Marketing
The Marketing fields are set up under the Admin / Defaults / Manage Customer Defaults / Marketing menu option. While there are currently no standard reports to use this data they are intended to be used for marketing related tasks.

This data is available as part of the Customer \ Utilities \ Export email list option
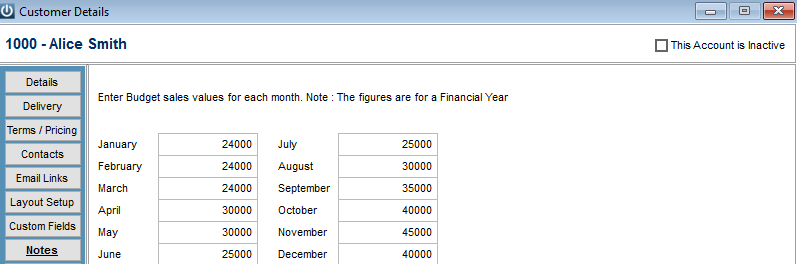
Sales Budgets
Enquiry
Opens the Enquiry screen for this Customer.
- Customer Right Click Menu
Right mouse clicking on a Customer in the Manage Customer Screen will display the following menu:
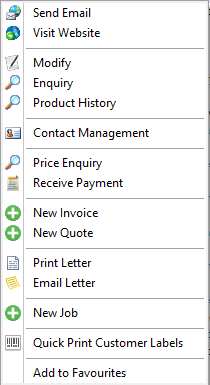
Send Email – Opens a blank email message using the default email software. This will only be visible if an email address is entered for the Customer.
Visit Website – Opens the default web browser application to the Customer’s website address.
Modify – Opens the Customer Details window.
Enquiry – Opens the Customer Enquiry window.
Product History – Shows a list of Products the Customer has purchased and the last date this occurred.
Contact Management – Opens the Contact Management screen for this Customer. This option will only be available if the software has been licensed for the Contact Management module.
Price Enquiry – Allows a Price enquiry to be done for this Customer without having to create an Invoice.
Receive Payment – Allows a Payment to be received from this Customer.
New Invoice – Allows an Invoice to be created for this Customer.
New Quote – Allows a Quote to be prepared for this Customer.
Print Letter – Allows the User to Print a predefined letter for this Customer.
Email Letter – Allows the User to Email a predefined letter for this Customer. This will only be visible if an email address is entered for the Customer.
New Job – Allows a Job to be created for this Customer.
Quick Print Customer Labels – Allows printing of Customer Postal or Delivery labels for this Customer.
- Customers Dropdown Menu
Access the Customers menu from the drop down menu at the top of the screen.
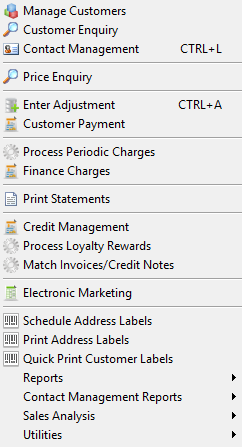
- Manage Customers
Displays the Manage Customer List on the front screen. By default, the list excludes Inactive accounts. These can be made visible by selecting the Include Inactive option.
On the top right corner are the icons for Details Panel and Change Columns.
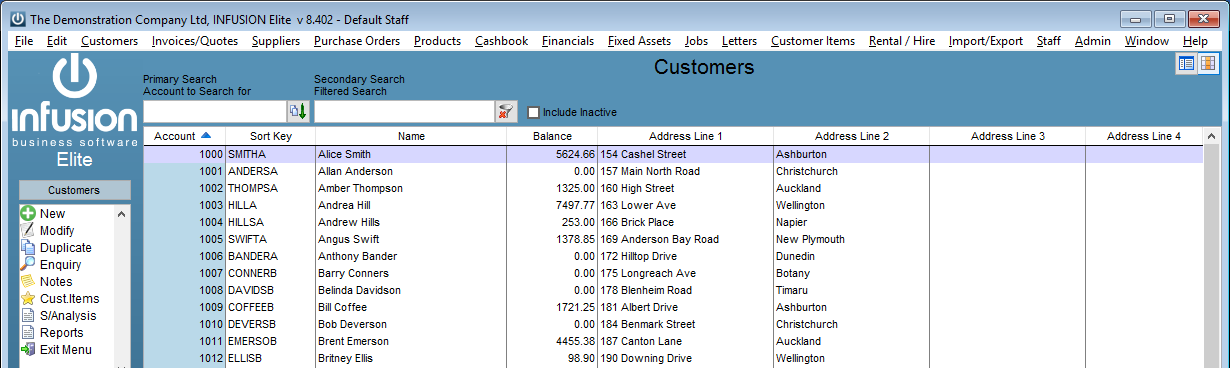
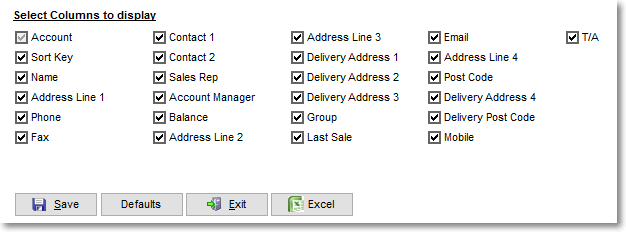
The Change Columns icon allows the user to see which fields are available to display on the list and these can be enabled or disabled as required. Selecting Save will save these preferences for the user. Defaults will restore the options back to the default settings. Selecting Excel will export the list to an excel spreadsheet using the selected columns and respecting any filter applied on the list. Exit takes the user back to the list.
The Details Panel icon opens a panel on the right hand side of the list for a quick glance at the information on a Customer account (select an account by highlighting it on the list).
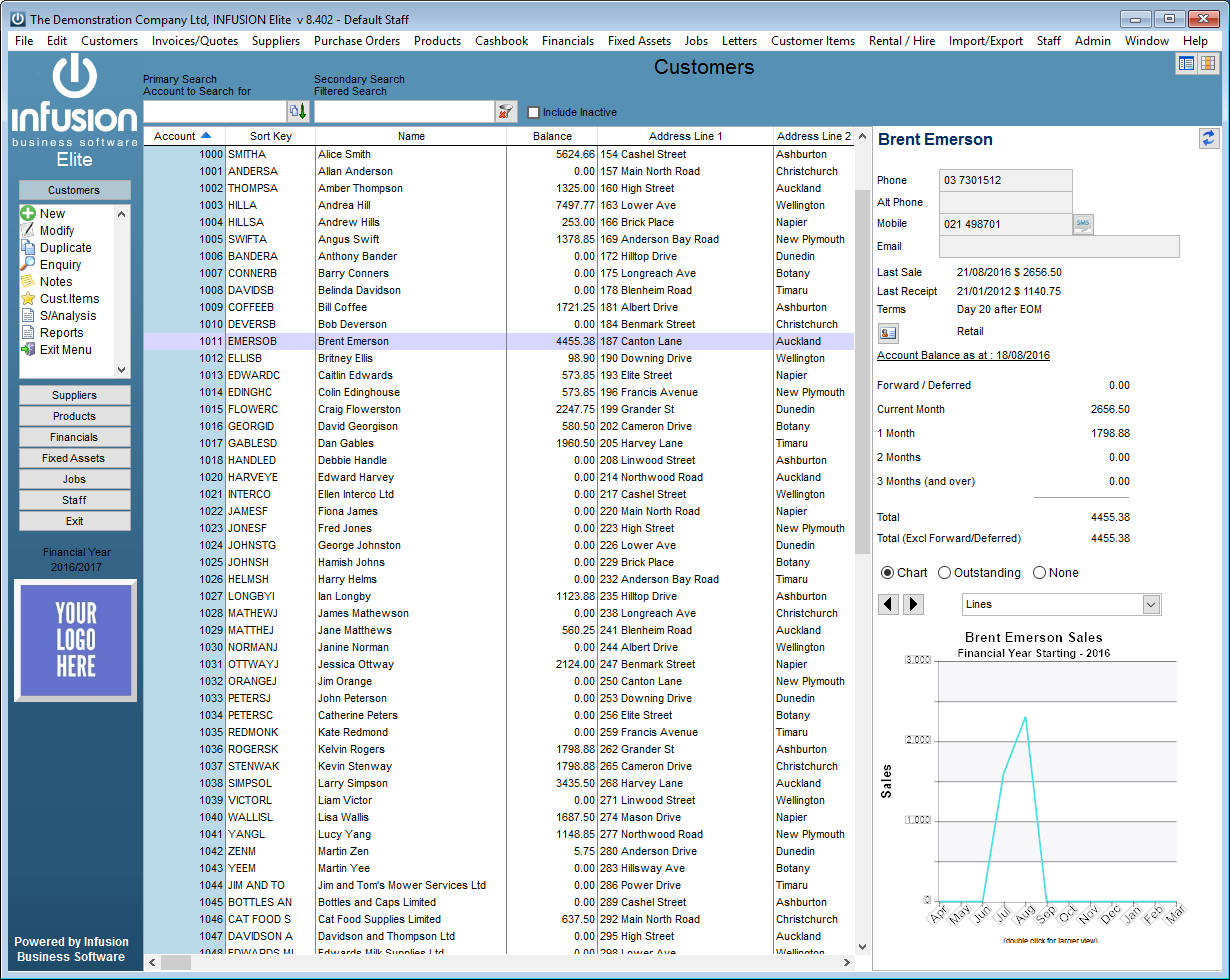
The Panel has three sections. The top section displays the main Phone Numbers and Email of the account (with action buttons allowing quick sending of SMS or email, if enabled), along with dates of Last Sale and Last Receipt, the Terms and the Price Level.
The middle section displays the Account Balance. There is also an icon at the top of this area that allows switching from balances to Contact Management Logs, if available.
The bottom section has three options to display: Chart, Outstanding and None.
The Chart option shows the current financial year by default. The user can navigate to previous periods using the arrows on top of the chart. The format of the chart can also be changed. Double clicking on the chart will pop up a zoomed in version of it that can be moved to a different monitor if required.
The Outstanding option displays the list of Outstanding Invoices.
The None option will just leave the section empty. Having always the Chart or Outstanding options showing may be slow when navigating from one account to another on slow networks / computers.
- Customer Enquiry
Details Tab
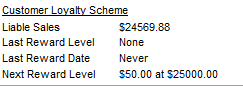
Allows for viewing of the main contact details for the Customer and Customer Loyalty details. These cannot be edited.
Selecting a Map button will display through Google Maps the location of this address. This requires internet access.
Customers who are part of the loyalty scheme will have their balances displayed on the right hand side.
Contacts Tab
Allows you to view the details for any Contact setup for the Customer. These cannot be edited from here.
Selecting a Map button will display through Google Maps the location of this address. This requires internet access.
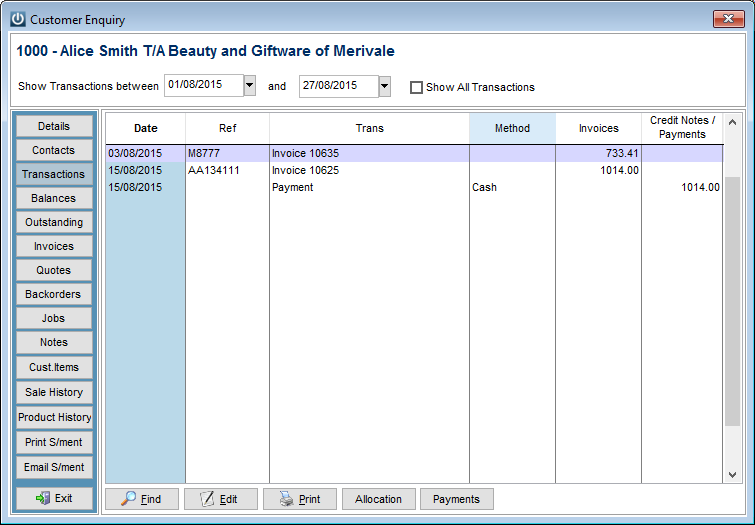
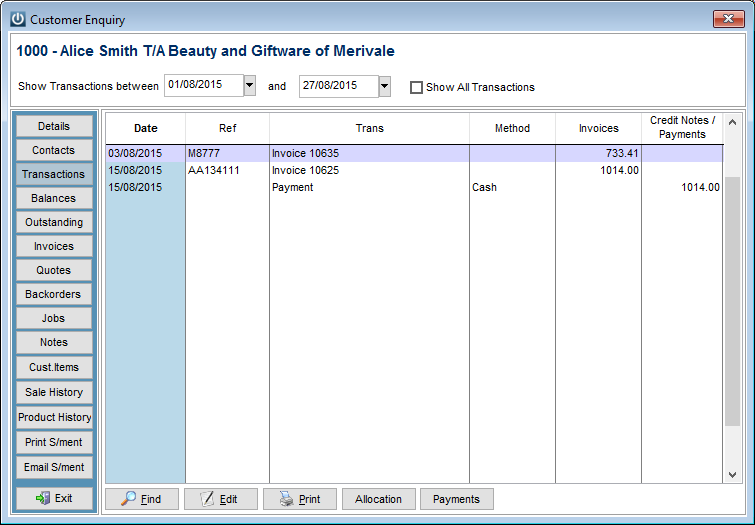
Transactions Tab
Allows viewing of all transactions for the Customer. By default, only transactions within the current month are shown. The date range at the top of the window can be changed to show more transactions. To view all transactions, select the Show All Transactions tick box.
Right click with the mouse on a transaction will give the option to preview the Original Document, which will output it on the screen or View Audit, which will show the drill down of the transaction.
For Invoices and Credit Notes, there are also three options to email the document (if an email address is set up under Email Links for Invoices):
Email (Queue) will put a copy of the document in the Email Queue from where it can be sent later.
Email Now (via Queue) will put a copy of the document in the Email Queue first, but then it will automatically send it without having to open the Queued Emails screen under the Admin menu.
Email (local Email Application) will copy the document to your computer’s clipboard and open an email screen from your email application where it can be pasted. This option bypasses the Email Queue in Infusion.
To see which invoices a payment was allocated to, select the payment from the transaction tab list then click on the Allocation button.
To see which payments have been made to an invoice, select the invoice from the transaction tab list then click on the Payments button.
The Find button can be used to locate transactions by searching for specific data in the Date, Ref or Transaction column.
The Edit button will allow editing of Delivery and non financial details of the Invoice.
Balances Tab
Shows the Customer’s current and outstanding balances.
Outstanding Tab
Shows all Invoices that have not been paid.
Invoices Tab
Shows Invoices for the Customer. Invoices can be reprinted and emailed from this section. Delivery and reference details for the Invoice can be edited from here. The same right click options described above are also available on this tab.
The Find button can be used to locate transactions by searching for specific data in the Date, Invoice #, Order #, Job ID or Customer name column.
Copies of Invoices can be printed or emailed (if an email address is set up under Email Links for Invoices) by using the Print and E-mail buttons at the bottom of the screen. Delivery and Reference details for the Invoice can be edited from here.
Quotes Tab
Shows all Quotes that have been created for this Customer along with any corresponding Invoices or Jobs created from them.
The Find button can be used to locate Quotes by searching for specific data in the Date, Quote #, Invoice #, Job ID or Customer Name column.
Copies of Quotes and associated Invoices can be printed or emailed (if an email address is set up under Email Links for Invoices).
Backorders Tab
Displays Pending Backorders for the Customer.
The Find option can be used to locate Backorders by searching for specific data in the Code, Description, Quantity, Date, Original Invoice # or Order # fields.
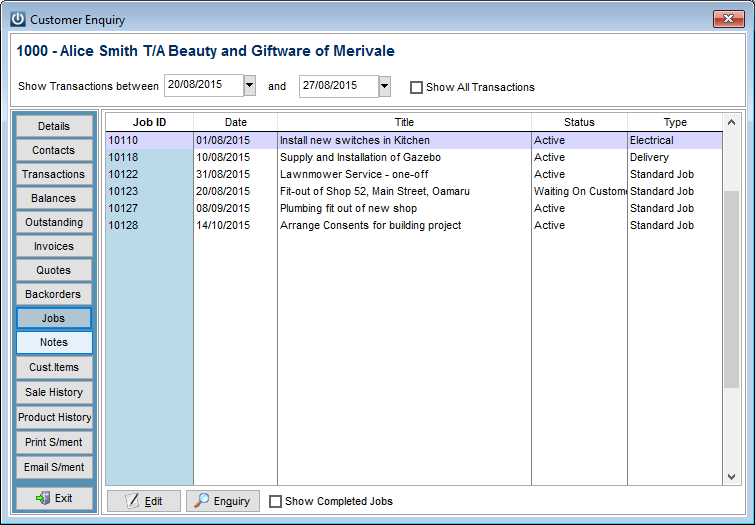
Jobs Tab
Displays Jobs assigned to the Customer. Jobs can be Edited and Enquired on through this screen. Completed Jobs for this Customer can be shown if the Show Completed Jobs option is selected.
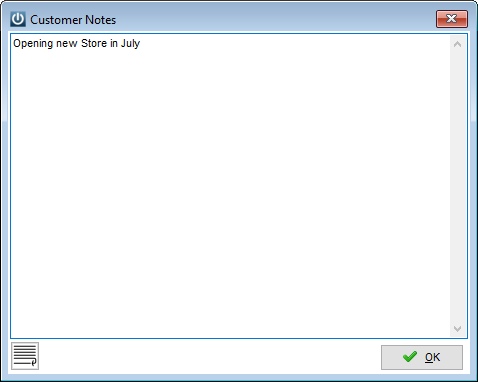
Notes Tab
Displays the Customer Notes. These can be Edited or Added to from this screen including adding Standard Descriptions.
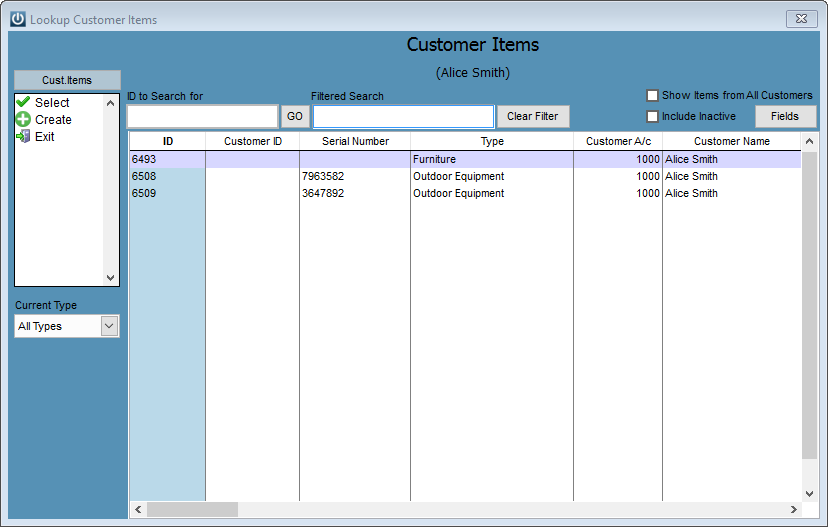
Customer Items Tab
Displays a list of all Customer Items for this Customer and allows an Enquiry on them. Notes can be added against the Customer Items at this level. A Customer Item for the Customer can be Created from this screen.
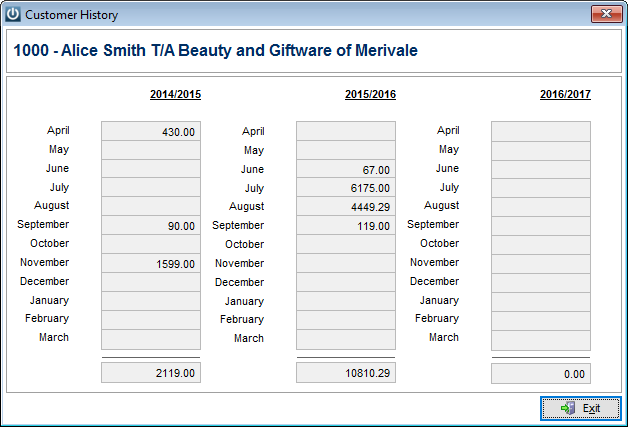
Sale History Tab
Shows the Customer’s Sales history by month for the past two and current financial years.
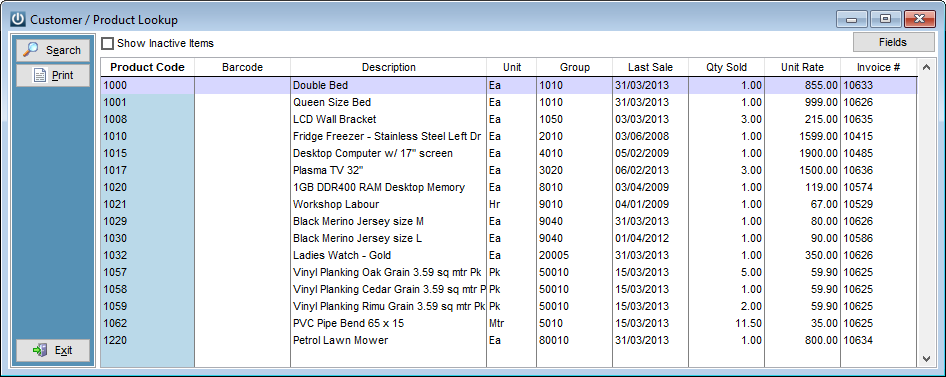
Product History Tab
Shows a list displaying the last occurrence in which a Product was purchased by the Customer.
Print Statement Tab
Allows printing of a statement as at a specified date for the Customer.
Email Statement Tab
Allows emailing of a statement (as at a selected date) to the Customer. An email address needs to be set up for Statements under Customer / Email Links for the option to be active.
Contact Management
Opens the Contact Management screen (once a Customer has been selected).
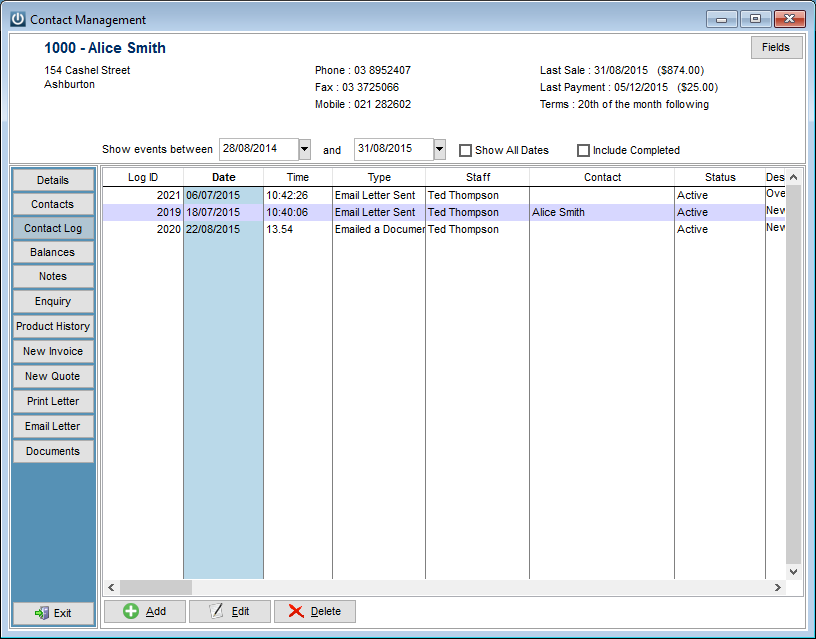
The Contact Management functionality has been designed to track all communications from within your system to your Customer. The system keeps a log entry of all SMS messages, Emails and Letters sent.
Whenever a phone call is made or received then an entry should be added by selecting the Add button at the bottom of the screen.
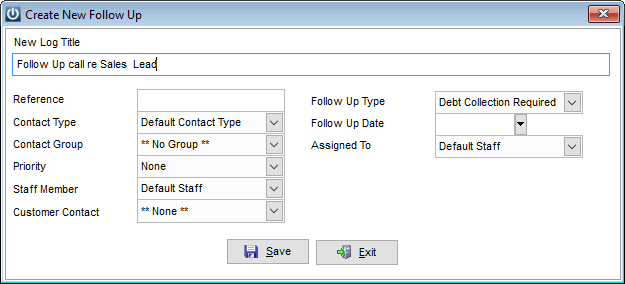
The Contact History screen opens when adding a new entry, or when double clicking on an existing entry. It will display a list of all previous events down the left hand side of the screen while on the right hand side giving you the ability to add the details of the new event
The system will automatically enter the date and time. You can then select a Contact Type (Email, phone, letter, SMS, Etc.). From here you now select the Contact Group (Sales, Accounts, Other)
Select and set a priority
The event Staff Member will default to the user logged in but this can be changed.
Select the Customer Contact
The Contact log Title should be used to briefly describe the reason for the contact – Overdue Account call or Monthly Sales call.
The Contact Log Notes will provide extra space for a more detailed description.
At this point the event can be marked as complete or you can set a follow up event by selecting a Follow Up Type and Date and who the event is to be Assigned To for the follow up.
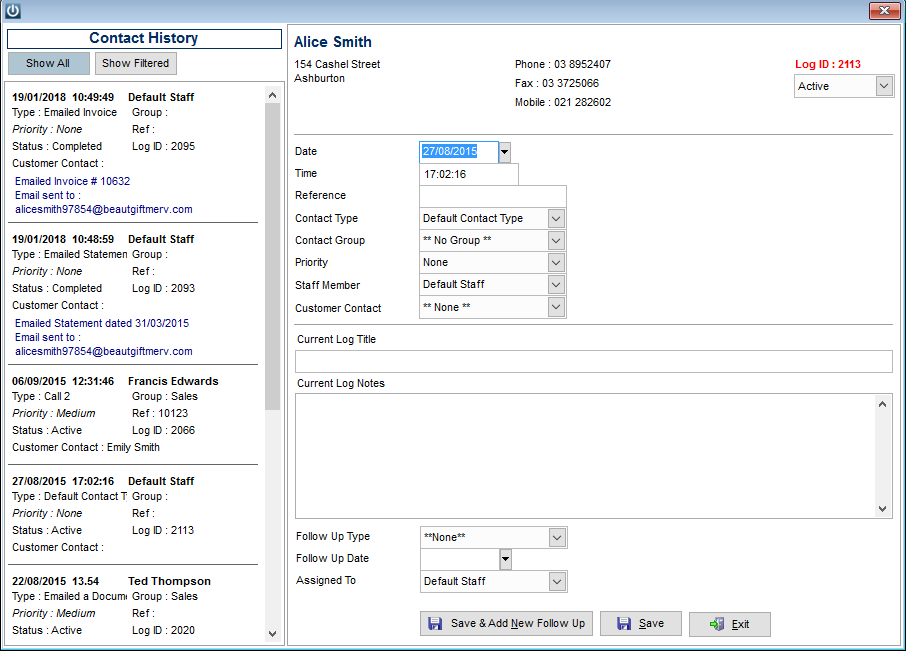
Selecting the Save & Add New Follow Up will give you an option to mark the current event as complete and then prompt you to confirm the details of the new event.
This follow up event now appears in the Staff member’s To Do List
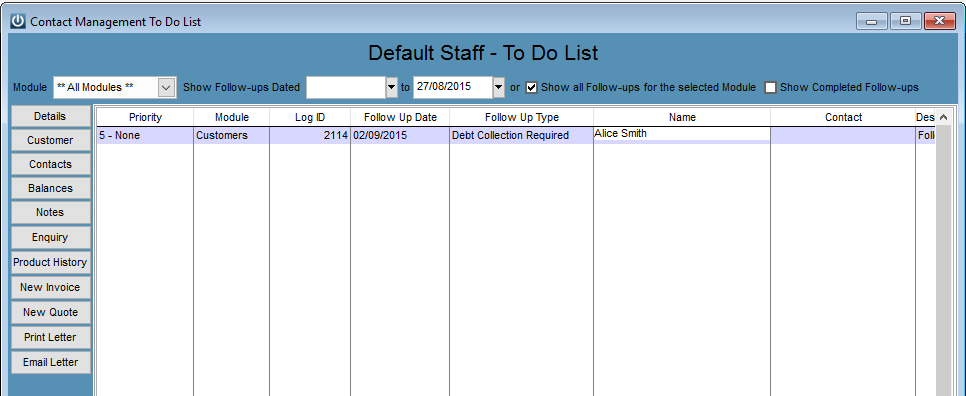
Event displaying here can be opened by double clicking on them.
- Price Enquiry
Allows a Price enquiry to be done for this Customer without having to create an Invoice. The price displayed will take into account all discount factors such as Discount Matrix, Default Discount, Contracts Rates.
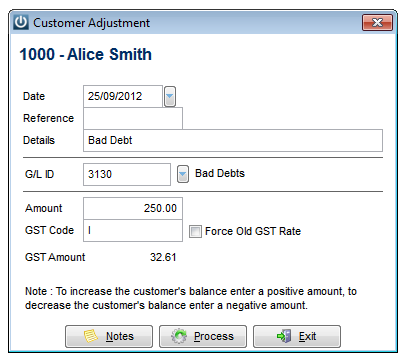
- Enter Adjustment
Allows an adjustment to be made to the Customer’s account. Adjustments are coded directly to G/L Ids. Additional notes can be added to the transaction using the Notes tab.
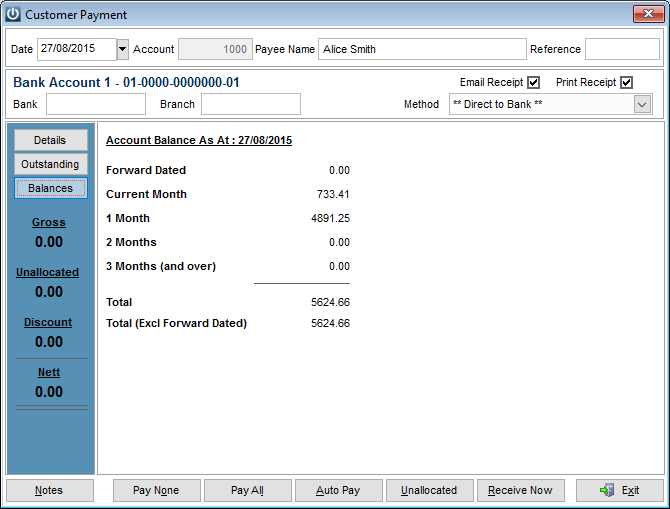
- Customer Payment
Allows processing of a Customer’s payment against their account.
If there are multiple bank accounts setup, from the drop down box select the bank account the payment will be entered into.

Select the Customer.
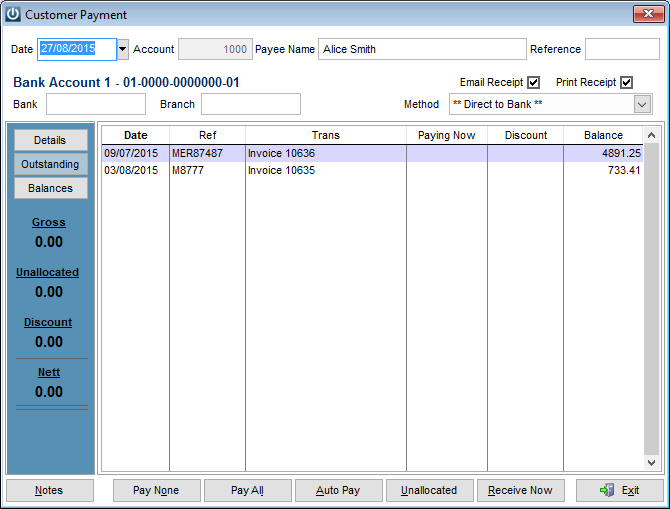
Details Tab
Shows the Customer details. These cannot be edited from here.
Outstanding Tab
Shows all Transactions yet to be paid. Change the Date if required, you can also change the Payee Name to match the name on a cheque. Enter a Reference if required. Select the Method of payment from the drop down menu.
If paying by cheque (as the Method) enter the Bank Name and Branch. After this has been entered for the first time, these details will automatically appear when receiving a payment from this Customer.
Double clicking in the Paying Now column beside the Invoice being paid will fill this field with the same amount as in the Balance column.
The Notes button shows the Customer notes.
Pay None button will move any payments currently showing in the Paying Now column back into the Balance column.
The Pay All button will move all balances currently showing in the balance column into the Paying Now column.
Auto Pay will display a pop up box allowing entry of the amount being paid. This amount will be allocated to Invoices from the oldest to the newest. The last Invoice may be partially paid if there isn’t enough to pay the full balance and the system is set up to do so under Manage Customer Defaults / Preferences.
Unallocated allows an unallocated payment to be made to the Customer’s account.
Once all details for the Payment have been entered select Receive Now.
Balances Tab
Displays the Customer’s current and outstanding balances.
- Process Periodic Charges
Allows processing of Periodic Charges setup against Customers under the Charges tab.

Select from the drop down menu to display either Current Charges Only or All Charges.
To display only Periodic Charges of a single category type in the description to the Category field. Modify the Include Charges Due up to Date if Current Charges Only is selected. To process the charges, select Process.
- Finance Charges
This process will prepare a Finance Charge for accounts with an overdue balance matching the criteria specified. Note: Percentage Rates are a flat rate not per annum and are set up under each Customer and Manage Customer Defaults.
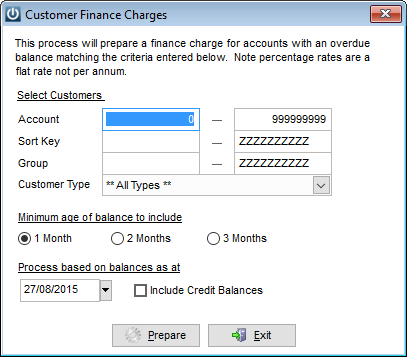
Select the Prepare button to display a list of all Customers and the Finance Charge due.
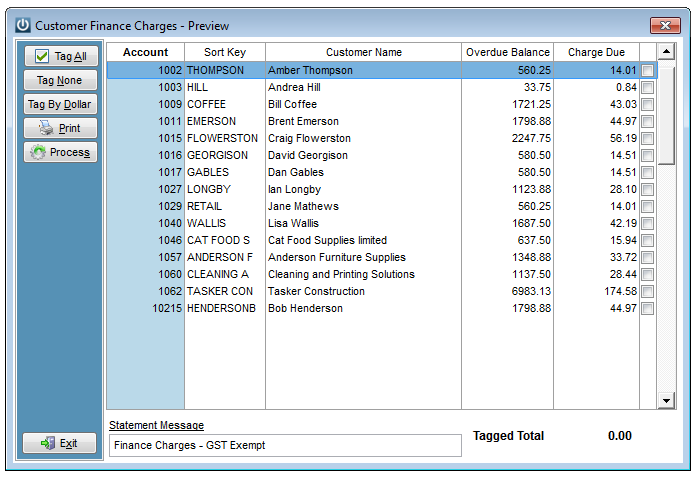
Accounts can be tagged and untagged using Tag All and Tag None. Selecting Tag By Dollar will allow accounts to be tagged if they are above the selected dollar value. Selecting Process will place the interest charge against the Customer’s account.
- Print Statements
Allows bulk creation of Customer Statements. These can be printed or emailed.
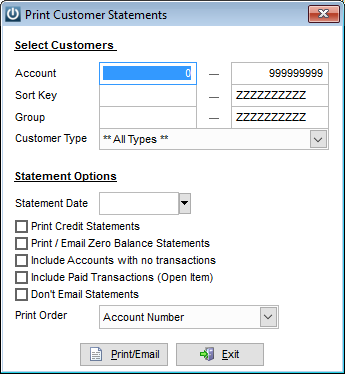
To process Statements for selected Customers enter an Account range, Sort Key range, Group range and Customer Type.
Enter the Date the Statements are to be for and select the tick boxes of the appropriate criteria of the statements to be generated.
Choose the order in which the Statements will be printed. Options are: Account Number, Sort Key or Name.
For Statements to be emailed out to Customers they need to have email addresses set up for this under the Customer / Email Links tab. Those Statements not emailed can be printed.
- Credit Management
Allows Customers to be placed on, or removed from being on Stop Credit.
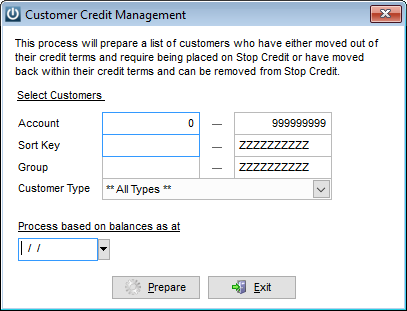
Specify the range of Customers and date for the balances to be calculated at then select Prepare.
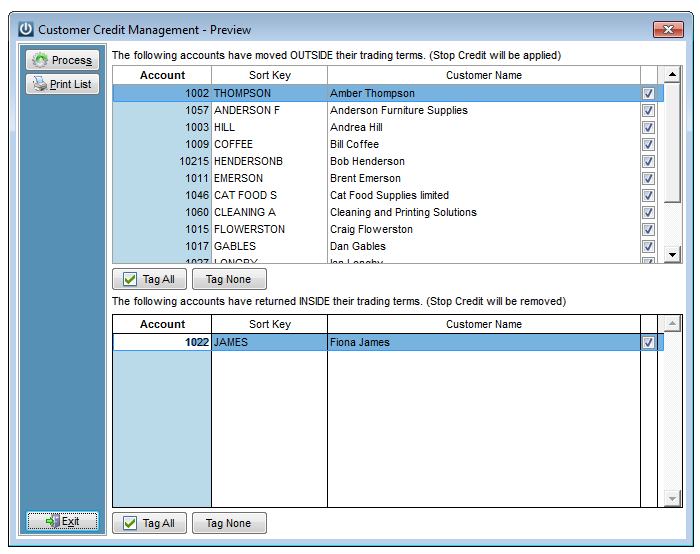
A list of all Customers falling outside their credit terms are shown in the first window and Customers already on Stop Credit and having come back inside their credit terms are shown in the second window. By default, all accounts are selected to have their credit status changed. To alter this, select the tick box at the end of the Customer account. A report for changes that have been made can be printed off.
- Process Loyalty Rewards
Allows Customer Loyalty Rewards to be processed.
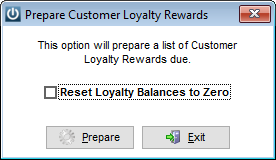
By selecting Prepare the system will create a list of Customers who have reached the required Sales levels. To set the loyalty balances to zero after these rewards have been processed select Reset Loyalty Balances to Zero.
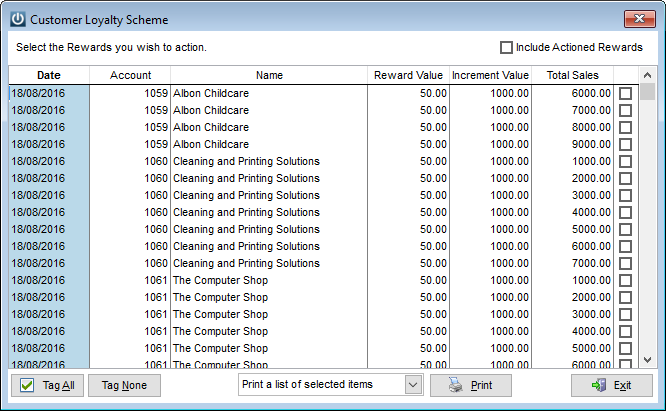
Select individually the rewards to process or alternatively use Tag All. Select the Print button to view a list of rewards being processed. Print this list to keep a record of these rewards. Once printed or upon closing the print preview screen a prompt will appear asking “Do you want to mark the selected rewards as actioned?”. Selecting No will allow the drop-down box at the bottom of the screen to be used to print vouchers. If a Loyalty Rewards type letter has been created in the Letters module it will show in the drop-down box. To print letters for the selected rewards, choose the Letter then select Print. After printing the Letters, you will be prompted to mark the Customers as actioned. Selecting Yes will remove them from the list. NB: If a Customer has reached several Sales levels they will receive a voucher for each level.
To see the Letters already sent select Include Actioned Rewards from the top right of the screen. Rewards previously sent Letters will be shown in yellow.
- Match Invoice / Credit Notes
Allows Invoices and Credit Notes to be matched so they won’t show on a Customer’s Statement.
Tagged transactions must add to zero and be on the same date for them to be matched.
- Electronic Marketing
The Electronic marketing gives you the opportunity extract a range of Customers based on a number of criteria including previous sales.
You can then send these Customers a personalised SMS message or export the data to a CSV file to be imported into your email marketing program such as Mailchimp
The system will let you extract a very exact list. For example, you can select all domestic Customers from the Auckland region who purchased a lawnmower between the 1st April 2005 and the 31st August 2005.
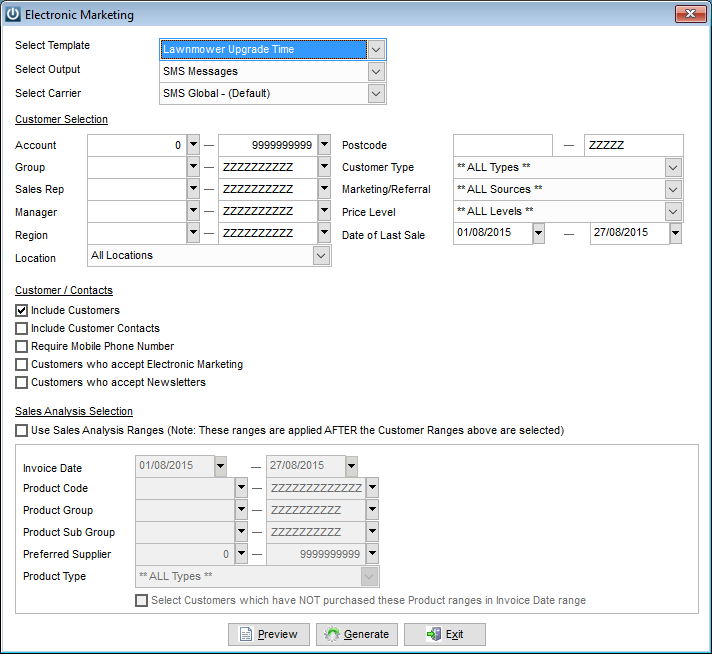
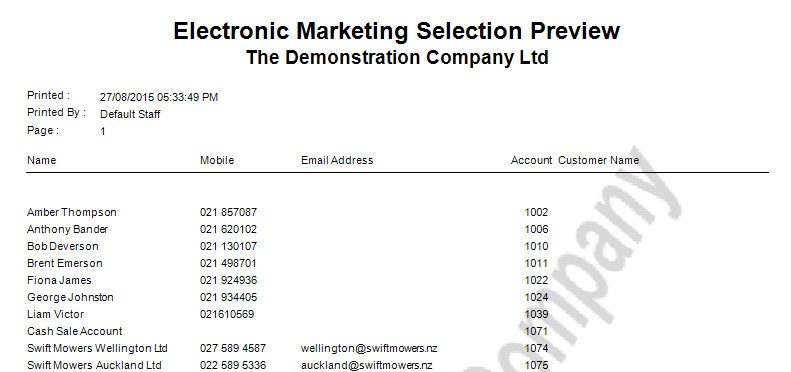
The Preview option will produce a list of Customers matching your criteria
Selecting Generate will then send the SMS messages or prepare the csv file based on your selection.
- Schedule Address Labels
Allows scheduling of Address labels for Customers. A range of Customers can be loaded by entering the appropriate ranges then selecting the Load Customers button.
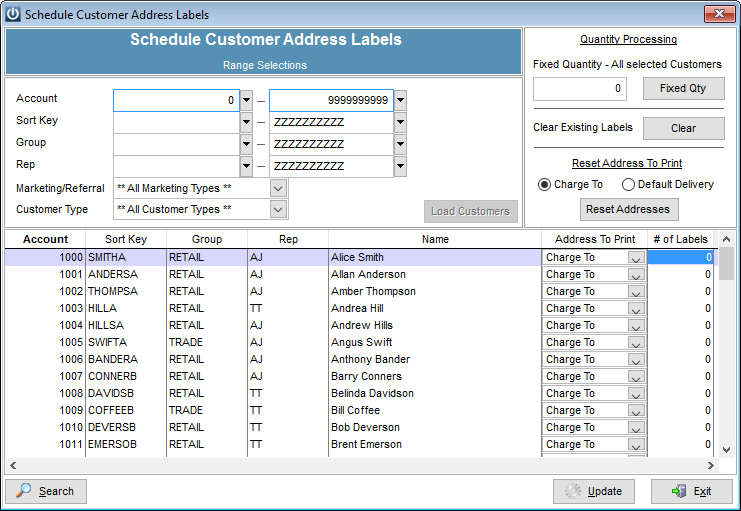
A fixed quantity of labels for all selected Customers can be scheduled. Selecting the Clear button will clear all scheduled labels.
The Address used for the labels can be set to “Charge To” or “Default Delivery” as set up under the Customer. These can be reset using the Reset Address to Print button. The address used for each Customer can also be changed in the “Address To Print” column.
The Search button locates a Customer in the list of loaded Customers.
Selecting the Update button will schedule all labels for printing.
- Print Address Labels
Allows printing of scheduled Customer Address labels.

Select the range of Customers labels are to be printed for.
The Sort By option will allow the print order to be set for the labels.
There are five Label Formats to choose from. These are set up under Admin / Settings / Manage Customer Label Size.
- Quick Print Customer Labels
Allows for printing of Address Labels for a single Customer.
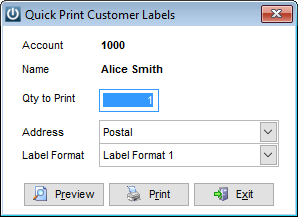
The Postal or Delivery address can be printed on the label. Five label formats are available. The sizing of each label is set up under Admin / Settings / Customers / Manage Customer Label Size.
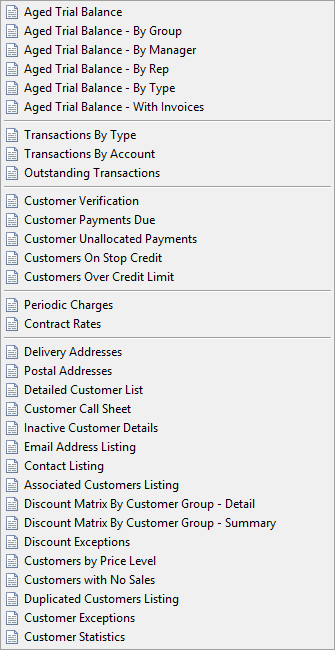
- Reports
Lists the Customer reports available.
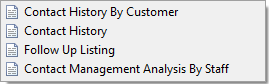
- Contact Management Reports
Displays the Contact Management module reports.
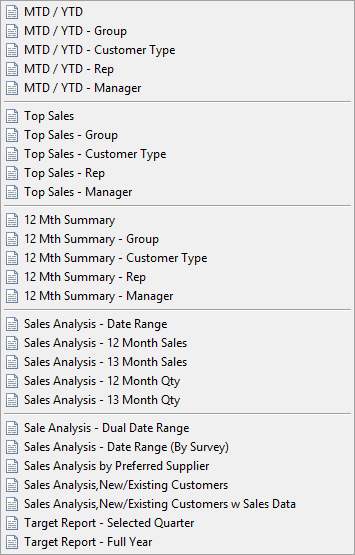
- Sales Analysis
Lists the Customer Sales Analysis reports available.
There is an extensive range of Sales reports, the most commonly used report is the Sales Analysis Date Range
The Sales Analysis date range report gives users the opportunity to select any date range and set ranges based on Customers, Types, Groups, Sales Reps, etc.
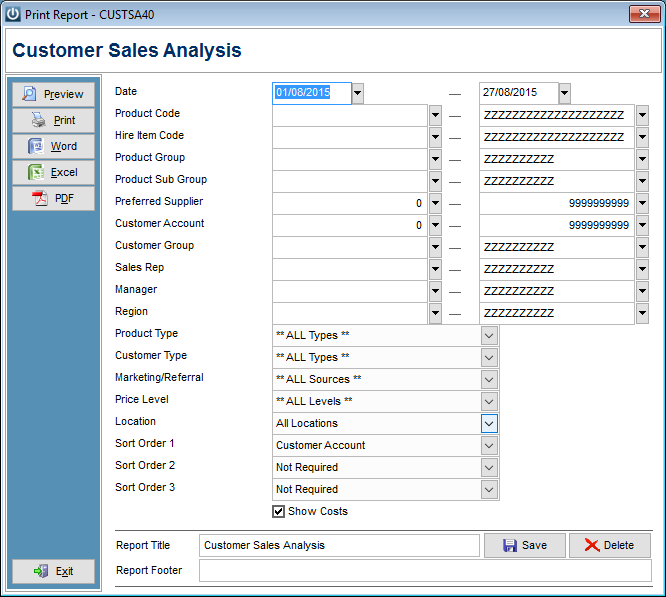
Once you have selected your ranges the Sort Order 1,2, and 3 will allow you to group your data. For example, you may choose to print all the sales for the current month, where the data will be grouped as follows:
Sort Order 1: Sales Rep, Sort Order 2: Product Group and Sort Order 3: Product Code.
This will tell you exactly which Reps Customers the Sales are coming from, which groups of products sales are out of and then which individual products are being sold.
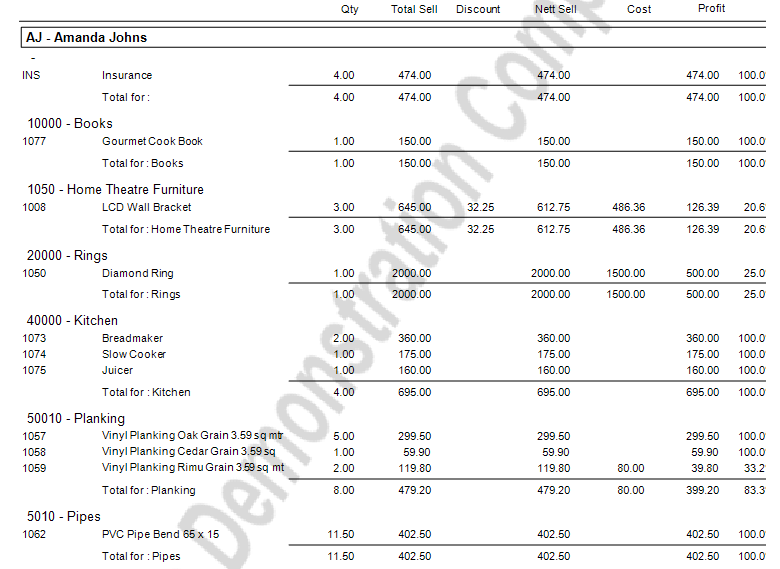
This report will then show you the quantity sold, gross sales price, and discount given, the net sale price achieved, the cost and profit (as actual and mark-up).
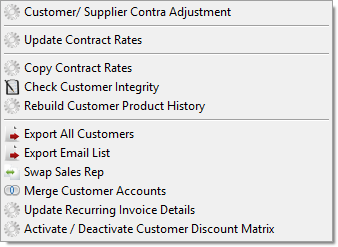
- Utilities
Customer / Supplier Contra Adjustment
Allows transfer of funds between a Customer and Supplier account with the balance of each account being adjusted by the entered amount.
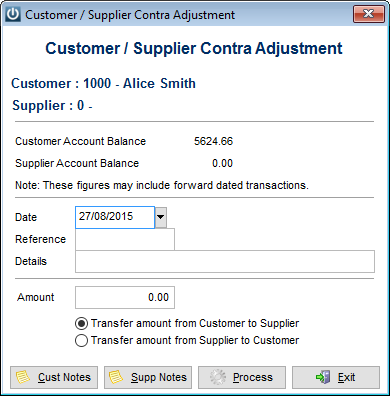
For this utility to work the Customer account must have a Supplier Contra Account setup under the Terms/Pricing section of their account. To transfer an amount out of the Customer account and into the Supplier account select the Transfer amount from Customer to Supplier option. To transfer an amount out of the Supplier account and into the Customer account select the Transfer amount from Supplier to Customer option.
Notes can be entered against the Customer and Supplier accounts by selecting the Cust Notes and Supp Notes buttons respectively. Select the Process option to action the transfer.
Update Contract Rates
Allows bulk updating of Contract Rates.
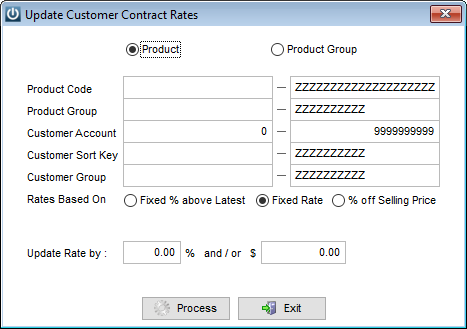
Choose the appropriate range of Products and/or Customers to be updated.
Select whether the range chosen will be updated based on a Fixed % above the Latest cost of the Product, a Fixed Rate or a % off Selling Price for the Product.
Select the % and/or actual $ value for the Products to be updated by then select Process
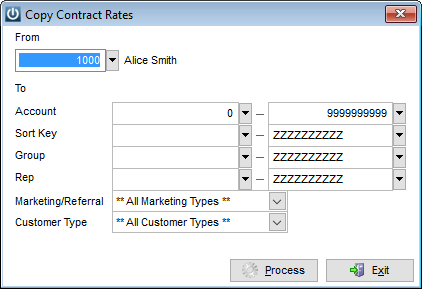
Copy Contract Rates
Allows copying the existing Contract Rates of a Customer to another Customer or to a range of Customers.
Check Customer Integrity
Recalculates Customer History data. It is recommended this is run every week.
Rebuild Customer Product History
Rebuilds the Product Sales History for Customers. This should be run after any Customer Sales data has been imported in to Infusion.
Export All Customers
Allows a CSV file of all Customer details in Infusion to be created (default file name: customer).
Export E-Mail List
Produces a CSV file of all Customers that includes their email address, address details, marketing and custom fields together with selected Sale data. The export can then be used to import into a Email marketing solution such as Mailchimp.

Swap Sales Rep
Allows Sales Reps associated with Customer accounts to be swapped. Ranges based on Account, Sort Key, Group and Current Sales Rep can be selected to swap.
Merge Customer Accounts
Allows two Customer accounts to be merged into one while retaining the transaction history. The Account to Merge will be removed from the Manage Customer screen and the Destination Account will display all of the transactions associated with the two accounts. Charges, Documents and Contacts are brought over to the Destination account.
Update Recurring Invoice Details
Allows the following details for Recurring Invoices to be updated:
1)Charge To Name and Address
2)Deliver to Name and Address
3)Product Descriptions
4)Rate / Discount based on Best Pricing Rules (excludes Build-ups)
5)Order Number
6)Invoice Date
7)Invoice Title
Activate / Deactivate Customer Discount Matrix
Allows ranges of Customers to have the Discount Matrix functionality (set under Terms/Pricing) activated or deactivated.
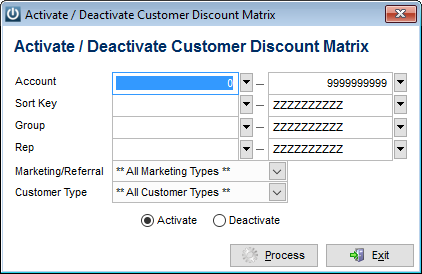
Select the available ranges to specify which Customers will be affected. Select the Activate or Deactivate option depending on the action required. Select Process to make the changes.