|
<< Click to Display Table of Contents >> Cashbook |
  
|
|
<< Click to Display Table of Contents >> Cashbook |
|
Cashbook
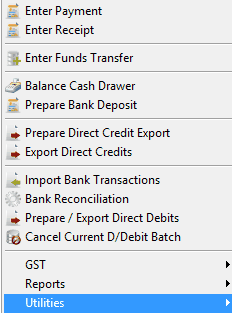
Access the Cashbook drop down menu from the top of the screen.
Enter Payment
Cashbook Payments are used to process Cheques or Automatic Payments made from your Bank Account(s). If there are multiple Bank Accounts set up select the appropriate account.

It is important that the Date is entered correctly as the system is date sensitive.
The Payee is the person to whom you have made the Payment to. This may be typed in or, if the Transaction has been saved as a Periodic Payment, select the drop down box at the end of the line and choose from a list of saved transactions.
The Memo field is used to record additional information about the Transaction.
The Cheque Number/Ref field is used to enter the Cheque Number or Bank Reference.
The Payment Amount is the total value of the payment including GST. The system will calculate the GST content as you disburse the transaction.
Select GST Payment to IRD option if a GST payment is being made.
The Force Old GST Rate option allows for the Primary GST rate prior to 01/10/2010 set under Manage GST Defaults to be used when Posting an Invoice.
GL ID field – enter in the GL ID to the Payment is to be coded to. The F8 key can be used to look up a GL ID. The system will by default enter the Amount to disburse into the Amount column. To split the Transaction over several GL IDs this amount can be amended. To assist with splitting a Payment press the F8 key while on the Amount column. Select a Percentage of the full Payment to be allocated to this GL ID.
To allocate a Cashbook Payment to a Job, enter a Job ID. Use the F9 key in the Job ID field to look up a Job. Similarly use the F9 key in the Department column to look up a Department. A Sell Rate can be added to the Cost. Select F9 while in the Amount column and set a Markup % or Sell rate.
The GST Code column allows Transactions to be entered as Including, Excluding, or Exempt of GST. These codes can be found in the Cashbook GST Default Setup (Admin / Defaults / Manage GST Defaults).
Once the Transaction information has been entered, selecting Save will save the transaction and ask if it is to be Posted. Saved Transactions can be recalled using the drop down arrow to the far right of the Payee field. This is useful for Periodic Transactions. Selecting Post will post the Transaction through to the Bank Account. Once the Transaction has been Posted it can not be altered.
The Print Cheque option allows a Cheque to be printed once the Payment is Posted. If the Pay Electronically option is selected, bank details will be asked for when the Payment is Posted.
Enter Receipt
The Cashbook Receipts section is used to process money received into your Bank Account.
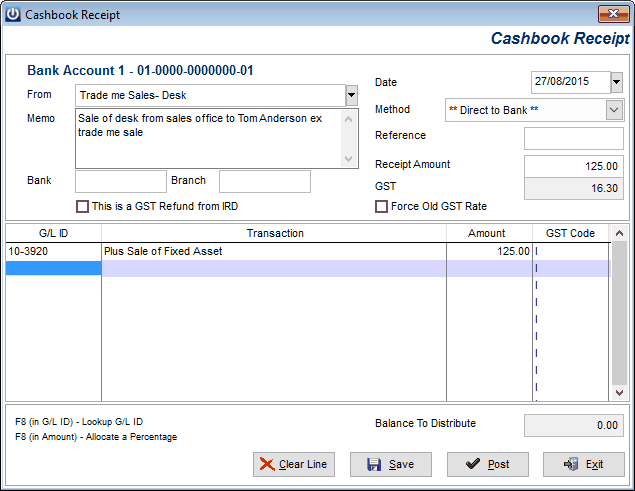
It is important that the Date is entered correctly as the system is date sensitive.
Enter in the From box the Customer from whom you have received the Payment. This can be typed in or, if the Transaction has been Saved, selecting the drop down box at the end of the line will bring up a list to choose from.
The Memo field is used to record additional information about the Transaction.
The Bank and Branch fields are used to record details if a Cheque is received.
The Method field – if the money has been paid directly to an account as a single deposit then select “Direct to Bank”. If processing a Cheque or Cash then select the appropriate method from the drop down box.
In the Receipt Amount enter the total value of the Payment including GST. The system will calculate the GST component of the Payment.
The Force Old GST Rate option allows for the Primary GST rate prior to 01/10/2010 set under Manage GST Defaults to be used when Posting an Invoice.
GL ID field – enter in the GL ID to assign the receipt. The F8 key can be used to look up a GL ID. The system will by default enter the amount to disburse into the Amount column. To split the Transaction over several GL IDs this amount should be amended. To assist with splitting a Payment press the F8 key while on the Amount column. Select a percentage of the full Payment to be allocated to this GL ID.
The GST Code column allows Transactions to be entered as Including, Excluding, or Exempt of GST. These codes can be found in the Cashbook GST Default Setup (Admin / Defaults / Manage GST Defaults).
Once the Transaction information has been entered click Post and finalise the entry or Save which will allow Posting of the Transaction and saving of its details for the next month. This is useful for Periodic transactions. Once the Transaction has been processed it can not be altered.
Enter Funds Transfer
Allows for funds to be transferred between two Bank Accounts set up in Infusion.
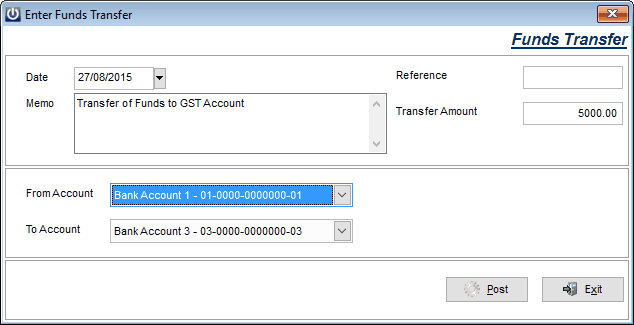
Enter a Memo notation, a Reference and a Transfer Amount. Select the account to transfer From and the account to transfer To, select Post.
The transfer will show on the Bank Reconciliation for each Account.
Balance Cash Drawer
The Balance Cash Drawer Function allows you to Balance a Cash Drawer for a POS system. Only previously unreconciled Cash Drawers will appear. See the POS Support Manual at www.infusionsoftware.co.nz for instructions on how to use the POS functionality in Infusion.
To reprint an Itemised report select the appropriate Cash Drawer then select Reprint.
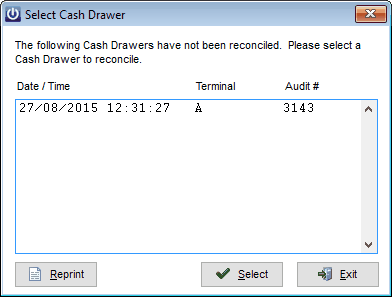
Highlight the Cash Drawer that has not been reconciled and select the Select button.
The Cashup screen allows reconciliation of the cash drawer over Payment Methods used.
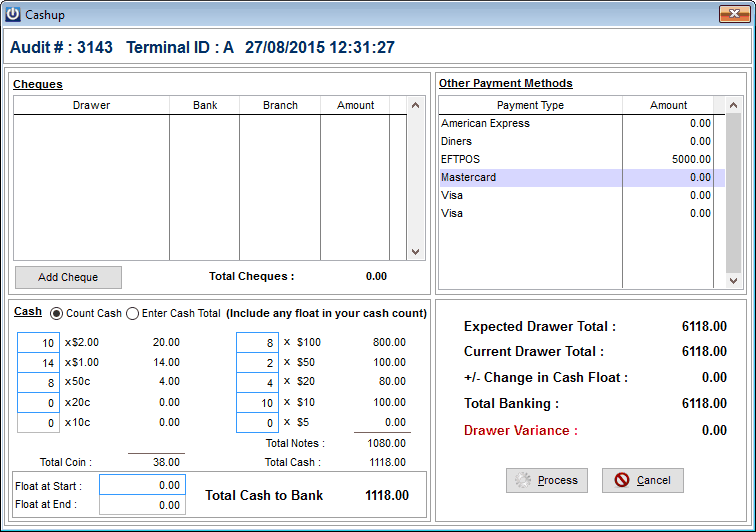
Details for any Cheques received will display in the Cheques box. Check these against the Cheques in the till. Place a tick in the tick box (far right) to add to the total. If the details were not entered when the cheque was received, select Add Cheque and enter the details.
There are two options for Cash that has been received:
- Count Cash allows entry of the number of each Coin and Note received.
- Enter Cash Total only requires entry of the Total Cash amount in the Cash Drawer.
The Other Payment Methods box allows entry of the total for each of the other payment methods received.
Once all totals have been entered the Current Drawer Total should equal the Expected Drawer Total. If there is a variance, check all amounts are correct.
Click Process.
If the Cash Drawer has a variance greater than $5, a reason for this will need to be entered recorded.

After selecting OK a Bank Account will be asked for the money to go in to. Once selected click OK.
This will bring up a message saying Cashup completed successfully.
Daily Banking can now be prepared.
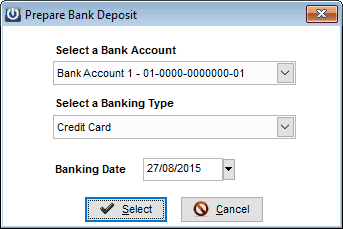
Prepare Bank Deposit
Any funds received as Cheques, Cash, or via EFTPOS and Credit Cards must be banked. This function allows the preparation of a Bank Deposit for these funds.
To prepare the Daily Banking, firstly select the bank account the funds are to be deposited in to and the banking type.
Select the Date – This will only allow items to be banked up to and including this date, future dated receipts will not be displayed.
Next select the items being banked by ticking the check box on the right hand side of the transaction. Items not ticked remain available to be banked at a later date.
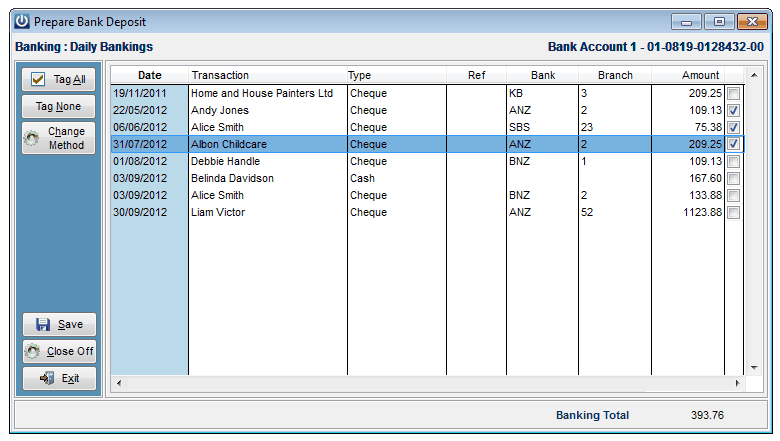
The Change Method option allows the method of payment for the highlighted transaction to be changed.
Once all required items have been chosen, select Close Off. A Deposit Supplement can then be printed.
For the other Bank Types follow the same steps.
Prepare Direct Credit Export
Allows preparation of an electronic file for exporting of Direct Credit Payments that have been entered through Cashbook or Supplier Payments. Use the Tag All or Tag None to tag the appropriate Payments. Select Save once all required Payments have been tagged.

Export Direct Credits
Allows export of Direct Credit Payments to a file which can be used by Banking software.
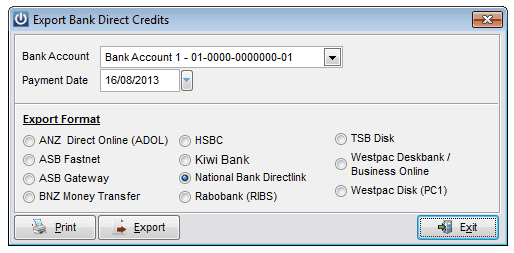
Firstly, select the Bank Account the money is to come from, then the Date the payment is to made at the bank (i.e. Payment Date).
Select the Format the payment file is required in from the Export Format section.
Print a copy of the Payments to be made (for a hard copy record) before the Export is carried out. Select a destination for the file to be saved to when exporting. Use this file with your banking software to process the Payments.
Import Bank Transactions
This utility allows for importing of either an .OFX, .QIF or CSV banking file. It is important to select the correct file Date for the Bank Transactions as if there are any transactions before the selected Date, the data will not be imported.
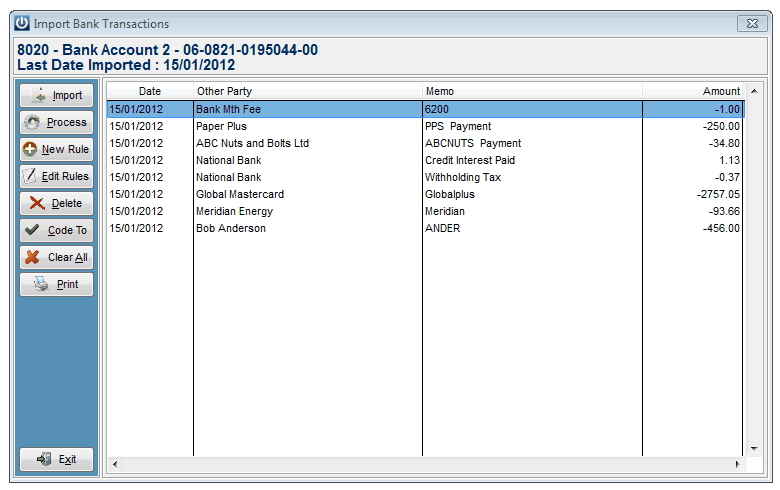
When downloading Transactions from the Bank be sure to only select Transactions up to the last business day at most. If a date ahead of this is selected some Transactions may not be included. These will NOT be able to be imported later. The downloaded file will only contain Transactions from the day following the last date imported (this shows on the import screen).
Importing a file containing Transactions starting later is OK however the missing Transactions can not be imported (without restoring a backup) and will need to be entered manually.
The Import button allows for importing of a bank transaction file. Always make a backup before importing data.
Process runs the Bank Import Rules (see below for setup) and codes the Transactions accordingly.
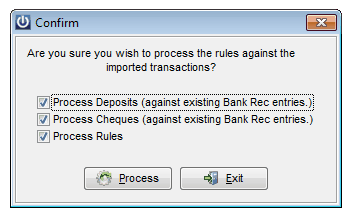
Having Process Deposits (against existing Bank Rec entries) selected will process any Customer deposits made that are on the Bank Rec (due to having processed a payment manually) and that are in the Import file and have the same transaction date. The transaction amount needs to be unique for that day for the transaction to be processed.
Having Process Cheques (against existing Bank Rec entries) selected will process any transactions that are on both the Bank Rec (due to having processed a payment manually) and that are in the import file that have the same cheque number irrespective of the transaction date. The dollar amount for the transaction also needs to match.
Having Process Rules selected will process any transactions meeting the coding rules (see below for setup) and code the Transactions accordingly.
Selecting the New Rule button from the Import Bank transactions screen will bring up the following window:
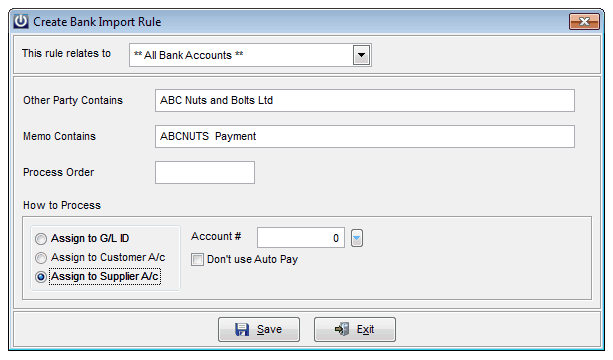
To setup a new Rule, select the Account the rule relates to.
Enter into the Other Party Party Contains and Memo Contains fields text, when if present in the fields of a transaction, the rule will be applied to.
The Process Order field allows the order in which the rules are run to be set. This field is in string format so numbers will come before text. (Note: for numeric data the order will be 1, 10, 100, 2, 21). The idea behind it is for rules with fuller descriptions to run first.
Select whether the transaction is to be assigned to a GL ID, Customer or Supplier account.
The first time a bank file is imported, rules need to be created to tell the system what to do with the transaction. This will be an ongoing process. Each rule can be set to apply to one Bank Account or all Bank Accounts.
Once a Rule is created it will be stored for further imports. Any rule can be edited later if required.
Once a specific bank file has been imported, clicking Process will update the Bank Reconciliation with all Transactions that match the criteria set down in the rules. It will also mark Transactions that may have already been entered manually as reconciled. The Transactions are those that have the criteria where:
- The Cheque Number and Amount match
- Deposits match with the same Date and Amount and are unique for this Date.
Transactions left in the import screen are those that have not been updated and need to either have a Rule created for them or by clicking the Code To, can be processed individually.
Bank Reconciliation
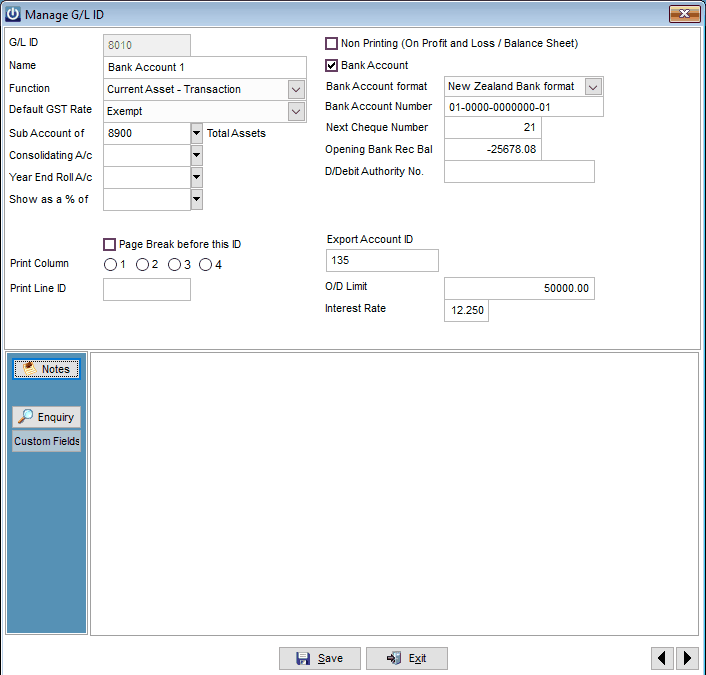
Prior to completing the first Bank Reconciliation, an Opening Bank Rec Bal needs to be entered against the bank account. This is entered under Manage GL IDs from the Financials drop down menu, double click the Account you would like to add the Opening Balance for.
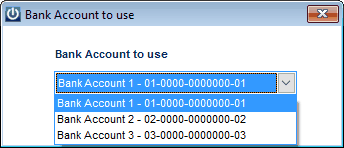
If there is more than one Bank Account, the correct Account needs to be selected. Once this is done the Bank Reconciliation screen will display with the correct opening balance.
From Cashbook menu Select Bank Reconciliation if you have more than one account set up you will firstly need to t select the correct account
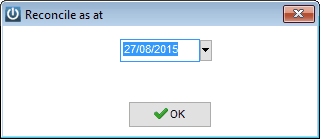
Once you have selected the account you will then need to select the date up to which you wish to reconcile, transactions after this date will not appear on the reconciliation screen.
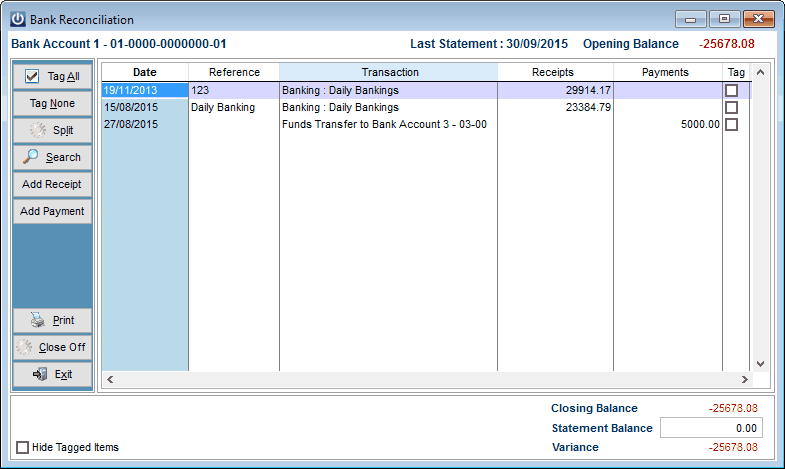
To mark an item as Presented, select the tick box at the right hand side of the Transaction. This will change the Closing Balance at the bottom right of the screen.
Once the Balance agrees with your Bank Statement a copy of the Bank Reconciliation report should be printed and filed with the Bank Statement.
The Add Receipt and Add Payment options open the Cashbook Receipt and Cashbook Payment screens respectively allowing entries to be made to the Bank Reconciliation from here.
After printing the report, select Close Off. This will remove all presented items from the screen. Note: This report can be reprinted if required at a later date from Cashbook / Reports / Reprint a Report.
Selecting the Exit button will also Save any changes made before closing the screen.
The transactions in the screen can be sorted by any of the columns shown by clicking on the heading of the column.
Transaction Split – If a transaction needs to be split, highlight the line then click Split. A prompt will then ask for the amount required to be split off (this should be a positive amount).
Prepare / Export Direct Debits GST
Allows creation of an electronic Direct Debit file to be sent to the bank. If multiple bank accounts are set up an account first needs to be selected for the Direct Debits to be paid in to. For a bank account to be a valid Direct Debit account it needs to be set up with a Direct Debit Authority number. Contact your bank to get an Authority Number. A date for the file needs to be entered. *Note - If a file is sent to the bank after the date entered it will be rejected. For Customers to display in the window they need to be set up under Customers / Terms / Pricing menu.
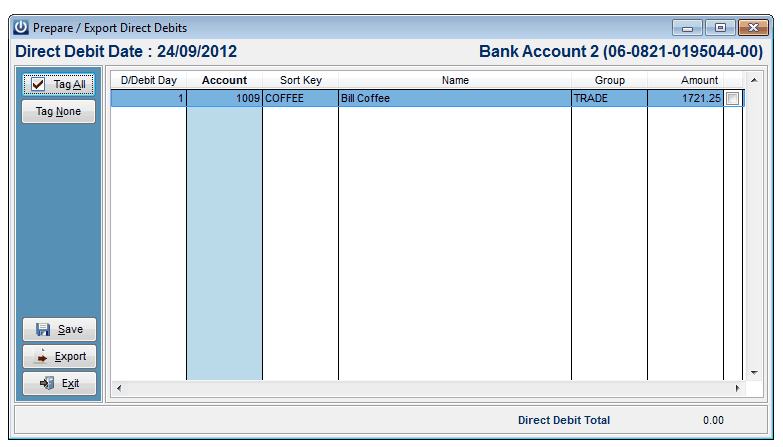
From the pop up screen select the amounts by ticking the box in the right hand column for the entry. Select Save to save the selections. This will then become the current Direct Debit Batch (there can only be one current Direct Debit batch). Entering back into this section will automatically recall the saved details for the current batch. Select Export to export the Direct Debit batch. The default file name is ddbatch.txt. Once the file is exported Payments will be made against the corresponding Customer accounts.
Cancel Current D/Debit Batch GST
Allows deletion of the current Direct Debit batch.
GST (Goods and Services Tax)
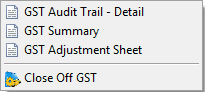
GST Audit - Detail and GST Summary reports
Print both the GST Audit - Detail and GST Summary reports before Closing Off GST.
GST Adjustment Sheet
Allows printing off of the GST Adjustment sheet listing any transactions posted after the 30/09/2010 GST return has been closed off and the GST Rate prior to 01/10/2010 used on the transaction (by using the Force Old GST rate option). The information is to be used in any subsequent GST returns to the 30/09/2010 return.
Close Off GST
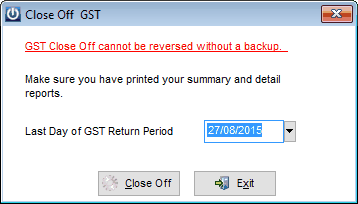
To Close Off the GST return, enter the last day of your GST Period and click the Close Off button. This can not be undone without a Backup.
Reports
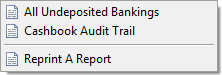
All Undeposited Bankings
Lists all undeposited bankings by Banking Type and Method.
Cashbook Audit Trail
Lists all Cashbook transactions within a date range relating to a Bank Account. Transactions are grouped by Type then Source.
Reprint a Report
Allows GST Detail and Summary, Daily Banking, Bank Reconciliation, Supplier Direct Credit batch and Cash drawer banking reports to be reprinted.
Utilities

Reverse a Transaction
While the system does not allow for deletion of a Cash Transaction, there is the option to reverse the Transaction. This process will reverse the Transaction to the Bank Reconciliation, GST and General Ledger. Note: this screen will only display Transactions within the specified date range. Only unreconciled transactions can be reversed.
. 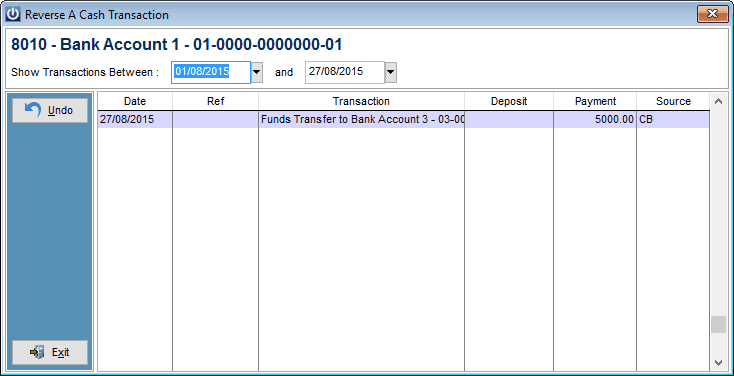
If a Customer or Supplier Payment is reversed an unallocated payment will be posted against the Account.
Find a Cheque
Allows the user to find which Supplier a cheque relates to Reverse a Transaction.
GST Audit Report
Displays a report of items that have been included for GST where the GL default for the disbursement code is marked as either exempt or zero rated for GST.
BNZ Invoice Finance Export
Allows exporting of Customer Invoice (Contact List, Invoice Batch and Reconciliation) data for End Users set up with the BNZ.