|
<< Click to Display Table of Contents >> Rental Hire |
  
|
|
<< Click to Display Table of Contents >> Rental Hire |
|
•Rental Hire
Before creating new Rental Hire Items default settings need to be setup. These are outlined in the Admin Section of the Help manual under the following subsections:
Defaults
- Manage Rental / Hire Defaults
Settings / Rental Hire
- Manage Rental Hire Item Types
- Manage Rental Hire Item Groups
- Manage Rental Hire Item Sub Groups
- Manage Rental Hire Statuses
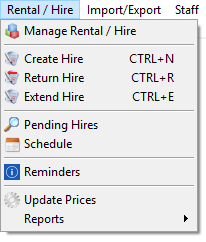
- Rental Hire Dropdown Menu
Access the Rental Hire drop down menu from the top menu bar.
Note – the display name “Rental / Hire” will be different if set up under the Long Description box in Admin / Defaults / Manage Rental Defaults.
- Manage Rental / Hire
Displays the Manage Rental / Hire screen.
By default, the list excludes inactive Rental / Hire items. These can be made visible by selecting the Include Inactive option.
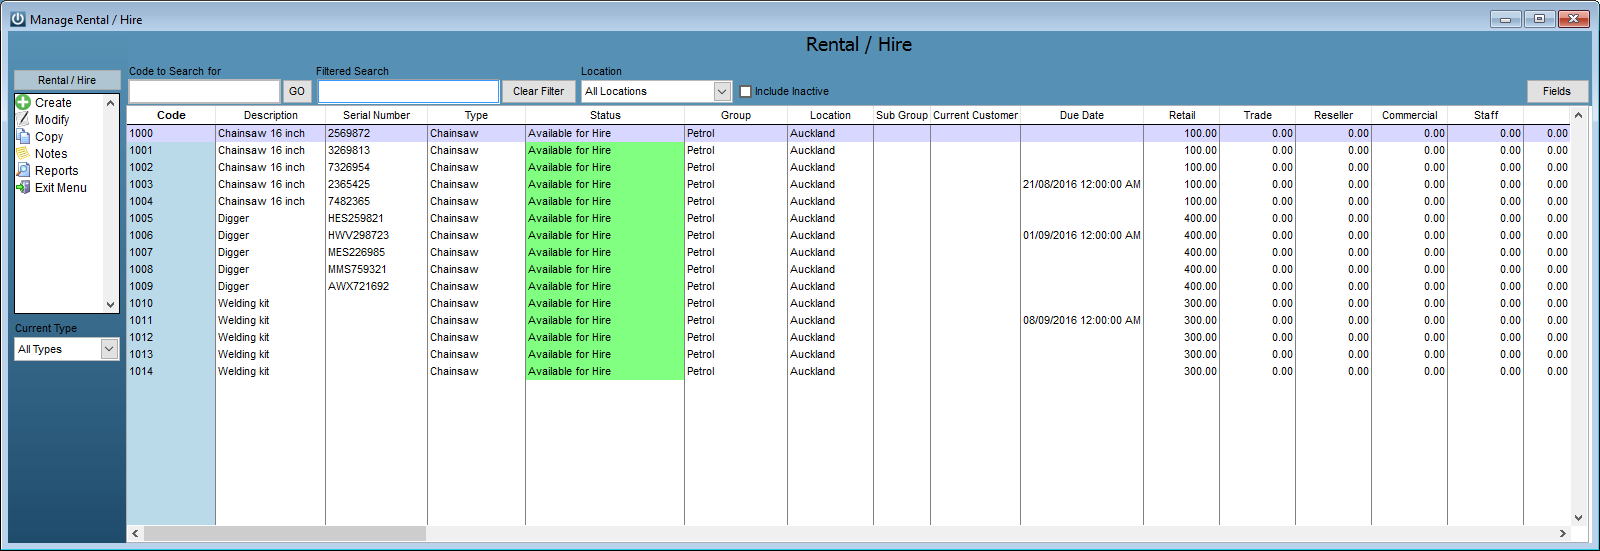
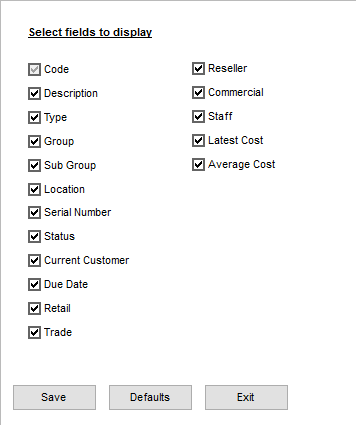
The Fields button on the top right corner allows the user to see which fields are available to display on the Manage Rental / Hire screen. These can be enabled or disabled as required. Clicking Save will save these preferences for the user. Selecting Defaults will restore options back to the default selection. Exit takes the user back to the list.
- Rental Hire Control Bar
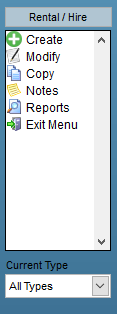
•Create allows creation of a new Rental Hire item.
•Modify allows modification of the Rental Hire item currently selected in the Manage Rental / Hire item screen.
•Copy allows duplication of the highlighted Rental / Hire item.
•Notes shows any notes added to the Notes tab in the Rental / Hire item’s details.
•Reports displays a list of all Rental / Hire item reports available.
•Exit Menu closes the Rental / Hire item menu bar and the Rental / Hire item screen.
Creating a new Rental Hire Item
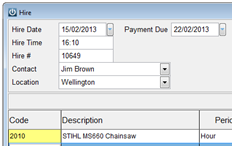
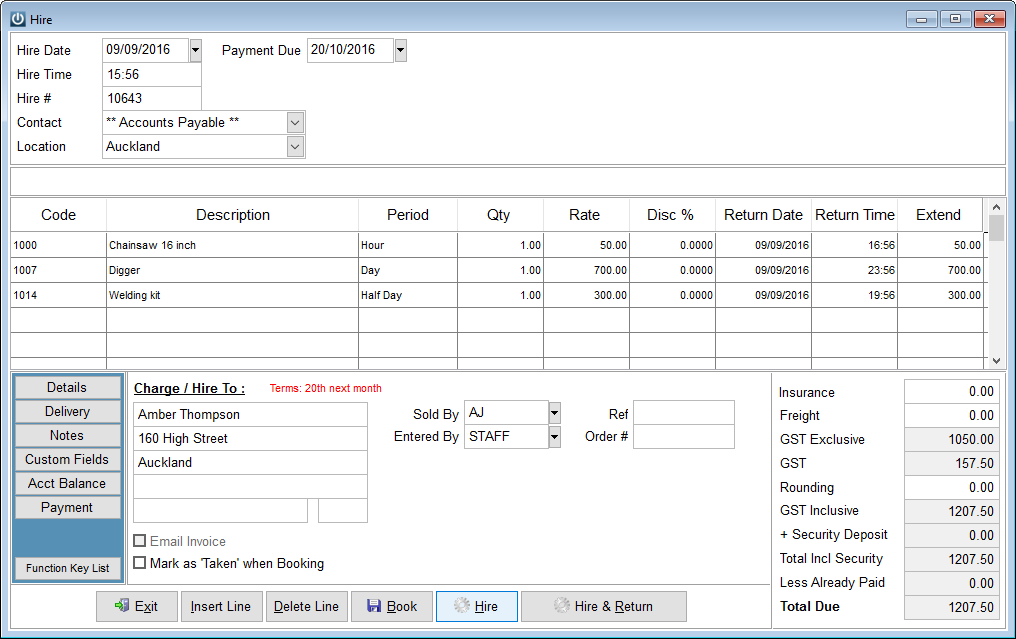
To create a new Rental Hire item select Create from the control bar. Select the Item Type being created.
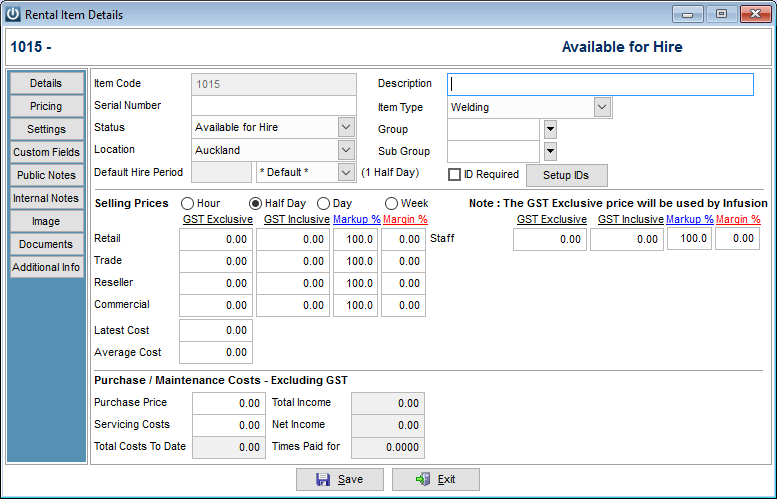
Details
Enter the Item Code for this Rental Hire item along with the Description and Serial Number.
Enter a Hire Item Type, Group and Sub Group where required. Any settings against each of these (setup in the Admin \ Settings \ Rental / Hire menu) will be used in the setup of the Product.
The current Status of the item can be set and modified at any time. This setting will automatically be updated as a hire is created and processed. The current status of the item is also displayed at the top right hand corner of the details screen. When an item is created, the default Status will be Available for Hire
The Location an item is at can be specified and updated manually from here.
The Default Hire Period can be specified for the Item. If it is set to *Default* it will use the settings against the Item Type, Group or Sub Group. If there are no settings against these the Default Selling Rate in Manage Rental / Hire Defaults will be used.
The ID Required tick box indicates if any Identification is required for hire of this item. Selecting the Setup Ids button will allow setup of the Ids required. Those inherited from the setup of the Item's Type, Group and Sub Group will display in the top section of the pop up. Additional Ids required for this Item can be specified and will display in the bottom section.
The Sell Prices and Cost information for the item is the same as that in the Pricing tab. Refer to below for more detail on this.
The Purchase Price and Service Costs for the item can be entered. These values are manually entered in to total to an overall cost for the Item (Total Costs To Date).
The Total Income field will show Income produced from previous Hires of this item. The Net Income is the Total Income less the Total Costs To Date value and the Times Paid for value is the Total Income divided by the Total Costs To Date.
Additional detail shown in this section includes the Service Costs which is manually entered and the cost from any work having been done to maintain or repair the item.
Pricing Tab
Allows setup of the pricing structure for a Rental Hire item.

The Sell Prices can be set up for Hourly, Daily, Weekly and Monthly hire by selecting the radio buttons at the top of the screen. For each of these time frames rates and quantity breaks can be set for all active Price Levels.
The Latest Cost and Average Cost field values are set manually per Hire Period and used in Sales Analysis reports.
Settings Tab
Select appropriate Sales G/L, Purchase G/L and Closing Stock G/L codes for the Product along with a GST rate in the Sell Tax and Buy Tax fields. The default settings will be those set up under the Admin / Defaults / Manage Financial Links menu or those set against the Product Group assigned to the Product.
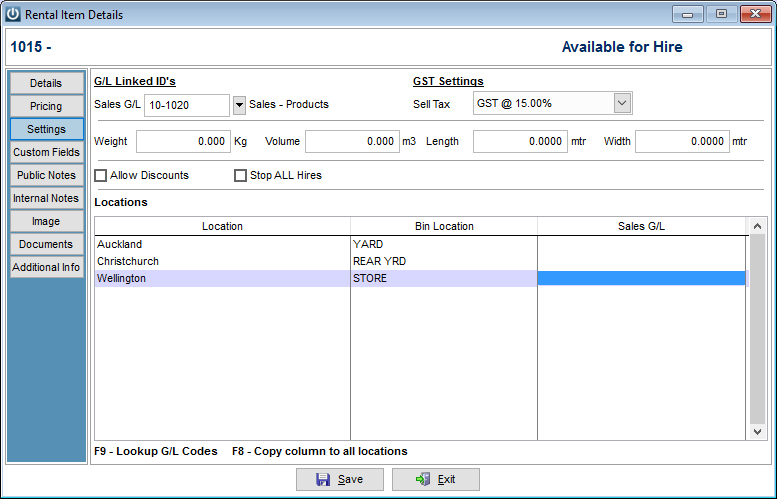
A Sales G/L ID can be set per item along with a Sales GST Rate.
If known, enter the items Weight, Size, Length and Width for freighting calculations.
Select the Allow Discounts box if the Product can be discounted when invoiced.
The item can be set to not be available by selecting the Stop All Hires tick box.
The Locations section allows setup of Bin Location and Sales G/L Ids specific to the Location. For Invoices the Location specific G/L ID takes priority over the Location G/L ID then comes the Rental Hire Item G/L ID.
Use the F9 key to look up G/L Ids and the F8 key to copy data to all locations in the column.
Custom Fields Tab
Allows entry of Rental Hire Item information under user defined fields. Thirty fields are available and are set up per Rental Hire Item Type from under Admin / Settings / Rental Hire / Manage Rental Hire Item Types.
Public Notes Tab
For entry of general Notes associated with the Rental Hire item. Custom Texts can be added to the Notes section.
Internal Notes Tab
For entry of Rental Hire item related Notes that are meant for internal use. Custom Texts can be added to the Notes section. A Pop Up note can be set. This will pop up whenever the Rental Hire item is used.
Images Tab
Allows for multiple Images to be stored against the Item. Notes can be stored against each image.
Documents Tab
Allows links to be created to Rental Hire item related files residing on the User’s computer / network. The appropriate software needs to be installed on the user’s computer to open any document.
Additional Info Tab
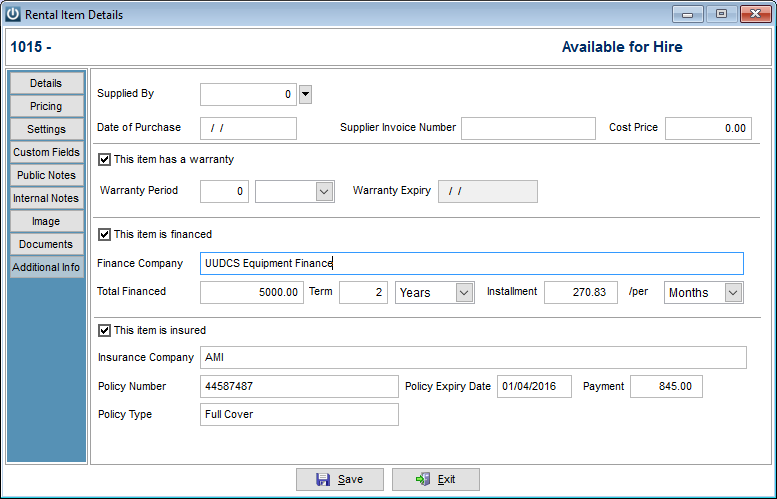
Details relating to who the Item was Supplied By and its Warranty. Who it is Financed and Insured with can be recorded.
Rental Hire Right Click Menu
Right mouse clicking on a Rental Hire Item in the Manage Rental / Hire screen will display the following menu:
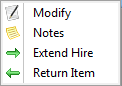
Modify – Allows the User to edit the details for this Item.
Notes – Displays a Public and Internal Notes relating to this Item
Extend Hire – Opens the Extend Hire screen for this Item.
Return Hire – Opens the Return Hire screen for this Item.
- Create Hire
•To Hire an item, select CTRL+N or Create Hire from the drop down menu
•Select the Customer the Hire is for.
•If there are any Pending Hires for the Customer, they will display in a Pending Hires screen. These can be Recalled or a New Hire created.

•If the Customer account is set up as an Organization, a Contact will be asked for. The Contacts available in the list are those set up against the account. A new Contact can be added with the new details being saved against the Customer account.
•If there are no Pending Hires or an Individual was selected as the account, the Hire screen will display.
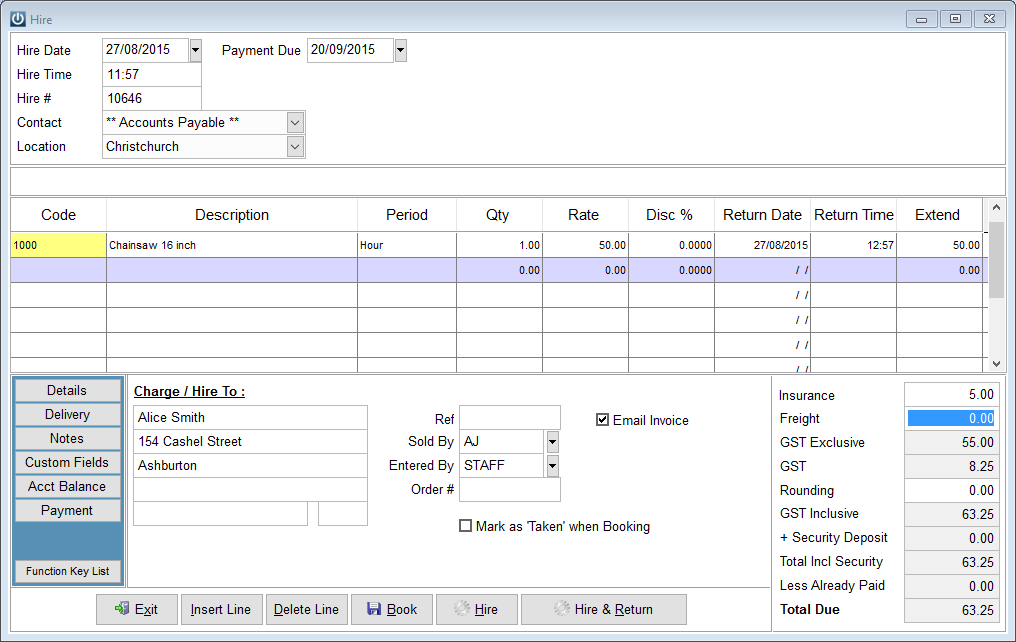
•Enter the code of the item being hired. Selecting F8 when in the Code field will allow lookup of Rental / Hire item codes.
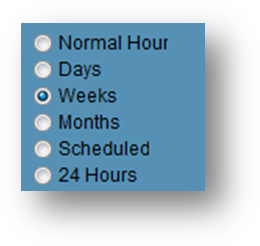
•If an Image has been setup against the item, it will display in the top right hand corner of the screen.
•The system will pick up the default hire Period (e.g. Hour) set against the item. The Expected Return Date and Expected Return Time will be calculated based on the amount of time (Qty) the hire is for. These values can be manually overridden.
•If the hire time ends outside of the business hours, it should be set for the start of the next business day. This can be set to automatically happen by selecting the When a return time is after the closing hours, default to a return time of the beginning of the next business day option under the Rental Hire defaults menu.
•Multiple items can be added to the hire.
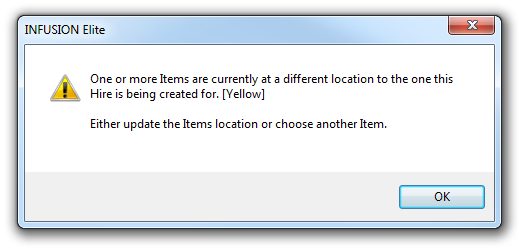
•If the item is not available, the user will get a message in red stating this and will not be able to process the hire arrangement without removing it.
![]()
The Code field for the Item will also be coloured red.
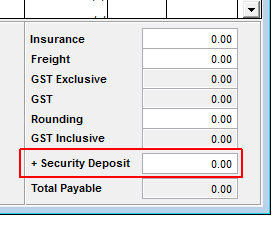
•A Security Deposit can be added. This is credited to a Rental/Hire Security Deposits GL ID (set up under Financial Control Links) in the balance sheet and applied on return.
•Insurance may also be charged. This can be automatically calculated based on the value of the Hire if set up under Manage Rental Hire Defaults.
•Products from the Products list can be added to the Hire by selecting Insert Product (e.g. oil for a Chainsaw hire).
•If the Location of the Hire is different to the Location of a Hired item, the Code field will display in yellow.
•If a Hire like this is Processed the following message will display
Details Tab
General Hire information is shown in the Details tab including Charge details for the Customer, Reference and Order number details.
Delivery Tab
Displays delivery information if required. This could be different from the Customer's address.
Notes Tab
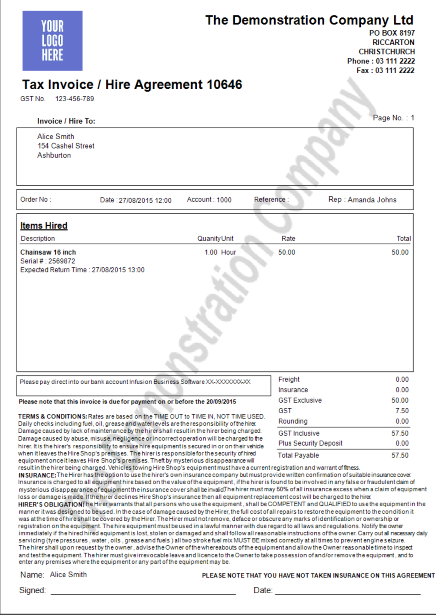
An Invoice Title and Notes can be added to the Hire. These will display on the Hire document.
Custom Fields Tab
Eight custom fields can be used for the Hire. The Title for these are set from under the Invoice Fields tab under Manage Customer Defaults.
Acct Balance Tab
The Customer's Account balances can be viewed
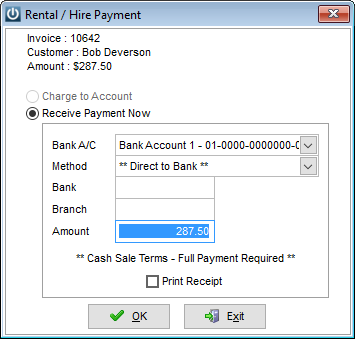
Payment Tab
Allows payment for the Hire to be setup before selecting Process.
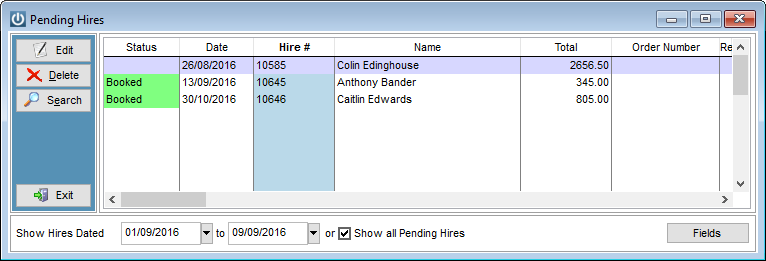
•The Hire can be saved for recall from the Pending Hire screen by selecting the Book button. A Booked hire will show in the Pending Hires screen with the Status bar in green

and if the Mark as "Taken" when Booking option is selected marked as taken and show in yellow.

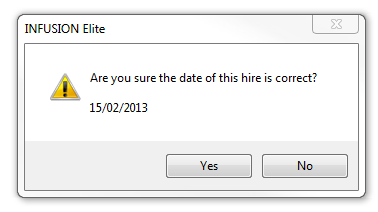
•Selecting Hire will process the Hire while selecting Hire & Return will create the Hire and return the items all at the same time. If the Hire Date is prior to the current date the following message will display.
•If ID requirements have been set up through the Rental / Hire settings or against the item an ID's Required screen will display when a Hire is Processed
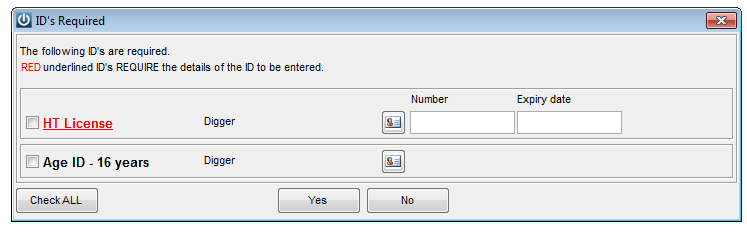
The list displaying covers all items on the Hire and so could require Multiple Ids. The ID type required and the item it is associated with display on each line (e.g. HT License, Digger)
For the Hire to proceed all Ids need to be selected from the tick box at the left hand side of the screen. Use the Check All option to select all items. Information about the ID can be entered if fields have been set up under Admin \ Settings \ Other \ Manage ID Types. If the ID displays in red, it has been set up so that this information is required before the Hire can go any further.
Selecting the ![]() icon will display an image of the ID set up against the Contact for this ID Type. An image can be added through this screen using the Set Image option. If the Hire has been set to require a contact when hiring to Organizations (set up under the Manage Rental / Hire Defaults menu) the image will be saved against the contact otherwise it will be saved against the Organization (i.e. under the Identification tab of the Customer account).
icon will display an image of the ID set up against the Contact for this ID Type. An image can be added through this screen using the Set Image option. If the Hire has been set to require a contact when hiring to Organizations (set up under the Manage Rental / Hire Defaults menu) the image will be saved against the contact otherwise it will be saved against the Organization (i.e. under the Identification tab of the Customer account).
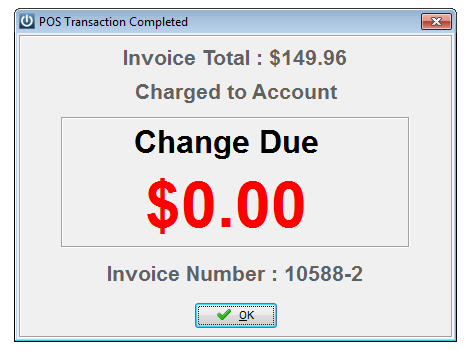
•Selecting Process will prompt to print a hire document and confirm the Hire.
•If the Customer hasn't any credit terms, payment for the Hire will then be prompted for. If the Customer has credit, then it will be charged to their account.
•The Item's Status will be updated to show that it is On Hire and when it is due back.

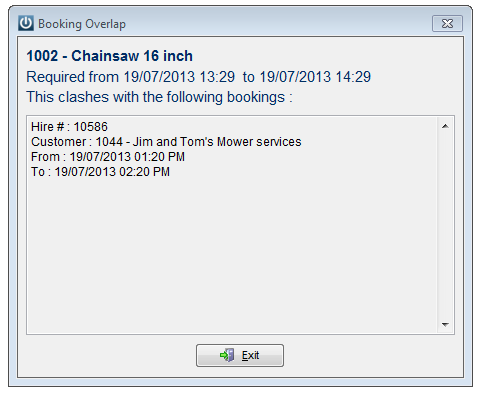
•If an item is already on Hire (Booked or Hired) over the time set for a new Hire, then a pop up will display indicating this and detailing the existing Hire details. This helps prevent double bookings on an item.
- Return Hire
•To process the Return of an Item, select Return Hire from the Rental / Hire drop down menu or CTRL +R
•The Hire Return Lookup screen will display all items that are on hire.
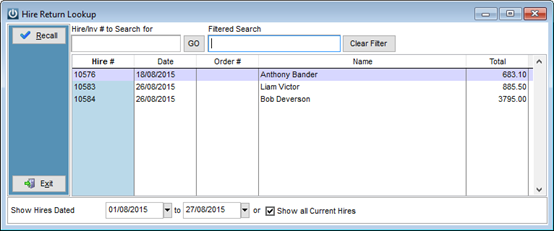
•Locate the required Item, highlight it and select Recall. This will display the Return screen.
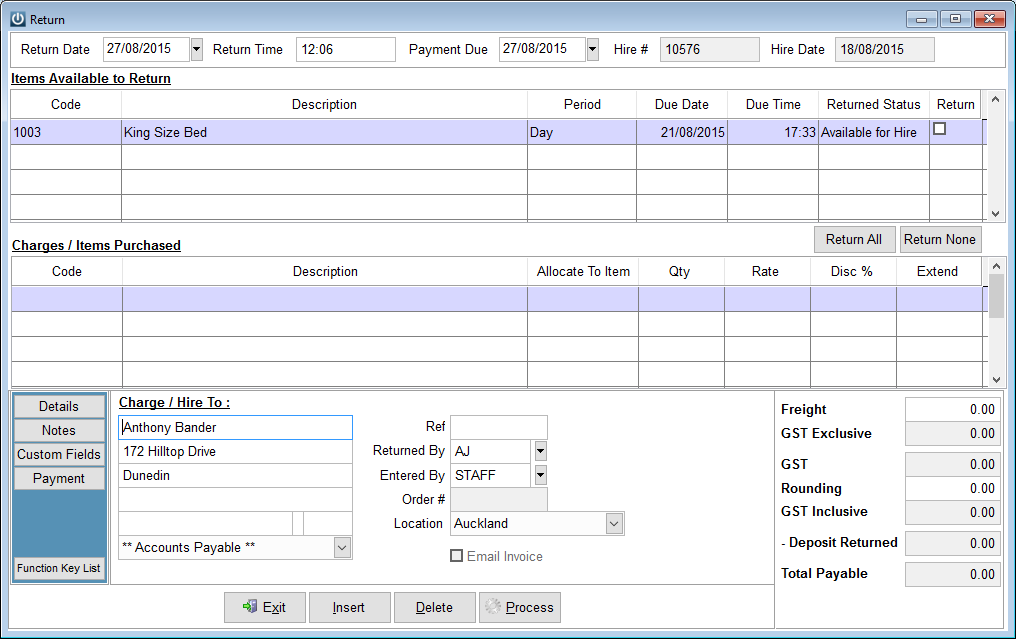
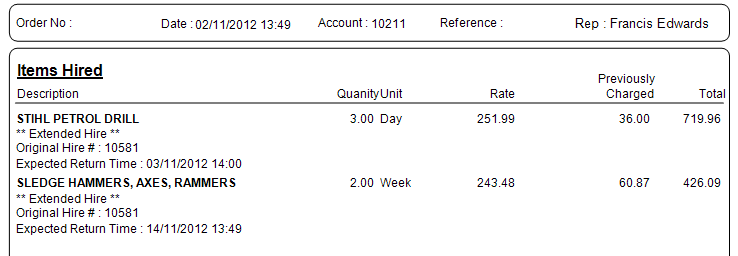
The top grid of this screen displays items being returned and the bottom grid to additional items purchased or additional charges (e.g. a late return).
•Firstly, select the Return check box. All items can be selected by using the Return All button.
•The system will check to see if the item is late or early. If it is late a pop up box will display asking if a late fee is to be charged.
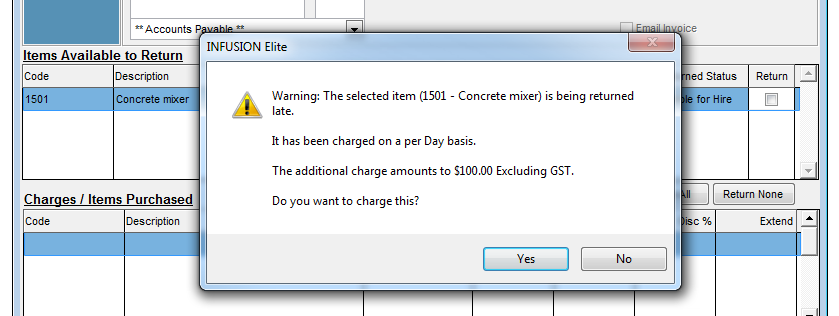
The late charge fee will be added to the Charges / Items Purchased section using the Late Fee Product code set up under the Rental /Hire Defaults.
This charge can be allocated to an Item by entering its code into the Allocate To Item field. This can also be done by selecting from the drop-down options available. The list displaying is for those items being returned.
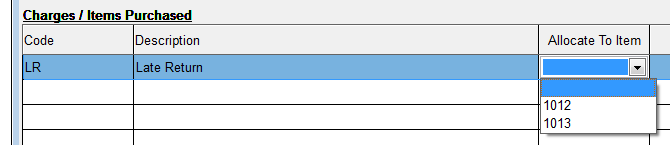
The income from this charge will be added against the selected item and be included in its Total Income value.
•Additional Products can be added in to the Charges / Items Purchased section by typing the Product Code into the Code field or using F9 to look up a Code
•If the Customer had paid a deposit this would be recalled and credited against the item overdue fee.
•Selecting Process will complete the process and produce a document to cover the extra charges.
•If charges have been added when processing the return, a payment will be asked for. This may be a refund if a security deposit was initially paid.

•If logged in as a POS user, the POS Payment screen will display instead (for a Cash Customer)
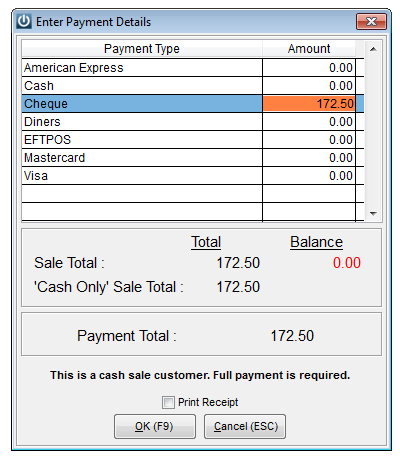
•For Customers with credit terms the following screen will display if logged in as a POS user.
•The Status of the item will be set to Available for Hire when it is returned.
- Extend Hire
A Hire that a payment has already been processed for can be extended. This can be done per item on the Hire.
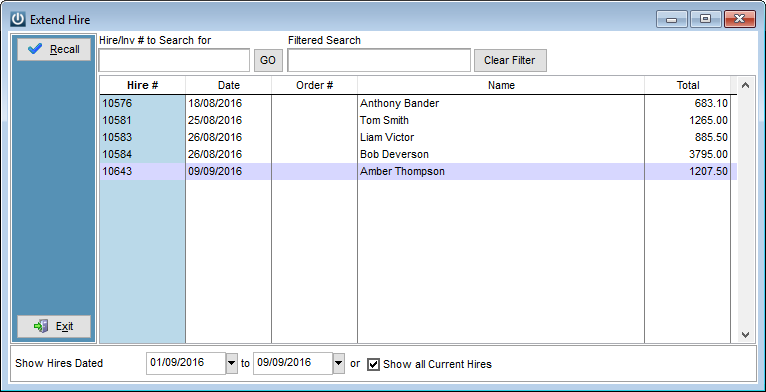
•From the Extend Hire screen select Recall to open the highlighted Hire.
•Click on the row of the item that is to be extended to display a pop up box allowing entry of the new date.
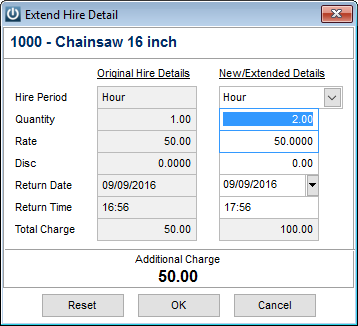
•The left hand column displays the current setting against the item while the right hand column allows entry of the new details. The Additional Charge due to this extension will display at the bottom of the screen. Use the Reset button to reset the New/Extended Details back to the Original Hire Details.
•Selecting OK will update the Hire with the new details.

•The Extended line will display in grey.
•Do this for each item having its Hire extended.
•The Return Dates for these extended items do not need to be the same.
•Selecting Process will create a new Hire document for the extended items.
Note: If the Customer is set up as Cash terms a payment must be processed to complete the extended hire. If the Customer account has credit terms, then the additional charges will be charged to their account.
The original Hire and the new extended Hire can both be further extended if required.
- Pending Hires
If a Hire is created, then Saved it will be available to be recalled from the Pending Hires screen. Select Edit to open the highlighted Hire.
- Scheduler
A visual display of items Hired out can be seen from the Rental Hire Scheduler window.
•Double clicking on a Hire will open the Return screen.
•A new hire for an Item can be created by clicking and dragging in the row for the Item.
•The left hand column colour is that of the item's status.
Time bar images
The colour of the bar will be that set against the Hire Status.
![]()
Overdue hires will display with a Red fill.
![]()
Hires that have only been Saved (not yet Processed) display in the following colour
![]()
Hovering the mouse over the Hire entry will display all of the text against it.
![]()
An arrow![]() or
or ![]() indicates a Hire agreement has been scheduled prior to or after the current time displayed on the scheduler
indicates a Hire agreement has been scheduled prior to or after the current time displayed on the scheduler
The ![]() image indicates the currently selected line.
image indicates the currently selected line.
The dotted vertical red line indicates the current day and time
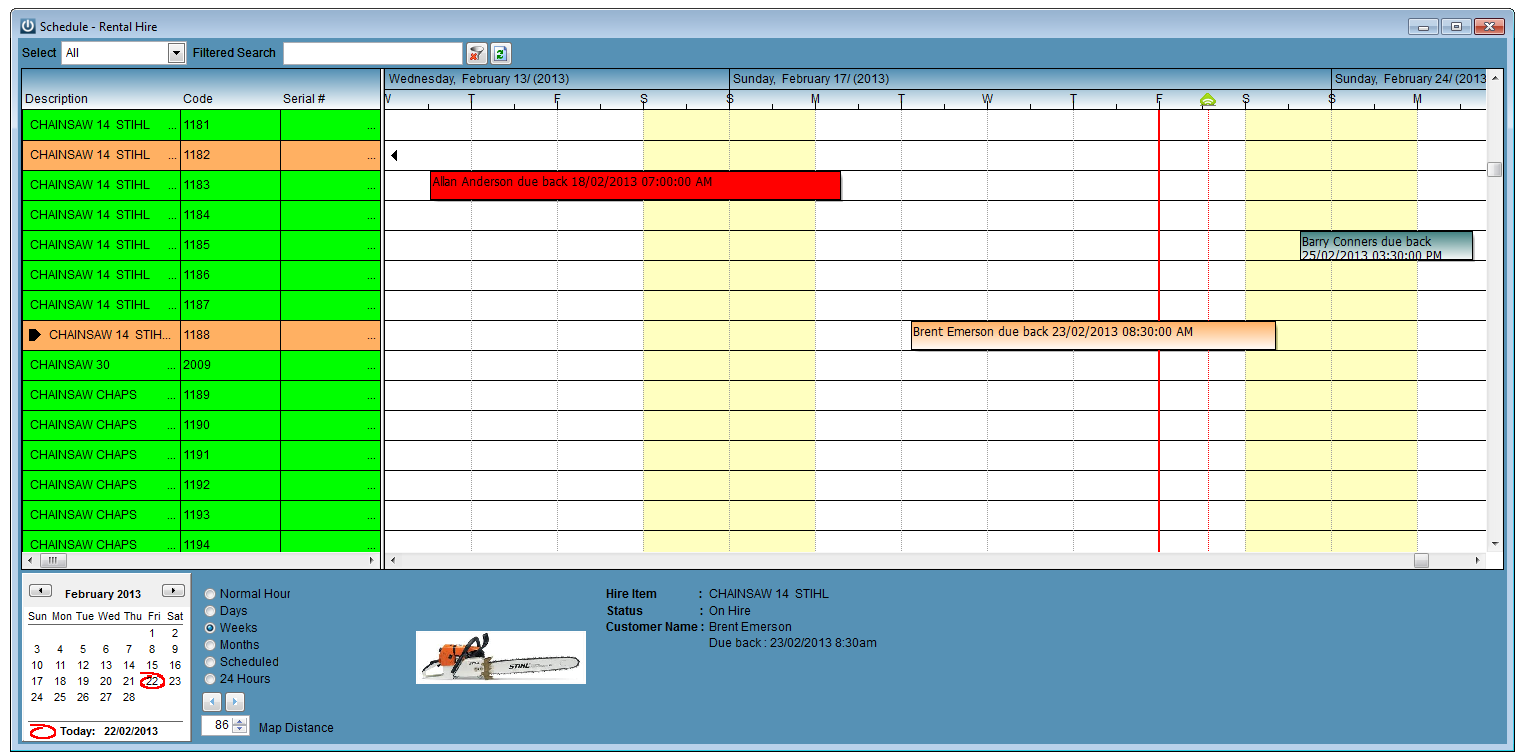
Filtered Search
The Filtered Search option allows location of a specific Item or range of items. By using the drop-down box the search can be limited to items of a certain Status
The Refresh button ![]() is used to manually refresh the scheduler. Note: The Scheduler auto refreshes when you click off then back on to it.
is used to manually refresh the scheduler. Note: The Scheduler auto refreshes when you click off then back on to it.
The Filtered Search text can be cleared by selecting the ![]() icon.
icon.
Scheduler Controls
The Calendar arrows can be used to navigate to the required month. Clicking on a day will set the calendar focus to this date.
Selecting the Today icon ![]() will bring the focus of the calendar back to the current day. The focus date for the Scheduler is displayed to the right of this e.g.
will bring the focus of the calendar back to the current day. The focus date for the Scheduler is displayed to the right of this e.g.![]()
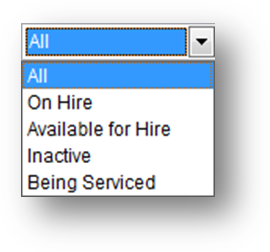
The radio buttons allow selection of different time frame views for the Scheduler
- Normal Hours displays as per the Hire Defaults normal hours for the selected day
- Days displays the selected day plus one day either side of selected day.
- Weeks displays in a week time frame with the focus on the selected day.
- Months displays in a month time frame with the focus on the selected day.
- Scheduled displays time frame that covers all Scheduled Hires
- 24 Hours displays the 24 hours for the current day.
The left and right Arrows ![]() increment the selected date
increment the selected date
The Map distance spinner ![]() is used to zoom in or out of the displayed time frame.
is used to zoom in or out of the displayed time frame.
Double clicking on the Description, Code or Serial field for an Item will open its Modify screen.
An image of the selected item and details on the highlighted hire display in the footer section of the screen
- Reminders
•Under the Bookings section are displayed all items that have been booked for Hire (i.e. not picked up by the Customer yet)
•The Returns section displays all items out on Hire and yet to be returned
•From both screens the detail about the highlighted Hire can be viewed by selecting Details. Letters or an SMS can be sent to the highlighted Hire or all tagged Hires.
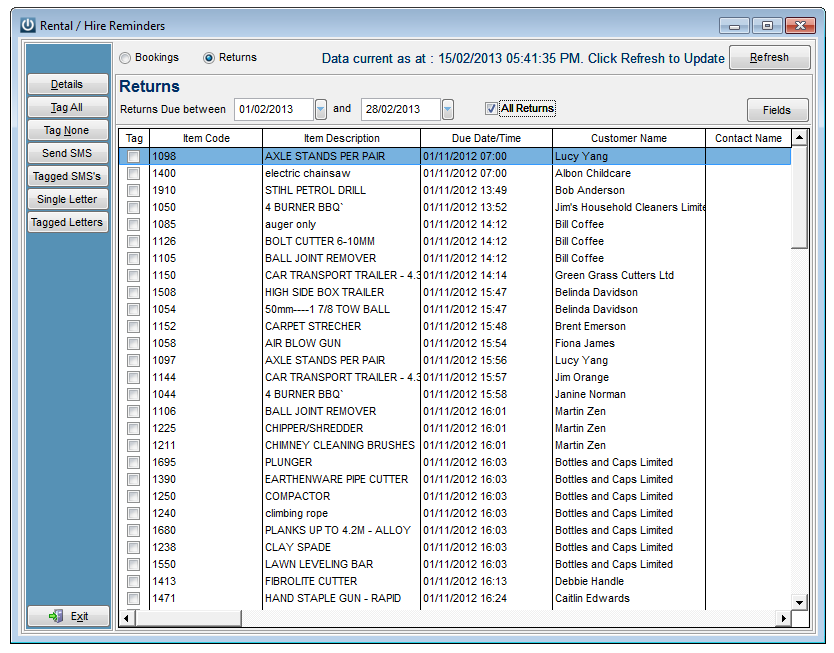
SMS Templates for both Bookings and Returns can be set up under Admin \ Settings \ Other \ Manage SMS Templates
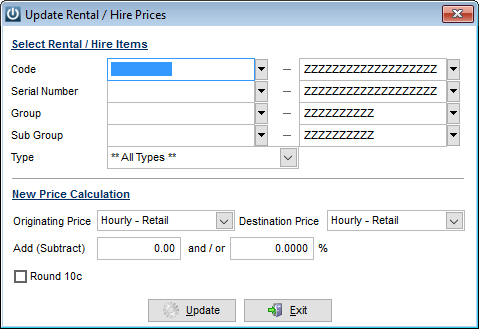
- Update Prices
The Update Prices option allows updating prices for a range of Rental / Hire Items.
- Reports
The following reports are available for Rental Hire items:
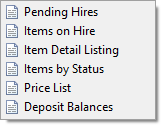
Note: Sales from the Hire of items can be reported on from the Customer Sales Analysis reports.