|
<< Click to Display Table of Contents >> Products |
  
|
|
<< Click to Display Table of Contents >> Products |
|
Products
Before creating new Products default settings need to be chosen. These are outlined in the Admin Section of the User Manual under the following subsections.
Defaults
Manage Product Defaults
Settings
- Manage Locations
- Manage Product Types
- Manage Product Groups
- Manage Product Sub Groups
- Manage Additional Price Levels
- Manage Product Label Size
Products Control Bar
A number of actions can be performed from the Products Control Bar.
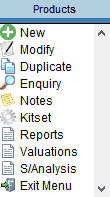
| • | New allows creation of a new Product. |
| • | Modify allows modification of the Product currently selected in the Manage Product screen. |
| • | Duplicate allows duplication of a Product. |
| • | Enquiry allows viewing of transaction information and details of the Product e.g. Pricing, Quantities and Purchase Orders. |
| • | Notes shows any notes added to the Notes tab in the Product details. |
| • | Kitset allows the Product currently selected in the Manage Product screen to be made into a kitset. From here you will select other component Products which make up this kitset. |
| • | Reports displays a window listing all of the Product Reports. Select the required report then Select to bring up the report window. |
| • | Valuations displays a window listing all of the Product Valuation Reports. Select the required report then Select to bring up the report window. |
| • | S/Analysis displays all of the Sales Analysis reports available for Products. |
| • | Exit Menu closes the Product Control Bar Menu and the Manage Products screen. |
Creating a new Product
Manage Products
Select the New option from the left hand control bar to create a new Product. If Automatically Number Products is selected from the Admin / Defaults / Manage Product Defaults / Preferences section the Product Code will be automatically generated. If it’s not selected a product Code will need to be entered.
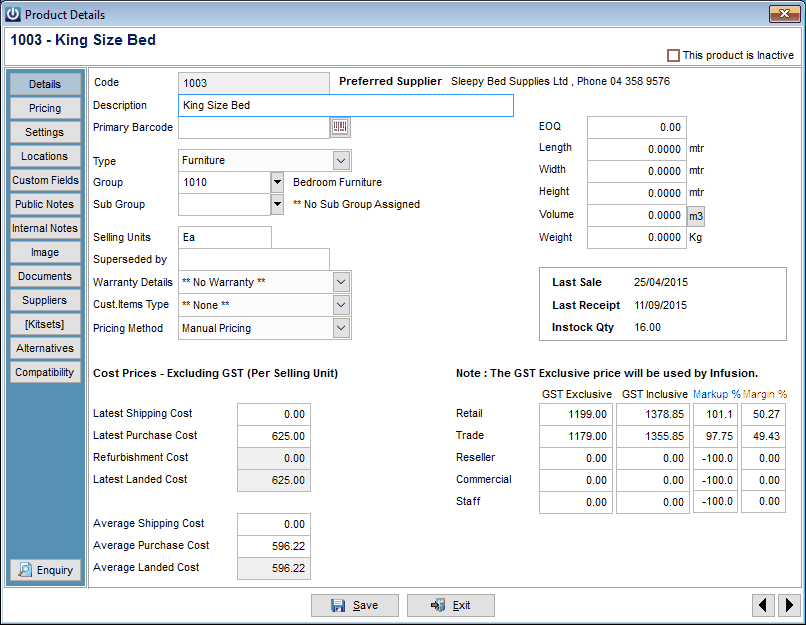
Details Tab
Enter the Description of the Product and a Primary Barcode if appropriate. Additional Barcodes can be added by selecting the button at the end of the Primary Barcode field.
Enter units the item is sold in (e.g. ea, hr) in the Selling Units field.
If the Product is no longer current and has been Superseded by another Product, enter the Code of the item that is superseding it. During Invoicing a warning will appear to use the new code when the superseded code is selected.
A Warranty can be entered into the Warranty Details field. The dropdown options for this are setup in Admin / Settings / Customer Items / Manage Warranty Types.
Enter a Product Type, Group and Sub Group where required. Settings against each of these (setup in the Admin / Settings / Products menu) will be used in the set up of the Product.
A Customer Item Type can be selected for the Product. The **Default Item Type** is set under the Defaults section of the Product Type in Admin / Settings / Customer Items / Manage Product Types. The dropdown options for this are setup in Admin / Settings / Customer Items / Manage Customer Items Types. Setting an Item Type will display the Setup Default Services tab which allows setup of Services that will be scheduled when the item is sold.
Pricing Detail shown is the same as that in the Pricing tab. Additional detail shown in this section includes the Preferred Supplier of the Product, the Last Sale and Last Receipt dates along with the Instock Quantity over all locations.
The Product can be made Inactive by selecting the This item is inactive option. To make Inactive Products display on the Manage Products list, select the Show Inactive Items option at the top of the screen. Inactive items will display with a grey background.
You can enter and store the EOQ, Length, Width, Weight, Volume and Height of the product. This information can then be used for preparing dispatch dockets, freight sheets, and packing slips.
Pricing Tab
Allows setup of the pricing structure for a Product.
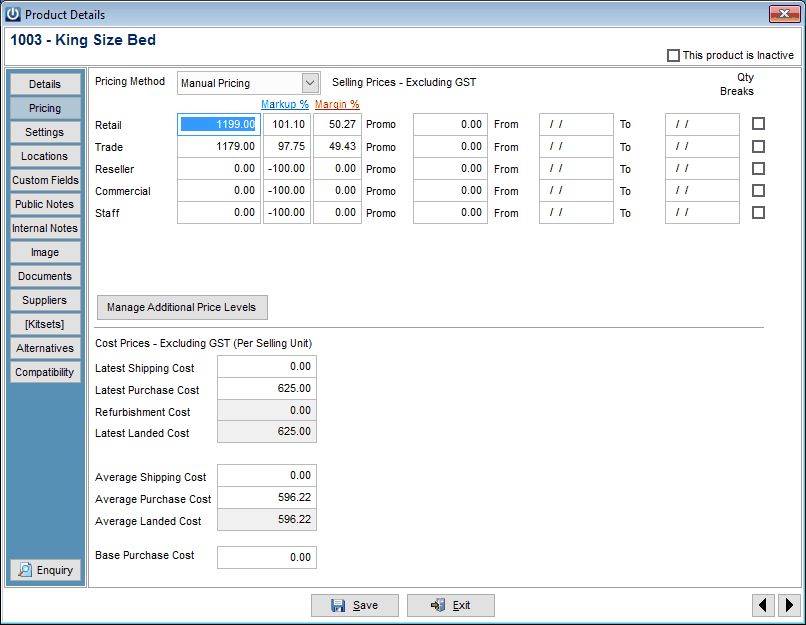
The Pricing Method field allows setting of either Manual Pricing or Product Group Markups. Manual Pricing allows assigning of a price for each Pricing Group. Product Group Markups will use the percentages set for the Group selected under the Details tab. Percentages are setup in Admin / Settings / Products / Manage Product Groups.
The Price GroupSelling Price field names are setup in Admin / Defaults / Manage Product Defaults Manage Product Defaults/ Price Groups.
Markup and Margin values are calculated off the Costing Base On setting under the Manage Products Defaults / Preferences section.
Having the Qty Breaks box ticked will disable Promotional Pricing and allow setup of three quantity break values for each Selling Price Group.
The Promo section allows a promotional price to be set for the date period selected. This price over rides all Selling Prices. Contract Rates over ride Promotional Rates. Discounts are not applied by default to Promotional Prices.
The Manage Additional Price Levels button is used to enter prices for Additional Price Levels set up in Admin / Settings / Products / Manage Additional Price Levels. Qty Breaks, Promo Prices and Markups are not available on these prices. They also can not be viewed when looking up Rates on invoicing.
The Latest Shipping Cost reflects the freight cost of the Product. This can be adjusted manually or through the F12 option when Receipting in a Purchase Order.
The Average Shipping Cost is calculated by averaging the Freight costs entered in via the F12 option when Receipting in Purchase Orders.
If set to do so from the Admin / Defaults / Manage Product Defaults / Preferences screen the Latest Purchase Cost and Average Purchase Cost fields are updated as Product is receipted in.
If the Product is a Trade In and a Job was created to refurbish it, when the Job is invoiced any costs put on it will be added to the Refurbishment cost field of the Product.
The Base Cost can be used as a third cost field.
Settings Tab
Select appropriate Sales GL, Purchase GL and Closing Stock GL codes for the Product along with a GST rate in the Sell Tax and Buy Tax fields. The default settings will be those set up under the Admin / Defaults / Manage Financial Links menu or those set against the Product Group assigned to the Product.
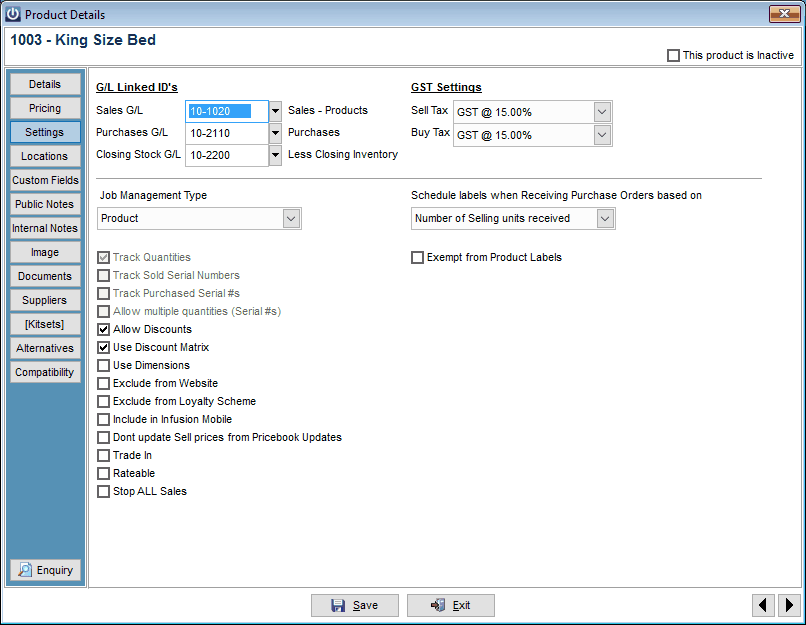
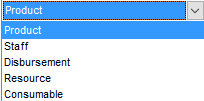
A Job Management Type (if using Infusion Elite or Service Manager Pro) of Product, Staff (included in the Staff labour / Timesheet reports in the Job Management module) or Disbursement can be set.
Select the Track Quantities box if the Product reduces in quantity when invoiced. Once there is a quantity of the product in stock this field will be greyed out if previously selected. The on hand quantity needs to be zero for this option to be deselected
Select the Allow Discounts Track Quantities box if the Product can be discounted when invoiced, and the Use Discount Matrix Track Quantities box if discount via a discount matrix is enabled.
The Use Dimensions option will allow use of Length and Width dimensions (i.e. area) in Quotes and Invoices.
Select the appropriate boxes if tracking of Serial Numbers is required for Sold and Purchased products. If these boxes are selected, Invoices and/or Purchase Orders for this item will allow a quantity of only one per line. The Serial Number options will be greyed out if there is quantity of the Product in stock. To activate these settings the on hand quantity for the Product needs to be zero.
The Allow multiple quantities (Serial #'s) option allows a serial number to be entered against quantities greater than 1. Part of this quantity can be sold / invoiced out.
Having the Exclude from Website option selected will stop the Product from being uploaded to a Webmaker website.
The Exclude in Infusion Mobile will prevent the item from showing on the Mobile device.
By default all products are included in the Loyalty Scheme if it is activated. Selecting Exclude from Loyalty Scheme will exclude it from the scheme.
Don’t Update Sell prices from Pricebook, will allow the user to set the retail selling price and not have it updated when a new supplier Pricebook is imported.
Select the Trade In box if this product is a Trade In. If a Product is created by receiving it as a Trade In through an Invoice this option will automatically be ticked.
Ratable can be used to identify items where there is a royalty, or license fee payable.
The Stop all Sales Exempt from Barcodes option will stop all sales of this product.
The Exempt from Product Labels option will stop Purchase Orders and Receipts from scheduling Barcodes for this Product (e.g. Freight).
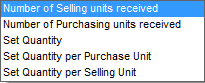
The number of labels printed when an item is receipted in can be specified. For Products with Ratios set against them, the number of Selling and Purchased units will differ.
Locations Tab
Allows setup of Location specific information for Product. A Bin Location, Minimum and Maximum stock holdings along with the GL IDs for Sales, Purchase and Stock of the Product are set here.
Unlimited
For Transfers and Invoices, the Location specific GL ID set against the Product takes priority over the Location GL ID then comes the Product GL ID.
Use the F9 key to look up GL IDs and the F8 key to copy data to all locations in the column.
Custom Fields Tab
Allows entry of information under user defined fields relating to the Product. Thirty fields are available and are set up under Admin / Defaults / Manage Product Defaults / Custom Fields.
Public Notes Tab
For entry of general Notes associated with the Product. Standard Descriptions can be added to the Notes section.
Internal Notes Tab
For entry of Product related Notes that are meant for internal use. Standard Descriptions can be added to the Notes section. A Pop Up note can be set. This will pop up whenever the Product is used.
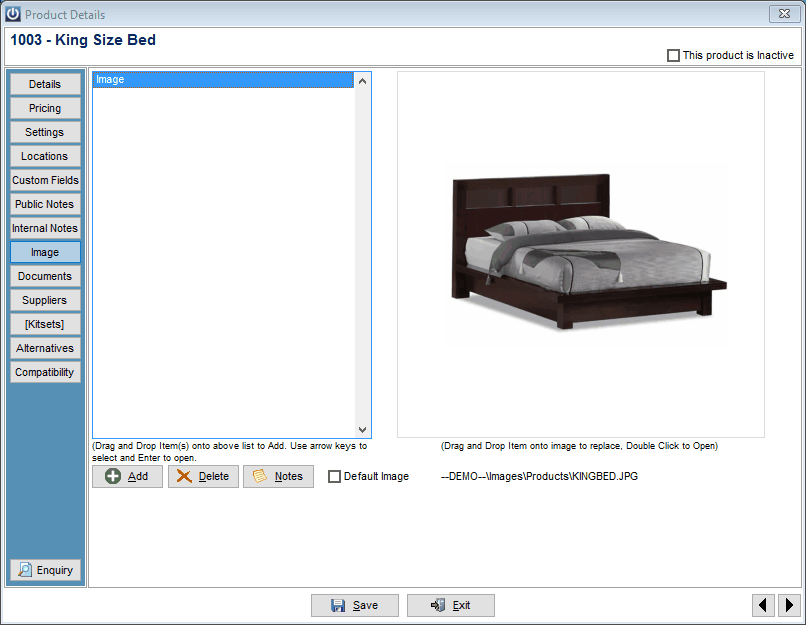
Images Tab
Allows for an unlimited number of Images to be stored. To add an image, select Add or you can drop and drag a number images in one go from another folder.
Each image can be given a name to clearly identify it, such as front view, Side View , Rear View.
All images uploaded are stored in the data\Images\Products Folder inside your installation.
Documents Tab
Allows links to be created to Product related files residing on the User’s computer / network. The appropriate software needs to be installed on the user’s computer to open any document.
By Selecting Add the system will create a link to the document in its current location.

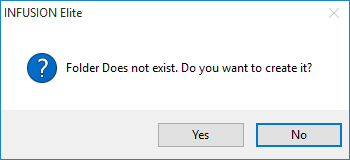
Selecting the Hyperlink next to Open Folder the system will automatically create folder in the data\documents\products\PROD Code – if a folder does not exist then you will be prompted to create this the first time.
This folder is now available for to save data and files in here from any program. The advantage of this is that from within your system you can access all documents relating to the product.
Suppliers Tab
Allows setup of Supplier specific information relating to the Product. Select new from the bottom of the screen to add details for the new Supplier or select the Supplier to view details associated with them.
Please Note the first time you create a purchase order to a supplier the system will automatically create these details for you.
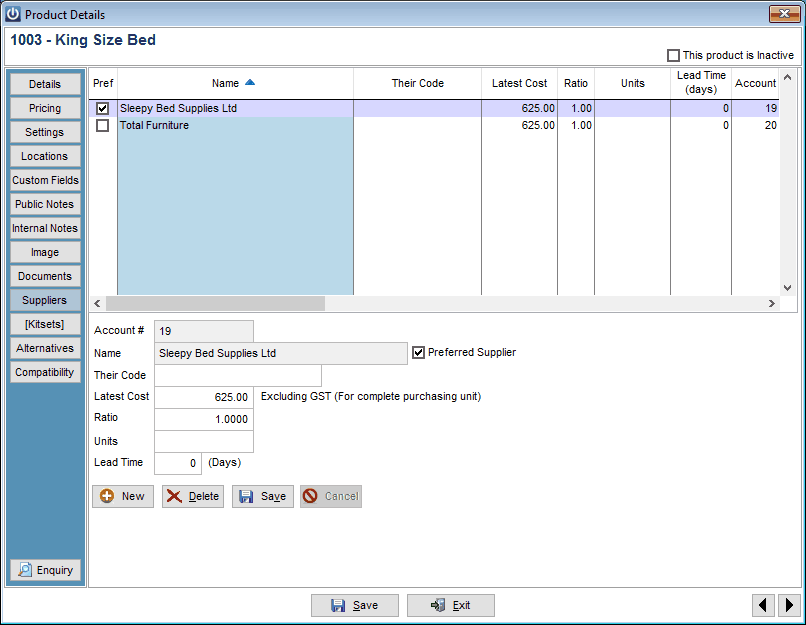
The Supplier’s Code for the Product can be entered into the Their Code field.
The Latest Cost is the unit cost from the last receipted Purchase Order from this Supplier.
The Ratio field allows a ratio to be setup between the purchasing of the product and receipting of it. As an example, one packet of screws (containing ten screws) may be purchased using the Product Code and with a Ratio of ten setup, ten screws will be receipted into stock so they can be sold separately.
The Units field is for the unit of measure the goods are purchased by.
A Lead Time can be entered in for the number of days it takes for a typical order to arrive.
A Preferred Supplier can be set if there are multiple Suppliers set up against this Product. The Preferred Supplier will display when the Supplier tab is first selected.
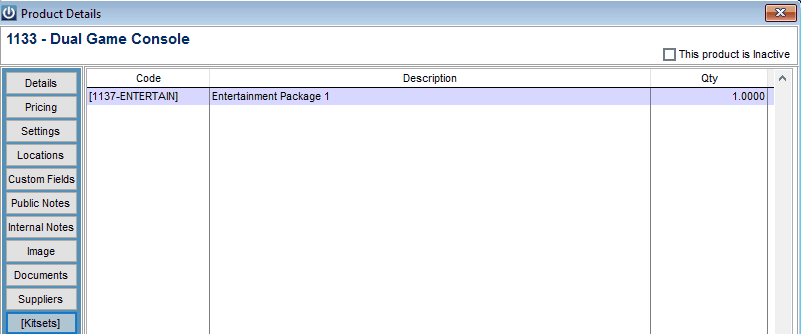
{Kitsets} Tab This screen will display a list of Kitset codes which use the current code as a component.
Alternatives Tab
The Alternatives Tab allows the user to select additional products which have already been set up and may be sold as an alternative if the selected product is not available.
Compatibility Tab
The Compatibility Tab will list the Makes and Models for which this product is compatible with, the Need to be set up under the Admin defaults product Defaults, prior to selection.
Enquiry Tab
Gives access to the Enquiry screen for the Product.
Products Right Click Menu
Right clicking on a Product in the Manage Products Screen will present the following menu:
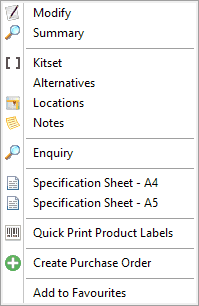
Modify – Opens the Product details window.
Summary – Opens a summary screen for the Product displaying setting, pricing and quantities in stock information. This screen includes the ability to enter in a Sell value to see what Markup or Margin this equates to along with entering a Markup or Margin to see what Sell price this gives.
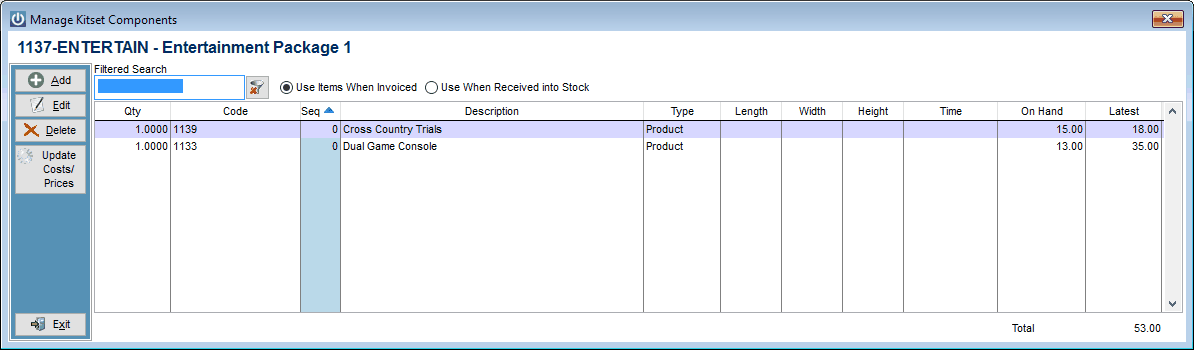
Kitset – Opens the Manage Kitset Components window.
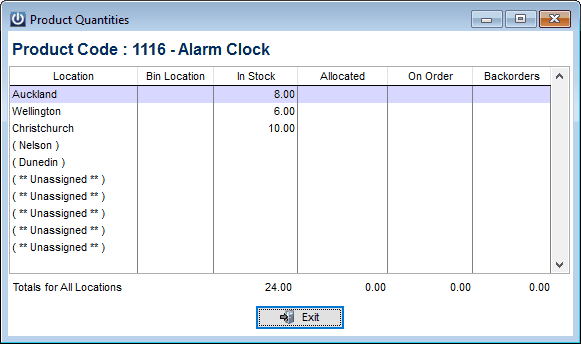
Locations – Opens the Product Quantities window which shows the quantities of the Product available over all Locations.
Notes – Opens the Notes field.
Enquiry – Opens the Product Enquiry window.
Specification sheet – A4 – allows printing of an A4 size specification sheet for this Product with a chosen Sell Price.
Specification sheet – A5 – allows printing of an A5 size specification sheet for this Product with a chosen Sell Price.
Quick Print Product Labels – allows labels to be quickly printed for the selected Product.
Create Purchase Order – Right clicking on the product code will prompt you to create a purchase order to the preferred supplier for this product. If the code does not have a preferred supplier set up then you will be prompted to select the supplier.
If a purchase order has already been created and saved you will be prompted to use this first.
Products Drop Down Menu
Access the Products drop down menu from across the top of the screen.
Manage Products
Displays the Manage Products screen.
Product Enquiry
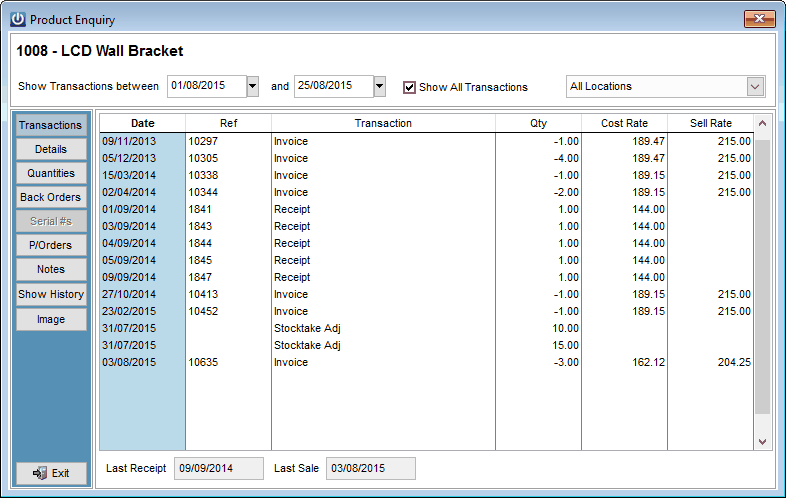
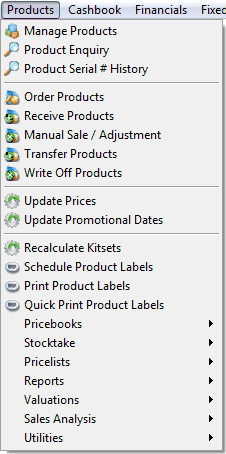
Transactions Tab
Displays a list of transactions (limited to the date range at the top of the window and the Location selected) relating to the Product. Relevant cost and sell rates for each transaction are shown.
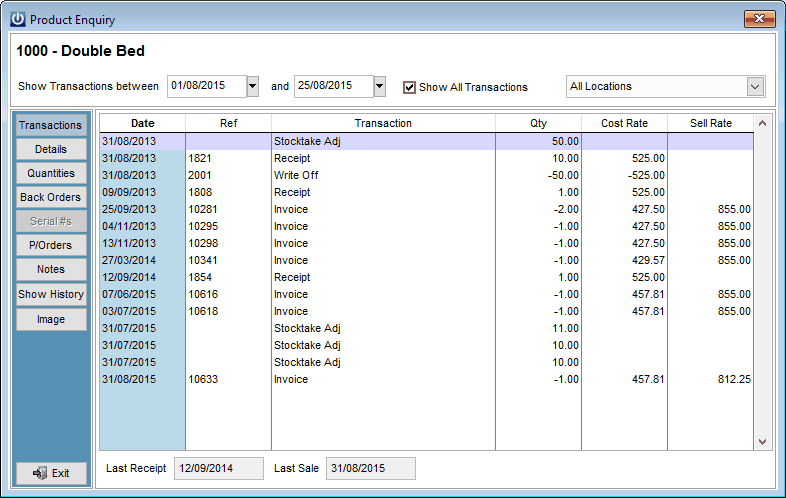
Details Tab
Pricing
Displays the details of the Product along with Sell and Cost Prices including Markups and Margins for each Price Group.
The Show Additional Price Levels button allows additional price levels to be viewed.
Latest and Average Shipping, Purchase and Landed Costs for the Product can be viewed along with any Refurbishment Costs from a Trade In Job.
A list of Cost Prices from Suppliers of the Product can be seen by selecting the Show Individual Supplier Prices button. Also shown is the Supplier’s Code for the Product.
Quantities Tab
Displays quantities of the Product in all active locations. Also shown are Allocations, Quantities on Order and Backorders.
Back Orders Tab
Displays a list of all Backorders for the Product.
Serial Numbers Tab
For Product that has been setup for Serial # Tracking, a list of all Serial Numbers currently in stock are shown.
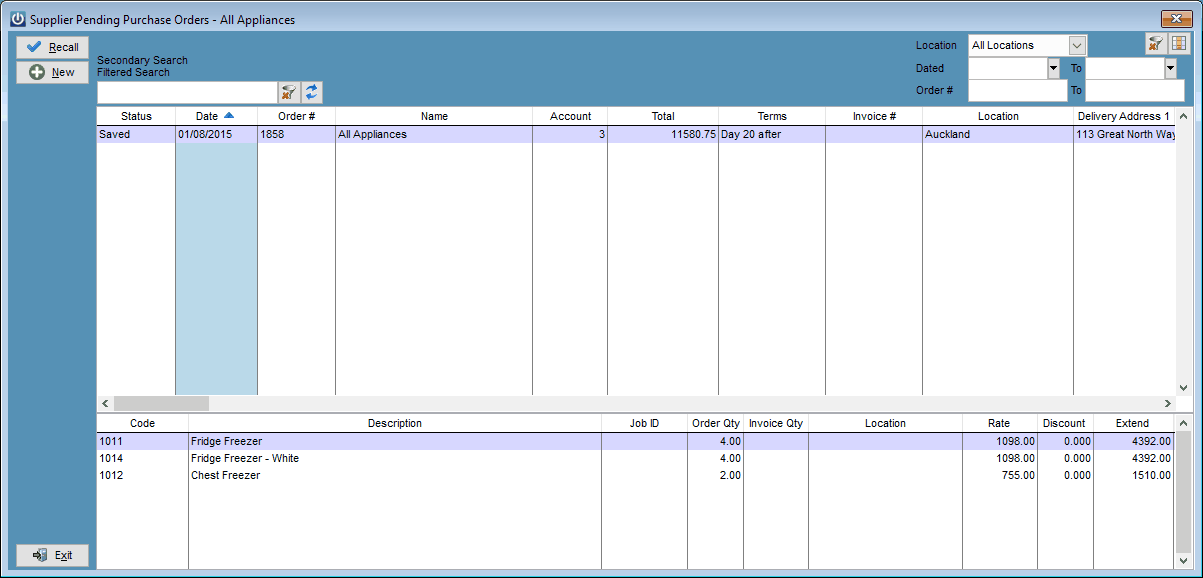
P/Orders Tab
Displays a list of all outstanding Purchase Orders for the Product.
Notes Tab
The Notes tab displays specific comments/notes regarding the Product. These come from the Public Notes tab under the Modify screen. Notes along with Standard Descriptions can be added in this screen.
Show History Tab
The Show History tab will display a rolling 12 month sales history broken down into three categories - Quantities, Sales Value, and Cost Value. These figures relate to the Location selected.
Image tab
Allows images associated with the Product to be viewed.
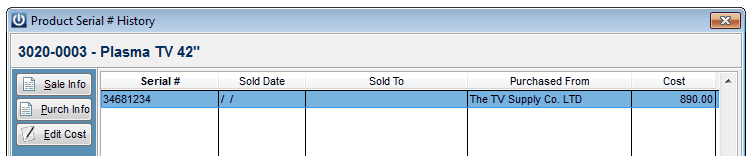
Product Serial # History
Displays the Sales and Purchase History for a Serial Tracked Product. Invoice and Receipt Documents can be viewed from here.
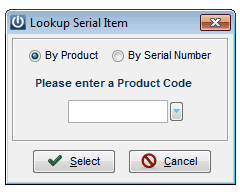
Serial Number Tracked items can be searched for by either their Product code or by entering the specific Serial Number. Purchase and Sale information about the Product can be viewed. The Cost for the Product can be changed using the Edit Cost option.
Order Products
Allows for creation of an Order for Product. Any Saved Orders can be Recalled or Deleted after selecting the Location the Product was ordered for.

Details Tab
Select a location the Product is being ordered for. An option is available for entering the Supplier’s Details.
The Date field is the date the Order was raised.
The Order No. field increases automatically as a new order is raised and can be changed in Admin / Defaults / Manage Supplier DefaultsManage Customer Defaults.
The Ordered By field is for entry of a staff member’s name.
Notes Tab
Allows Notes to be made relating to an Order.
To enter a Product on to the Order either:
| 1) | Type the Code of the Product into the Code field. |
| 2) | Select F9 when in the Code field. |
| 3) | Scanning or typing the barcode of the Product into the Code field. |
The F7 key will enter the “Misc” Product code into the Code column.
Typing /N in to the Code column allows Notes to be made about the Order. These will be displayed in the body of the Order.
The Save button will save the Order. Selecting the Location used for the Saved Order when creating a new order will display a pop up list of all Saved orders.
The Order button will allow printing of an Order and update the Product information indicating that they are on Order.
Receive Products
Allows Receipting of Products into Stock.

Details Tab
When creating a new Receipt select a location Products are to be receipted into. Any Saved Transactions will show in a pop up window after selecting the To Location.
An option is available for entering the Supplier’s Details.
Options are available to:
- Reduce the On Order quantities for the Product. Select this if you have already created an Order (using the Order Products menu option) for this Receipt.
- Don’t update cost prices.
- Don’t schedule barcodes when the Product is Receipted.
The Date field is the date the Order was raised.
The Receipt No. will increment with each Receipt created.
The Received By / Ordered By field is for entry of a staff member’s name.
Notes Tab
Allows Notes to be made relating to the Receipt.
To enter a Product on to the Order either:
- Type the Code of the Product into the Code field.
- Select F9 when in the Code field.
- Scan or type the barcode of the Product into the Code field.
The F7 key will enter the “Misc” Product code into the Code column.
Typing /N in to the Code column allows Notes to be made about the Order. These will be displayed in the body of the Receipt.
The Save button will save the Order. Selecting the Location used for the Saved Order when creating a new order will display a pop up list of all Saved orders.
For Product set up to Track Purchased Serial Numbers, a popup window will ask for the Serial Number of the Product. Only quantities of 1, 0 or -1 are allowed unless Allow Multiple Quantities Serial Numbers has been selected for the Product.
If the Product has been setup to Allow Multiple Quantities for a serial number (set up under the Details section of each Product), a single serial number will be requested for the entire number of items per line.
The price of the Product can be altered by entering the new value into the Rate column. This column can be hidden if Hide Costs in Transfers, Write Offs, Enter Order, Receipts and Manual Sales is selected in Admin / Defaults / Manage Product Defaults / Preferences.
The Save button will save the order in the system for recall later.
The Receive button will enter Product into the system in the specified location and update all balances. A Receipt docket will also be printed.
No financial charges are created for Receipts.
Manual Sale / Adjustments
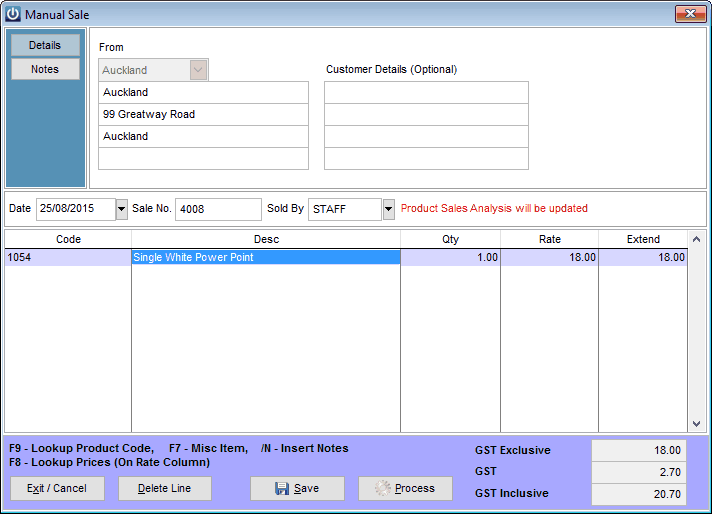
Allows for Manual Sales and Adjustments of Product.
Details Tab
Displays the Location the goods are being Sold / Adjusted from. Select a location Product are to be Sold / Adjusted from when creating a new entry. An option is available for entering Customers Details. Any Saved Transactions will show after selecting the From Location.
Notes Tab
Allows Notes to be made relating to the Manual Sale / Adjustment.
To create a Manual Sale / Adjustment either:
- Type the Code of the Product into the Code field.
- Select F9 when in the Code field.
- Scan or type the barcode of the Product into the Code field.
The F7 key will enter the “Misc” Product code into the Code column.
Typing /N in to the Code column allows Notes to be made about the Order. These will be displayed in the body of the Manual Sale.
Selecting the F8 key when on the Rate column allows changing of the rate by selecting from the list of Price Groups and Costs displayed.
If the Product is set up to Track Purchased Serial Numbers, a popup window will ask for the Serial Number of the Product. Only quantities of 1, 0 or -1 are allowed unless Allow Multiple Quantities Serial Numbers has been selected for the Product. If the Product has been setup to Allow Multiple Quantities for a serial number (set up under the Details section of each Product), a single Serial Number will be requested for the entire number of items per line.
The Save button will save the order in the system for recall later.
The Process Receive button will make the appropriate in stock adjustment to the Product in the specified location.
No financial charges are created for Manual Sales.
NB: Manual Sales / Adjustments can be optionally set to affect Sales Analysis figures – see Admin / Defaults / Manage Product Defaults / Preferences.
Transfer Products
Allows for Transfer of Product from one Location to another.
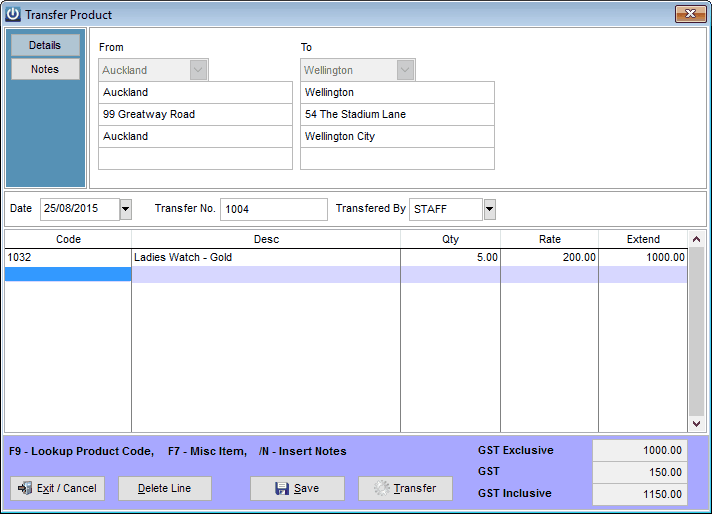
Details Tab
Displays the Location the goods are being transferred From and To. Select the appropriate Locations when entering a new Transfer. Any Saved Transactions will show after selecting the From Location.
Notes Tab
Allows Notes to be made relating to the Transfer.
To create a Transfer, either:
- Type the Code of the Product into the Code field.
- Select F9 when in the Code field.
- Scan or type the barcode of the Product into the Code field.
If the product is set up to Track Purchased Serial Numbers, a pop up window will ask for the Serial Number of the Product. Only quantities of 1, 0 or -1 are allowed unless Allow Multiple Quantities Serial Numbers has been selected for the Product. If the Product has been setup to Allow Multiple Quantities for a serial number (set up under the Details section of each Product), a single serial number will be requested for the entire number of items per line.
The F7 key will enter the “Misc” Product code into the Code column.
Typing /N in to the Code column allows Notes to be made about the Order. These will be displayed in the body of the Transfer.
The Save button will save the order in the system for recall later.
The Transfer button will process the Transfer and a docket will print.
If the Purchase G/L IDs are different for each location a G/L journal will be created between them.
Write Off Products
Allows for Product to be Written Off.
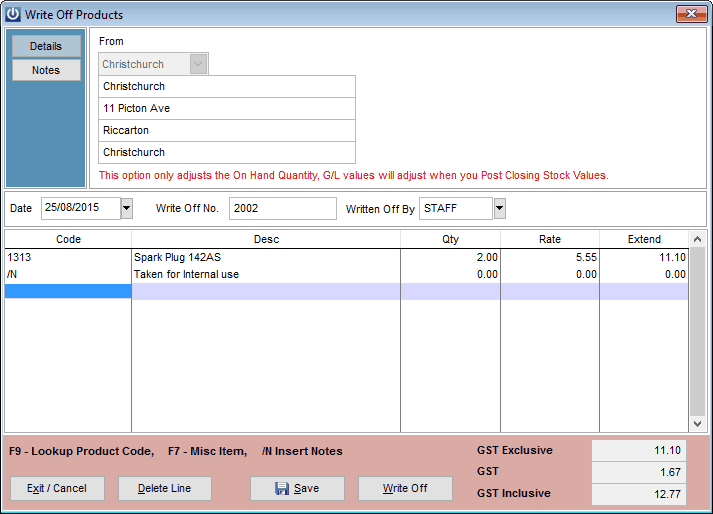
Details Tab
Displays the Location the goods are being Written Off from. Select a location Product is to be Written Off from when creating a new entry. This will bring up any previously Saved Write Offs which can be Recalled or Deleted.
Notes Tab
Allows Notes to be made relating to a Write Off.
To Write Off Product, either:
- Type the Code of the Product into the Code field.
- Select F9 when in the Code field.
- Scan or type the barcode of the Product into the Code field.
If the Product is set up to Track Purchased Serial Numbers, a pop up window will ask for the Serial Number of the Product. Only quantities of 1, 0 or -1 are allowed unless Allow Multiple Quantities Serial Numbers has been selected for the Product. If the Product has been setup to Allow Multiple Quantities for a serial number (set up under the Details section of each Product) , a single serial number will be requested for the entire number of items per line. These are all setup in Manage Products from the Products drop down menu, double click on Product name then select the Details tab.
The F7 key will enter the “Misc” Product code into the Code column.
Typing /N in to the Code column allows Notes to be made about the Order. These will be displayed in the body of the Transfer.
The Save button will save the entry in the system for recall later. These can be viewed when re-entering Write Off Products for the same Location.
The Write Off button will process the write off and a docket will be printed.
No financial charge is created for these transactions.
Update Price
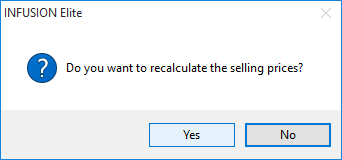
Allows updating of the Selling Prices for a selected range of Products. Enter a range of Products to be updated. Select the Originating Price and a Destination Price. Any Additional Prices that have been set up are available as options for these. To adjust the price by a set amount, enter a figure in the Add (Subtract) field. To adjust it by a percentage, enter a figure into the % field. A combination of both may be used – the addition is made before the percentage adjustment. A negative percentage can be used.
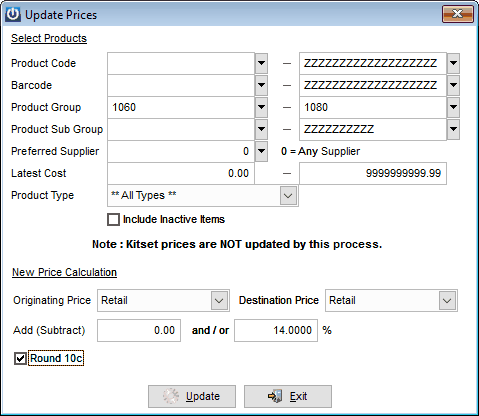
Selecting the Round to 10c option will round any destination prices to the nearest 10c (5c is rounded up).
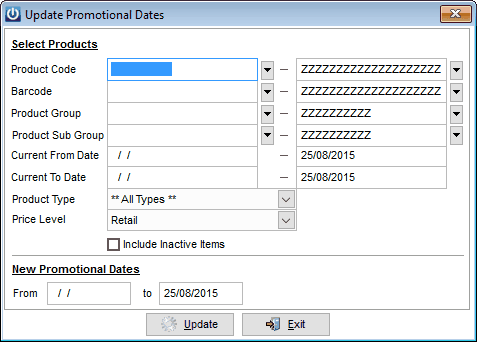
Update Promotional Dates
Allows updating of Promotional Dates set in the Pricing tab for Products. Once a Product or range of Products has been selected, the new Promotional Dates can be entered and changes made by selecting the Update button.
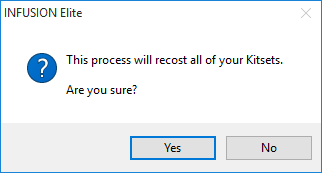
Recalculate Kitsets
Kitsets
Allows recalculation of Kitsets by re-totaling Cost and Sell values along with Weight and Volume.
Schedule Barcodes
Allows scheduling of Barcodes for Product. Enter a range of items using the Product Code, Barcode and Group ranges then the select the Load Products button.
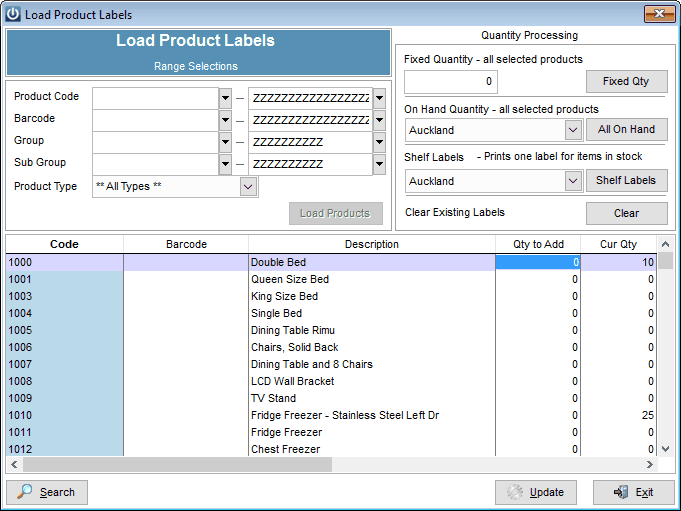
A Fixed Qty of Labels for each Product can be selected or Labels for all Products in stock (All On Hand) in a selected Location.
Selecting the Shelf Labels button will add a quantity of one to the Qty to Add column for items in the selected location.
Quantities for Products can also be edited line by line.
The Cur Qty figure is the number of Labels currently scheduled. Selecting the Update button will add the Qty to Add figure to this value.
Selecting the Clear button will clear all scheduled Barcodes.
The Search button locates a Product in the list of Loaded Products.
Print Product Labels
Allows printing of a range of scheduled barcodes.
Select a range of Products to print labels for from the Product Code, Barcode Group or Sub Group ranges along with the Product Type. The selection can be sorted when they print by Stock Code, Barcode and Description. The Label Format can be selected from six layouts. The default layouts for Label Formats 4, 5 and 6 allow selection of a Price to Print on the label.
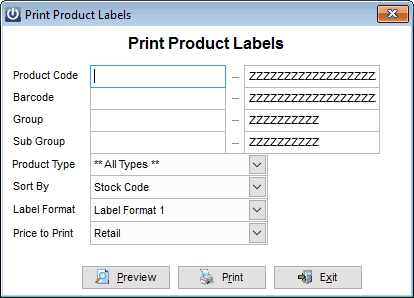
Select Preview to view how the labels will print then Print to print the labels.
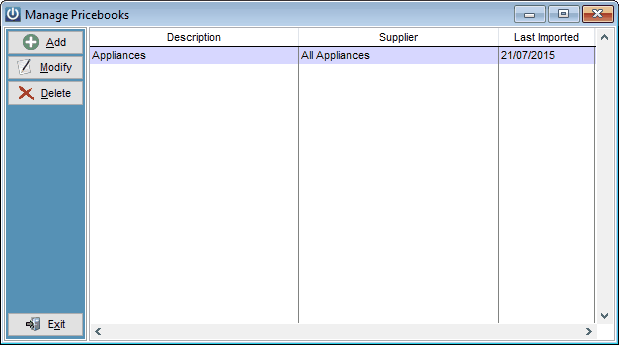
Pricebooks
Pricebooks are lists of Products from a particular Supplier. Pricebook items can be used on Quotes, Invoices and Purchase Orders by typing in /P to the Code field of the relevant Manage screen. Pricebook items are not part of the main Products list so won’t be included in any Stock takes.
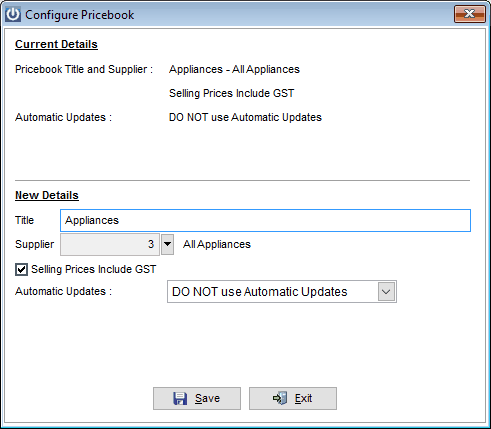
To create a Pricebook select Add from the Manage Pricebooks screen.
Enter in a Description for the Pricebook, the Supplier it is from and whether it is GST Inclusive or Exclusive. Pricebooks are imported by firstly setting up the Import Routine through Admin / Manage Import Routines then importing the data through Admin / Import Data.
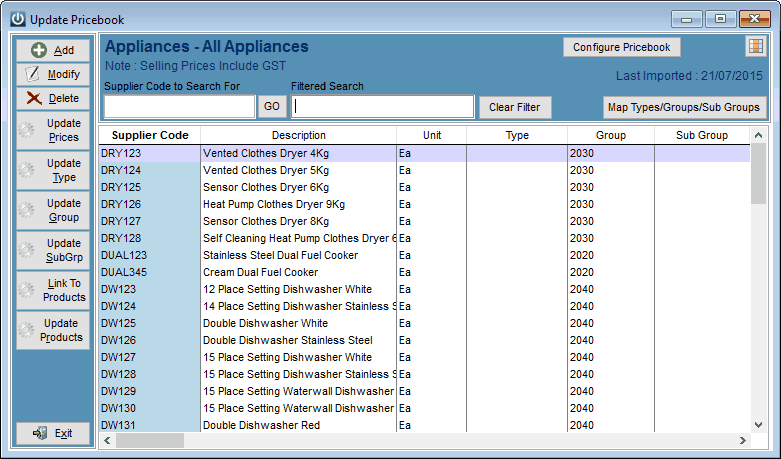
A Pricebook needs to be set up under a Supplier though this can be changed using the Change Supplier / Title option.
The Map Types /Groups/Sub Groups option allows Types, Groups and Sub Groups from the Pricebook to be linked to Product Types, Groups and Sub Groups in Infusion. By doing this a Product created in Infusion from a Pricebook code will be set up with the appropriate Infusion classifications. The Map to Same in Infusion option allows Types, Groups or Sub Groups from a Pricebook to be mapped to the same in Infusion. The first ten letters of each are compared for them to be a match.
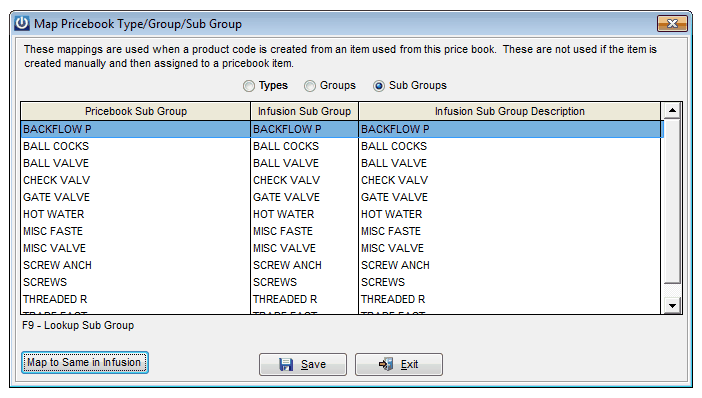
If the Type, Group or Sub Group from the Pricebook does not exist in Infusion it can automatically be created at this point.
Items can be added to the Pricebook using the Add button. Details of items in a Pricebook can be modified by selecting the item then the Modify tab.
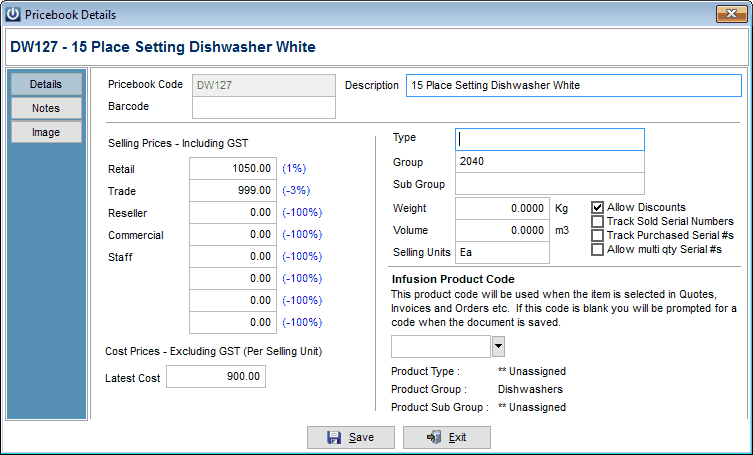
Details Tab
Ideally most of the required data on this screen will have been imported.
The Pricebook item can be linked to an existing Product under the Infusion Product Code section. If this is set, when the Pricebook item is converted to a existing part, rather than creating a new part, an entry will be created in the Supplier section against the existing Product with the Supplier’s Code and Latest Cost. The Latest and Average Costs for the existing product Code are updated when the order is Receipted.
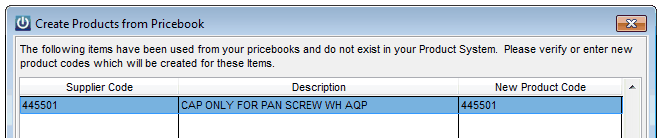
Pricebook items will be converted to a standard Product code when they are:
- On a Quote that is converted to an Invoice.
- On a Quote that has its items assigned to a Job.
- On an Invoice that is Saved or Processed.
- On a Purchase Order that is Ordered.
When these actions are taken the following pop up window will appear requesting confirmation of creating a new product code.
If a Pricebook item has been associated with an existing Product code under the Infusion Product Code section, the existing code will replace the Pricebook code when:
- A Quote is converted to an Invoice.
- An Invoice is Saved or Processed.
- Items on a Quote are assigned to a Job.
- A Purchase Order is Saved, Ordered or Receipted.
If a Pricebook item is used on a Purchase Order, the Supplier details for the new Product created or the existing Product it was associated with are updated when the Order is Saved, Ordered or Receipted.
The Update Prices option allows the Price of a range of Pricebook items to be updated.
The Update Type, Group and Sub Group options allows updating of the relevant classification of a range of Pricebook Products. (e.g. a range of Pricebook items can have a new Product Type set against them)
The Link to Products option will create a link between Pricebook items and Infusion Products if they have the same Code and are setup with a Supplier (under Products / Supplier for the Product) the Pricebook is set up for (Preferred or not). There is also a tickbox option to create this link if the Supplier link isn't set against the Product.
The Update Products option allows updating of Product Prices and Costs from the Pricebook data. The Product needs to be linked to the Pricebook item for this to be able to happen.
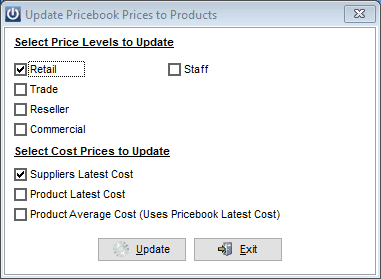
Update Pricebook prices
Allows the Price of a range of Pricebook items to be updated in the same way as the Update Prices option under each Pricebook.
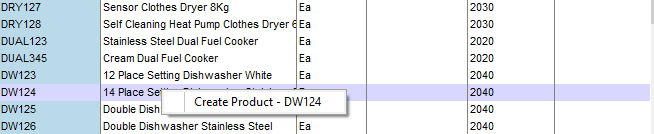
To add a product directly from the Price book to the products file, right click on the price book line and select Create product.
Pricebook reports
Stocktake
For more detailed notes on how to undertake a single user and multi user Stocktake refer to our Stocktake Support Manual under the Support Manuals section of www.infusionsoftware.co.nz.
Enter Stocktake
Allows entry of Stocktake figures.
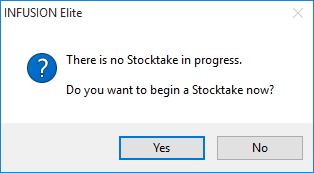
*Note - Only one Stocktake can be run at a time. Each Stocktake can only be for one location. To end a Stocktake select either Cancel or Update from the Stocktake menu.
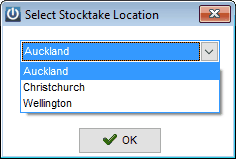
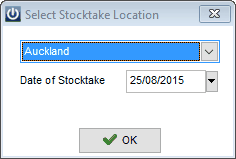
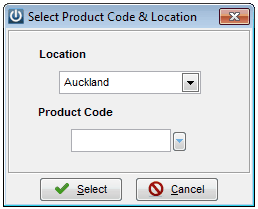
Select the Location and the Date of Stocktake.
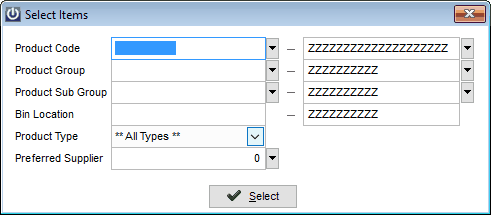
Next select the range of Products to be counted. This can be limited to those with a specific Preferred Supplier.
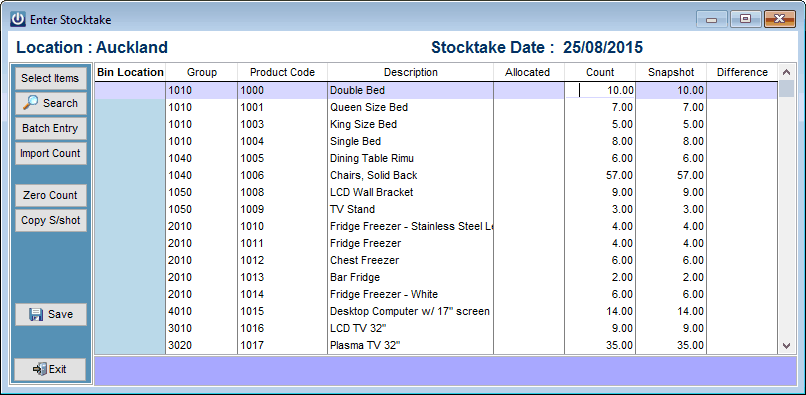
Enter the counted figure of the Product into the Count column.
To limit the displayed items click the Select Items tab. A popup window will allow narrowing of the range shown. Once selected though the range cannot be widened.
Batch Entry allows entry of data through a popup window. This is designed for a data entry type situation.
Import Count allows importing of stocktake figures from a .CSV file. This needs to be called:
- stktake.csv and contain the two columns Code and Qty OR
- stktakeb.csv and contain the two columns Barcode and Qty
Zero Count will zero the count column for all Products.
Copy S/Shot copies the Snapshot column figure into the Count column.
Selecting the Save button will save any entered data allowing for further entry later.
Stocktake Serial Tracked Product
Allows a Stocktake of Serial Number Tracked Products to be performed.
Select the appropriate Location and Product. Enter the Quantity Counted against the associated item.
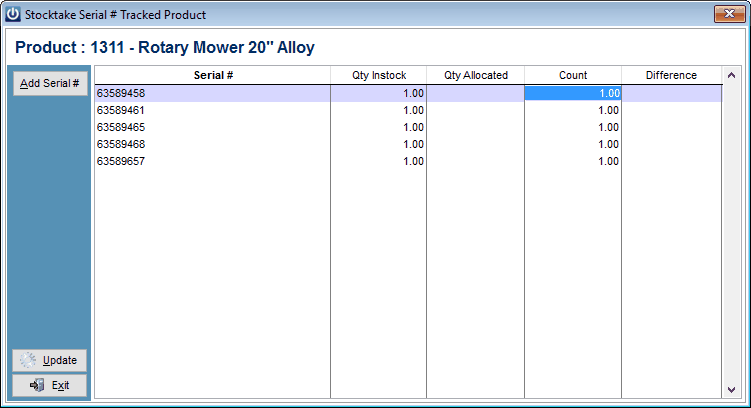
Use the Add Serial # button to add a new Serial Number to the list for the Product.
Cancel Stocktake
Allows the current Stocktake to be cancelled.
Update Stocktake
Allows the Stocktake to be updated. Before updating a Stocktake print off a Variance report to confirm quantities have been entered correctly. After Updating the Stocktake print off a Product Valuation report.
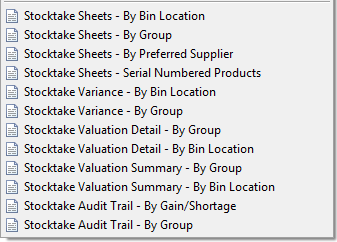
Stocktake Reports
The following Stocktake reports are available:
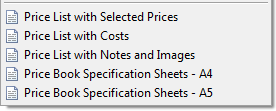
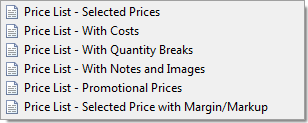
Price Lists
The following Price List reports of Products within Infusion are available:
Reports
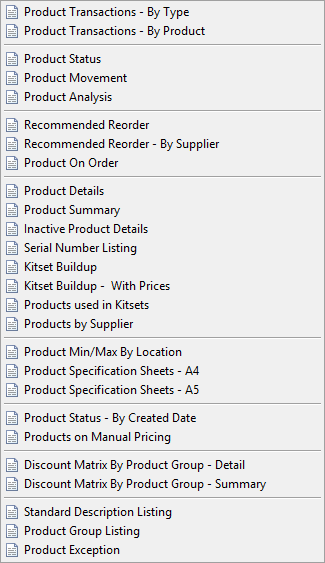
Lists the range of Product Reports available.
Valuations
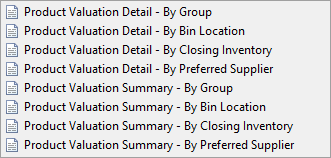
The following Valuation reports are available for Products:
Sales Analysis
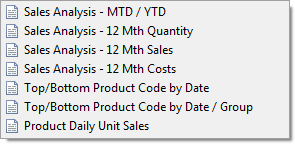
The following Sales Analysis reports are available for Products:
Utilities
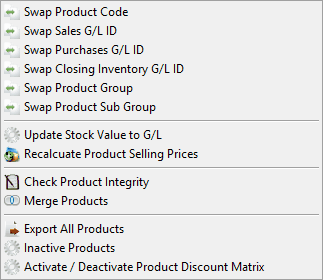
Swap Product Code – Allows the Product Code of an existing Product to be swapped. It will change the Code for all Transactions already created in Infusion. The new Code must not exist in any current Product file.
Swap Sales GL ID – Allows the Sales GL ID for a range of Products to be changed.
Swap Purchases GL ID – Allows the Purchase GL ID for a range of Products to be changed.
Swap Closing Inventory GL ID – Allows the Closing Inventory GL ID for a range of Products to be changed.
Swap Product Groups – Allows the Product Groups for a range of Products to be changed.
Swap Product Sub Groups – Allows the Product Sub Groups for a range of Products to be changed.
Update Stock Value to GL – This process will allow you to update in GL Inventory Value. It will calculate the Current Inventory holdings and values in the General Ledger, then you will be given the opportunity to edit the Inventory items before the General Ledger is updated.
Recalculate Product Selling Prices – Recalculates Selling Prices based on the Markups set under the Product Groups. It will only affect prices where the Markup is active and the Product is set to use Product Group Markups.
Check Product Integrity – Allows checking and re-building of Product balances.
Merge Products - Allows two Products to be merged with the destination code being the one that remains.
Export All Products – Allows exporting a listing of all Products to a CSV file (default name Products).
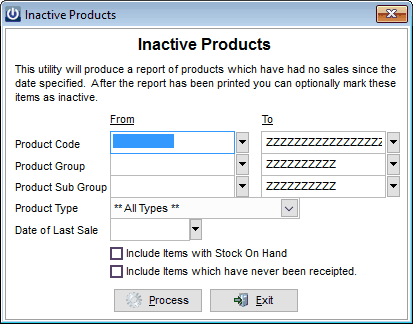
Inactive Products
Allows Products that haven’t sold for some time to be made Inactive. Firstly a report is produced based on the criteria entered in the screen below. Once the report has been run the Products on it can be made Inactive.
Activate / Deactivate Product Discount Matrix
Allows ranges of Products to have the Discount Matrix functionality (set under the Details section) activated or deactivated.
Select the available ranges to specify which Products will be affected. Select the Activate or Deactivate option depending on the action required. Select Process to make the changes.