|
<< Click to Display Table of Contents >> Admin |
  
|
|
<< Click to Display Table of Contents >> Admin |
|
Admin Drop Down Menu
Access the Admin drop down menu from across the top of the screen.

Reindex Files
Allows reindexing of Infusion files. It is recommended that this be carried out on a weekly basis. Always carry out a backup before reindexing. No other users can be logged into Infusion during the reindexing. If another User logs in while the Reindex is being done the data may be corrupted, hence the need to make sure a backup is done beforehand.
Check / Repair Files
This utility is used to repair any corrupt Infusion data files. No other users are allowed to be in the data file while this is being run. A backup of the data file must be created beforehand.
Once run a report will display listing all of the files that were tested and any that needed to be repaired.
Launch Microsoft Calculator
Launches the Microsoft Calculator to help with numerical calculations.
Queued Emails
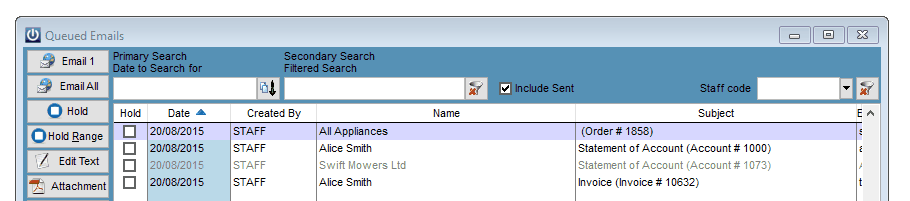
Displays a list of all emails queued to be sent. Emails can be sent individually (Email 1) or all at once (Email All). A set quantity of emails (e.g. 50) can be sent at one time by selecting the Email a set Qty button.
The recipients email address and text accompanying the email can be modified by selecting the Edit Text button. Email attachments can be previewed by selecting the Attachment button. Emails can be deleted individually (Delete 1) or all at once (Delete All). An audit report of sent emails can also be printed from the Audit Report option. The Purge Sent option allows the records of sent data prior to a selected date to be purged. Reducing the size of the sent emails list can speed up the sending of emails.
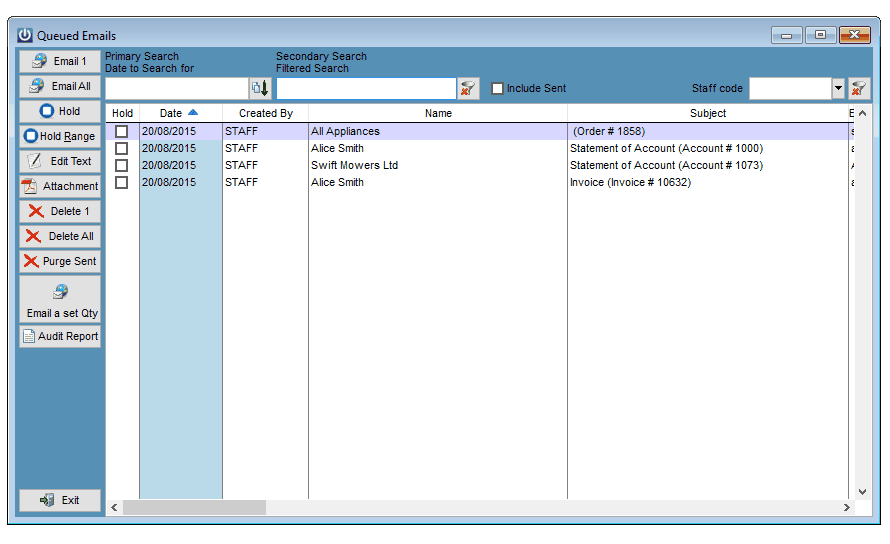
The Email 1 will send the highlighted email only.
The Email All Option will send all emails that are not on hold.
The Hold option will place the selected invoice on hold, indicated by placing a tick in the tick box.
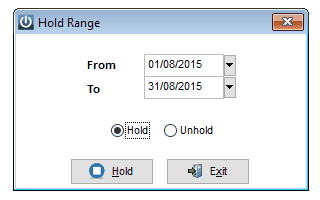
The Hold Range option will allow a date range of queued emails to be placed On Hold or taken off Hold.
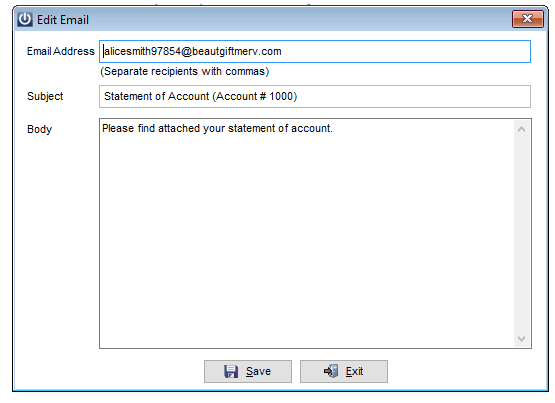
The Edit Text option will allow you to change the subject Line, amend the email address or update the message to be included in the body of the email.
Selecting the Attachment option will allow you to view the PDF File being sent.
The Delete 1 and Delete All options will allow you to delete emails that are not required to be sent.
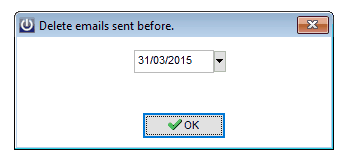
The Purge Sent will remove log entries up to and including the specified date.
The Email Set Qty will enable you to send a set number of emails, this will be useful if there is a large quantity to send.

The Audit Report will provide you with a list of emails sent, the recipients, the subject and the date and time, Note this report does not include emails which may have bounced back due to an issue with the address.
Email searching allows for primary and filtered searching on the emails to be sent.
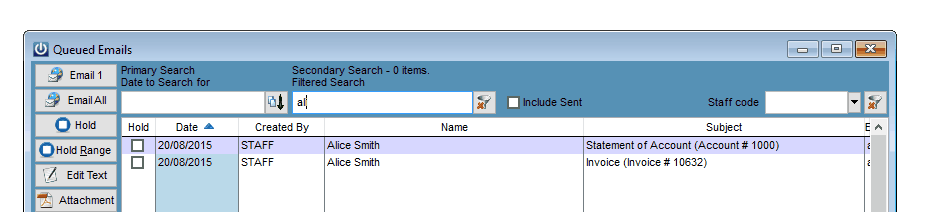
Selecting the Include Sent will display emails that have been sent in a light grey. If required these can be resent by highlighting and selecting Email 1.
The top right hand side of this screen allows you to filter on emails created by a select Staff member.
![]()
Manage Email Defaults
Preferences Tab
An Email Server and Default Sending Email Address need to be setup before emails can be sent. Contact your IT support if you are unsure about what server address to use.
All email will be sent to the email queue where it is ultimately sent from.
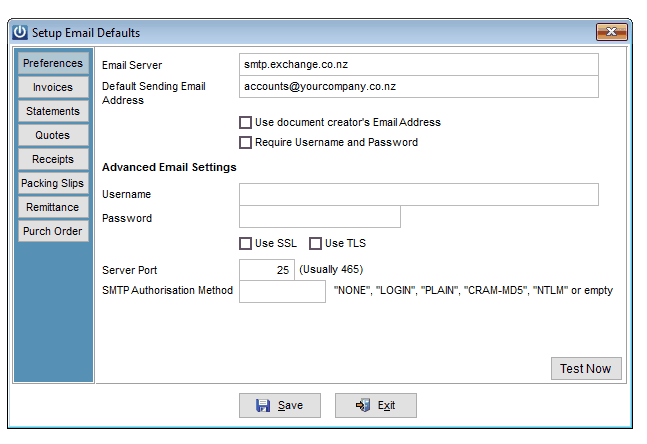
The Use Document Creator’s Email Address option allows email to be sent using the email address set up under the User’s Staff details rather than the Default Sending Email Address.
Enter a Username and Password if your email account requires this. Additionally if your email account requires SMTP Authentication select the SSL option and enter the required Server Port.
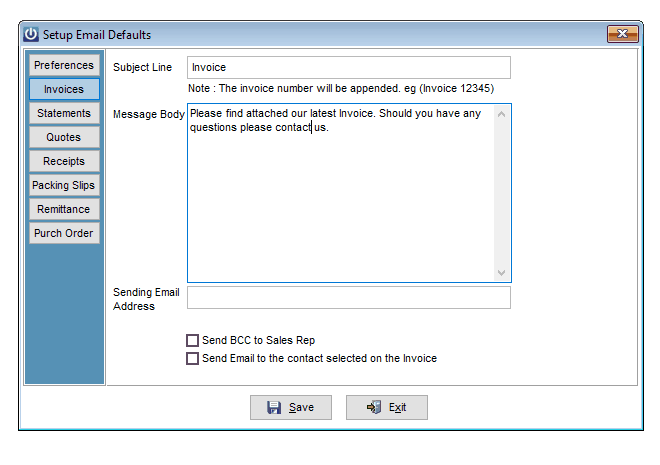
Invoices/ Statements/Quotes/Receipts/Remittance/Purchase Order Tabs
These allow for the setting up of standard Subject Line and Message Body text along with Sending Email Address for each of the various email outputs produced.
Other options are available to:
Use Sales Rep’s Email Address - On Invoices, Quotes and Packing Slips use the email address of the Sales Rep entered against each document as the sending email address.
Send BCC to Sales Rep - On Invoices, Quotes and Packing Slips sends a blind email copy of the document to the Sales Rep’s email address.
Send Email to the contact selected on the document - On Invoices, Quotes and Packing Slips allows the recipient of the email to be that specified in the Contact details of the document (as opposed to that set under the Customer’s Email Links details). Contacts with an email address loaded have (email) added to the end of their name in the dropdown lists on Invoices and Quotes.
Use Orderer’s Email Address - On Purchase Orders allows use of the email address of the Staff member ordering the goods (entered in the Ordered By field) as the sending email address.
Send BCC copy to Orderer - On Purchase Orders sends a blind copy of the Order to the email address of the Staff member ordering the goods (entered in the Ordered By field).
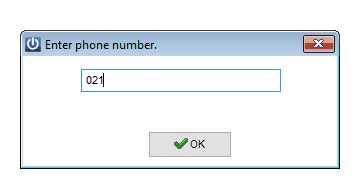
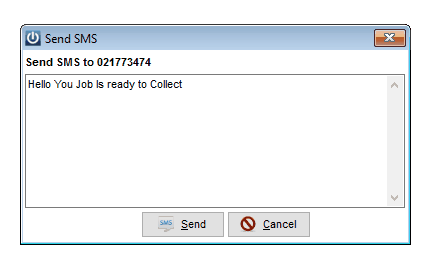
Send SMS
Allows sending of an SMS to a mobile number entered by the user.
Custom Reports
Lists all available custom reports. All custom reports can be run from here.
Manage Custom Reports
Allows editing of certain aspects of the Custom reports. This will usually be done by the Infusion software Certified Partner. The main feature to note is changing of the Access Required. This can be done by Editing the report then selecting the new required Access Level. The level of access is set in Admin / Manage Menu Groups and Manage Staff / Login.
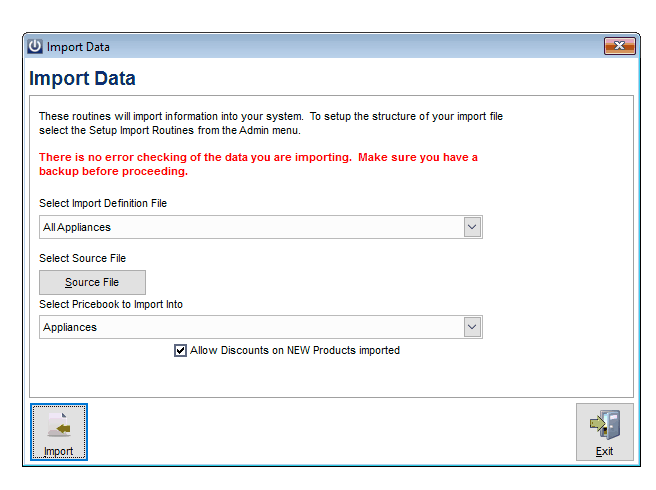
Import Data
Allows importing of data into Infusion software. The definition files are set up in Manage Import Routine section. Select the required Import Definition File and Source File. If Products are being imported select the Supplier. If a Pricebook is being imported select the Pricebook to import into. Finally select Import. There is no error checking of the data being imported so make sure you have a current backup of your data beforehand. The file/pathname of the source data must not contain an apostrophe (‘).
Manage Custom Utilities
Allows editing of certain aspects of the Custom utilities. This will usually be done by the Infusion software Certified Partner. The main feature to note is changing of the Access Required. This can be done by Editing the utility then selecting the new required Access Level. The level of access is set in Admin / Manage Menu Groups and Admin / Manage Passwords.
Import Customer Invoices
This routine will import Pending Customer Invoices from a CSV file. The file structure specifications are available on request from Infusion Software Limited. There is no error checking of the data being imported so make sure you have a current backup of your data beforehand.
Manage Import Routines
Allows Setup and Editing of Import Routines. To create an Import Routine select **Create New Routine** then select the Data Type to import. Give the Import Routine a Title and if it is not a Transaction Import then the Available Fields will have to be matched up to the fields in the import file. Double click on a field in the Available Fields box to move it over to the Fields in your import file box. If there is a column in the file not required use the IGNORE option form the Available fields to skip this. Select the format of the file being imported – either Comma Delimited, Fixed Width, Tab Delimited or OPEA (Outdoor Power Equipment Association standard file format). Once this is done select the Check & Save button. Fields with a “*” are always required.
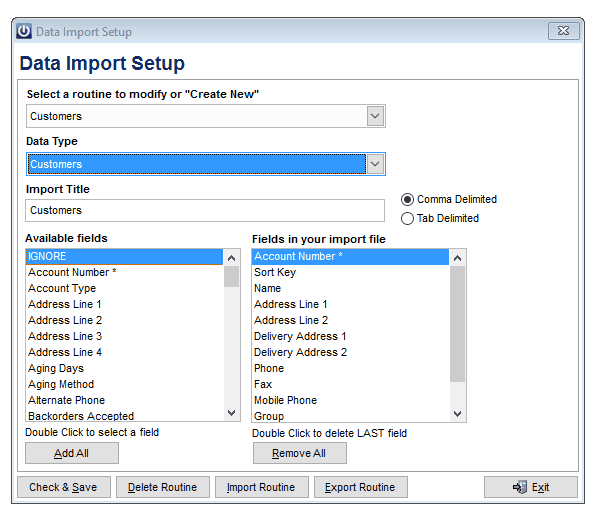
Contact support or your Infusion Software Certified Partner if you wish to know the structure of the file required to import transactions.
The Delete Routine button deletes a selected routine while the Import Routine and Export Routine buttons allow importing and exporting of import routine files (*.IID).
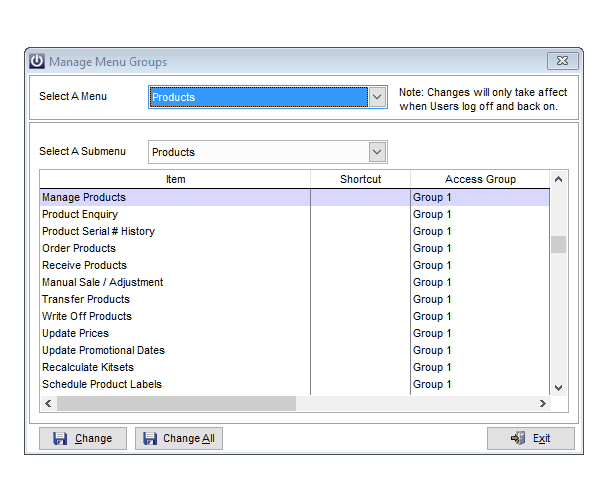
Manage Menu Groups
Allows restriction of access to certain areas of Infusion software. Selecting a menu and submenu will bring up items within a section. The Change button allows editing of the Access Group and Shortcut for an item. The Change All button allows changing of the Access Group for all items in the menu. By setting up Staff access levels under Manage Staff / Login, access to selected areas and functionality on Infusion can be restricted. The Shortcut Key combination for this module is set here as well. As an example, to set up Ctrl A as a Shortcut simply type in A in the setup. After logging off and on again, the selected menu Shortcut will be active. Press both the Ctrl and A keys at the same time to activate the menu item.
Other
Restore Backup
Allows restoration of Infusion software files from a backup. Select Restore, the data to be restored then the backup ZIP file. If a backup from an earlier version of Infusion is used then when logging back in to Infusion the database structure may need updating. This will happen automatically. Once complete log back into Infusion.
Purge Data
Deletes the selected data.
Who's logged On
Shows which users ("As" column) are logged in to Infusion and from what Windows login (Logged On) they have done this from.
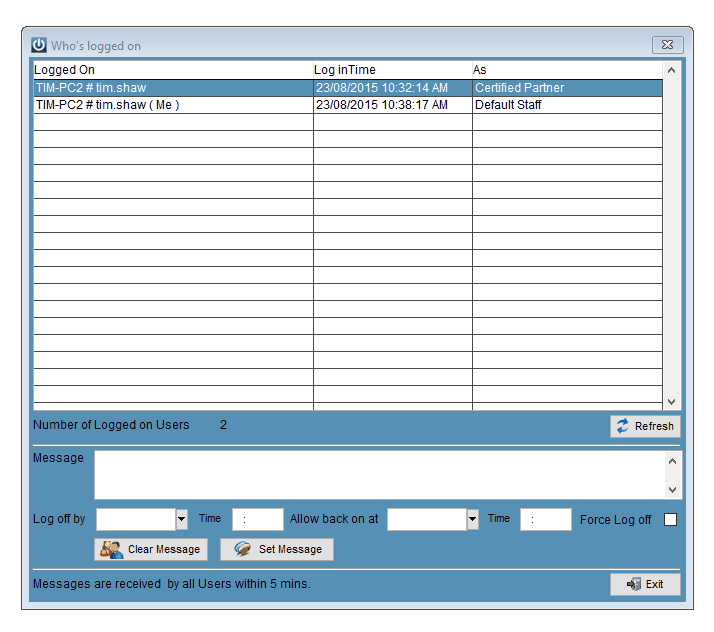
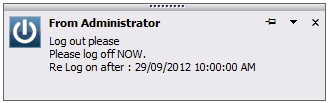
A message can be sent to all users from here by typing into the Message box then selecting Set Message. When a message is sent the date and time of this will display to the right of the Set Message button. Infusion users will see a message like the following displaying at the bottom right of their screen.
Selecting the Force Log off option logs users out at the Log off by time. If they are in the middle of processing a transaction (e.g. have the Invoice screen open) the system will not log them out.
View Audit Trail
Shows the system audit trail including when System Defaults were changed, Stocktake was updated, when a Backup was created, when the version of the software was upgraded, error logs etc.
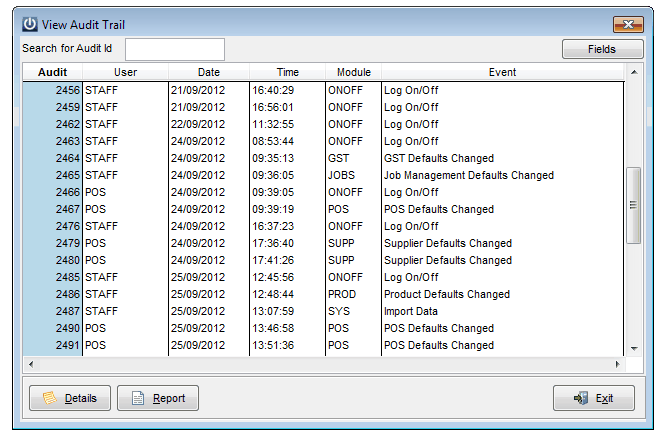
The User logged in at the time is also recorded. Selecting the Details tab while a line is highlighted will display more detail about the entry. The Report option allows printing of a range of events from the Audit log.
Reset Email Links
This option will turn OFF e-mail links for each of the documents detailed within this selection.

Enter License Information
Allows licensing of Infusion software. The Terms and Conditions must be agreed to proceed any further. If you want to use Infusion software you must agree to the license agreement. To License the software, type in company details in the spaces provided then print a License form. Fax this to Infusion Software Limited on 03 962 7022. A License key and System ID will be faxed back. Enter this into the respective fields then select the Save button. Re-installing Infusion software will require re-licensing it. If the software is on a network then only one PC needs to be licensed.

Create New Company
Allows creation of a new company. The new company will be visible / accessible from the login splash screen.
Delete Company
Allows deletion of an existing company. This cannot be the company currently logged into nor the first company in the list as it is the Main company.
Enter Conversion Date
Allows for GL account balances from an old system to be entered including Income and Expense remembering that Debits are positive and Credits are negative.
Enter Opening Year Balances
Balances Allows for alteration of any Year Opening Balances (Asset – Liability - Shareholders Equity only) remembering that Debits are positive and Credits are negative. The transaction will be made on the last day of the year prior.
Retrospectively Activate Loyalty Scheme
Allows to retrospectively activate the Loyalty Scheme as of a selected date. This is used when setting up the Loyalty Scheme. Make a backup before carrying this out.
System Reports
System Configuration Report
Displays a detailed listing of how Infusion has been configured.
System Verification Report
Displays a summary of Financial and system data for this installation of Infusion software. If any of the data does not balance or there are variances in the bank accounts contact your Certified Partner or Infusion Business Software Limited.
Financial Audit Check
Runs a report showing all transaction that do not balance. For data integrity this report should be run on a regular basis. If there are any issues or assistance is needed with the report please contact your Certified Partner or Infusion Software Limited.
Print SMS Audit Log
Allows printing of a report showing allow SMS / Text messages sent over the specified date range.
Non Invoice Transactions To Sales Accounts
This report displays all transactions that have been posted to Sales / Income GL IDs (e.g. Cashbook Receipt) but that have not gone through a Customer Invoice. This report can help identify reasons for differences in Customer Sales Analysis and P&L (Income accounts) differences.
Check For Partially posted Customer Invoices
This report will provide you with a list of any invoices which may have not been fully posted due to a network or system failure.
Deleting
Allows deletion of the following items.

Select the item to delete.
Enter the ID or click on the arrow to bring up the look up window. Select the required ID then OK.
Customers, Suppliers, GL and Fixed Assets with a current balance cannot be deleted. Products cannot be deleted if there is quantity on hand. Jobs must be marked as completed first before they can be deleted.
Pending Customer Invoices, Quotes, Supplier Purchase Orders, Supplier Invoices and Pending Hires need to be deleted from the respective Pending Screens. They are listed here so that when User Access Levels are set, this can be separated out. If a user does not have rights to view the deleting menu, the delete button will be greyed out on the respective Pending screen.
Use the delete Customer Payment option to remove a Payment from a Customer’s account. Payments available to be deleted will be those that have not been processed any further than just Receiving the Payment.
Selecting the Supplier payment will remove the payment and make the invoices.
Settings
Customers
Manage Customer Types
Setup of Customer Types. These are used in setting up Customer details and help with categorising and reporting. Customer Types can be deleted from here.
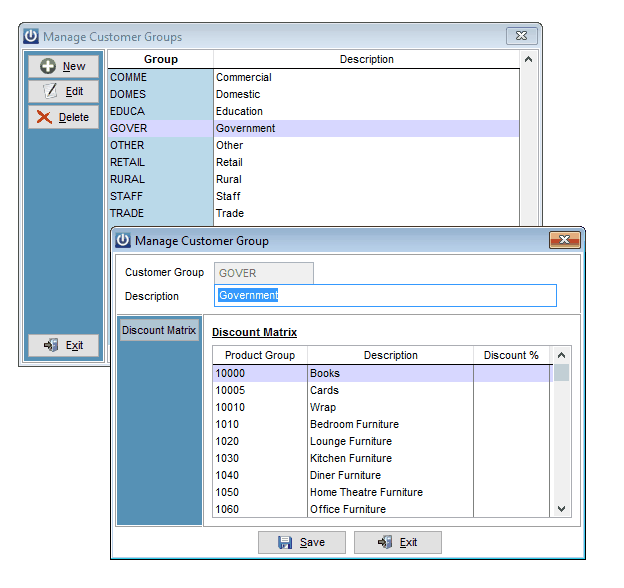
Manage Customer Groups
Setup of Customer Groups. These are used in setting up Customer details and help with categorising and reporting. Customer Groups can be deleted from here. The Discount matrix between Product and Customer Groups can be set here (also accessed through Manage Product Groups).
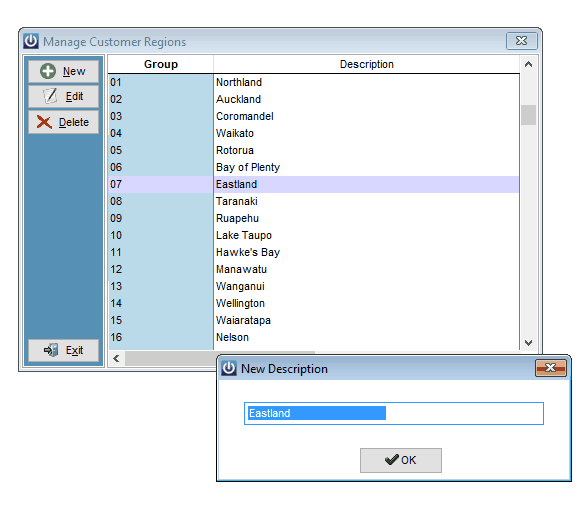
Manage Customer Regions
Customer regions can be set up to assist with analysing customer sales and reporting.
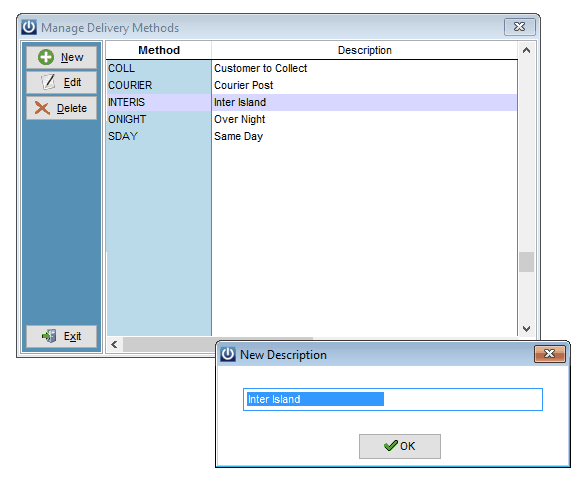
Manage Delivery Methods
Setup of Delivery Methods. These are used in Quotes and Invoices as the method to be used for delivery. Delivery Methods can be deleted from here.
Manage Marketing Types
Setup of Marketing Types. These are used as records of how the Customer found out about your business. This information is useful in setting how best to direct future marketing to attract more Customers. Marketing Types can be deleted from here.

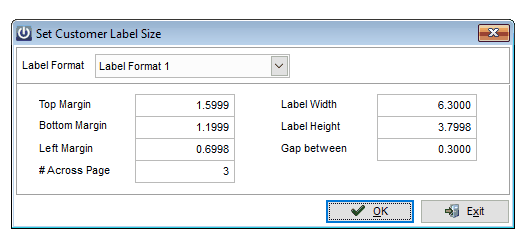
Manage Customer Label Size
Allows setup of Customer Label sizes and layouts including fields displayed. There are five standard layouts available. The size of the label can also be modified from the Help / Report/Label Editor menu.
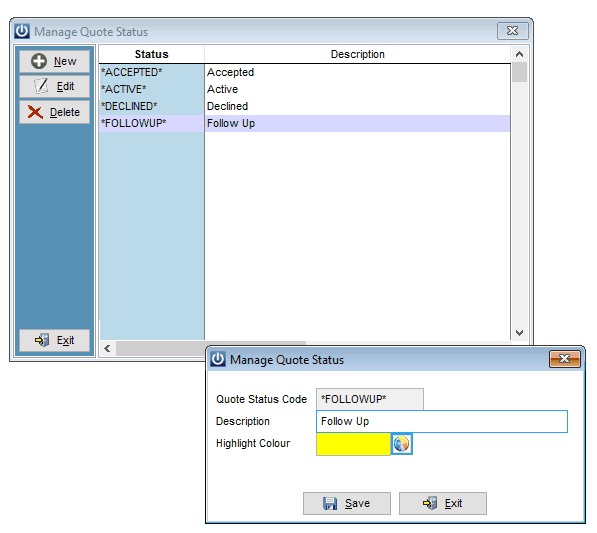
Manage Quote Status
The User set the Status of a Quotation, additional Quote Statuses may be set up with an associated colour type.
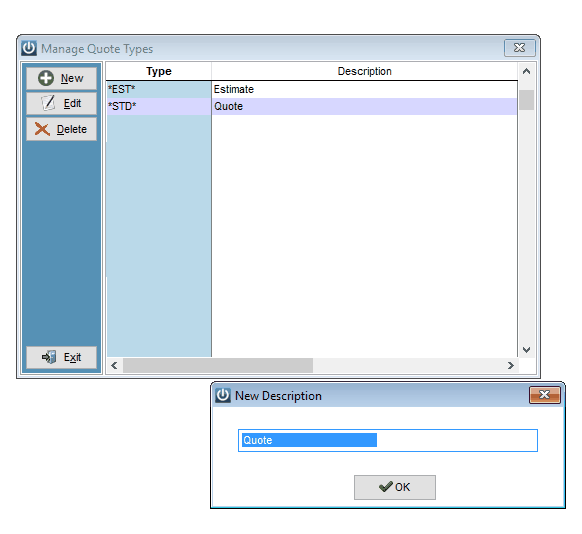
Manage Quote Types
Additional Quote Types may be added to the standard Quote and Estimate.
Status options
Suppliers
Manage Supplier Groups
Setup of Supplier Groups. These are used in setting up Supplier details and help with categorising and reporting. Groups can be deleted from here.
Manage Supplier Types
Setup of Supplier Types. These are used in setting up Supplier details and help with categorising and reporting. Types can be deleted from here.
Manage Supplier Label Size
Allows setup of Supplier Label sizes and layouts including fields displayed. There are five standard layouts available. The size of the label can also be modified from the Help / Report/Label Editor menu.
Products
Manage Locations
Setup of Locations for Products including the GL IDs associated with Sales, Purchases and Closing Stock.
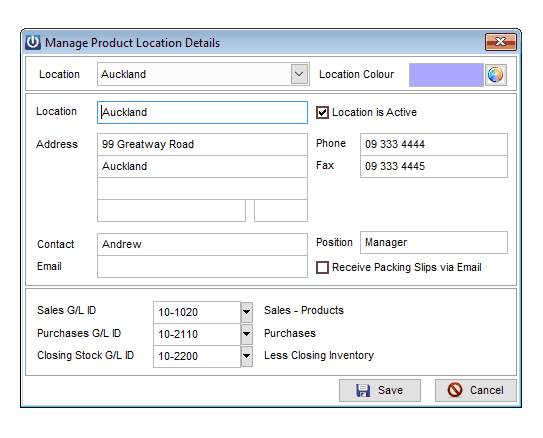
To add a new Location select from the location dropdown box one of the **Unassigned** entries. Fill in the Location name and address details along with GL ID link fields if required. To make the Location Active and show up in Product enquiries select the Location is Active option.
A colour can be set against the Location. By doing this the bottom section of Invoice, Quote and Job screens will display in the selected colour making it easier for the end user to identify where they are processing a transaction from.
When selected, the Receive Packing Slips via Email option allows a Packing Slip generated from a Customer Invoice to be sent to the email address setup for the Location.
Select Save to save the details and settings then Cancel to exit the screen.
The standard system is setup to allow for ten locations though 98 can be handled. Contact your Infusion software Certified Partner or Support to increase the number of available locations.
Manage Product Types
Setup of Product Types. These can be used to allow for more accurate and detailed reporting.
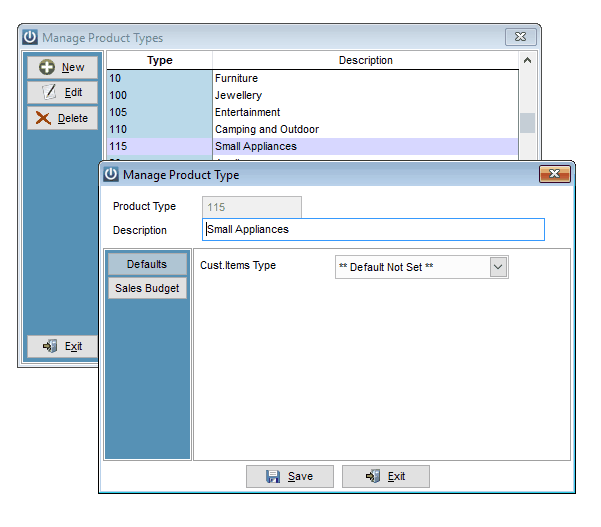
A default Customer Item Type can be set against the Product Type.
Sales Budgets
Sales Budgets may also be set up against the product Type to record and report on.

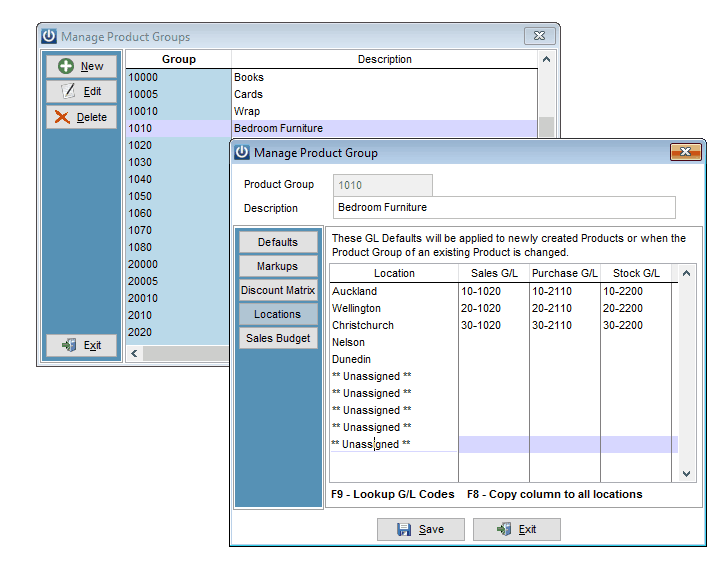
Manage Product Groups
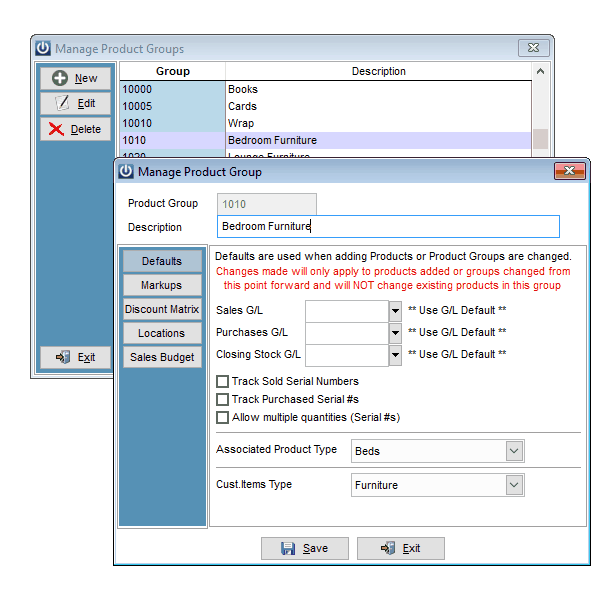
Manage Product Groups
Setup of Product Groups.
Select Add to add a new Group.
The Defaults tab allows Default Sales, Purchases and Closing Stock GL codes to be specified for when new Products are added or Product Groups against a Product are set or changed. The level of Serial Tracking of Products in the Group can also be set.
An Associated Product Type can be set can be set against the Product Group. By selecting an option here, when a Product is set to this Product Type only Product Groups set up against it will display under the Product Group dropdown box in the Modify Product screen.
A default Customer Item type can be set against the Product Group. This will be used if a Product is **Default Item Type** set in its Items Type field (Product Details screen).
Under the Markups section enter in the Mark up Percentages for each Price Group setup under Manage Product Defaults / Price Groups. The Active box must be ticked to make them active within the software.
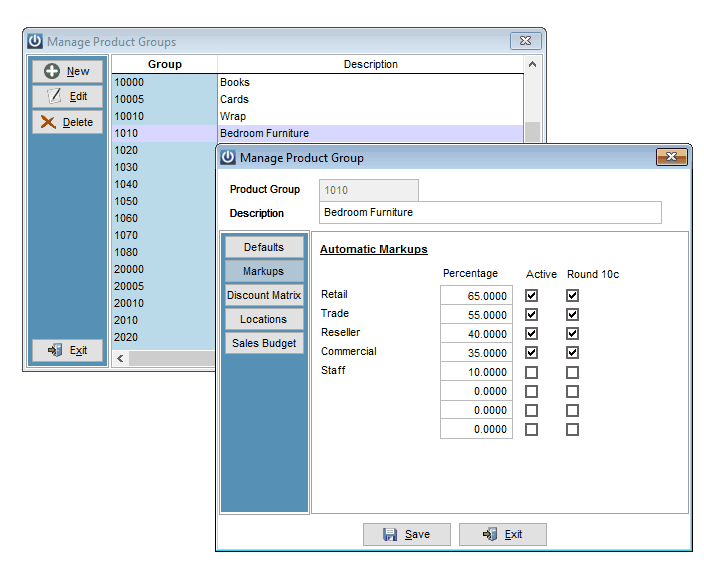
When changes are made to these figures, the Recalculate Product Selling Prices utility under Products / Utilities will need to be run.
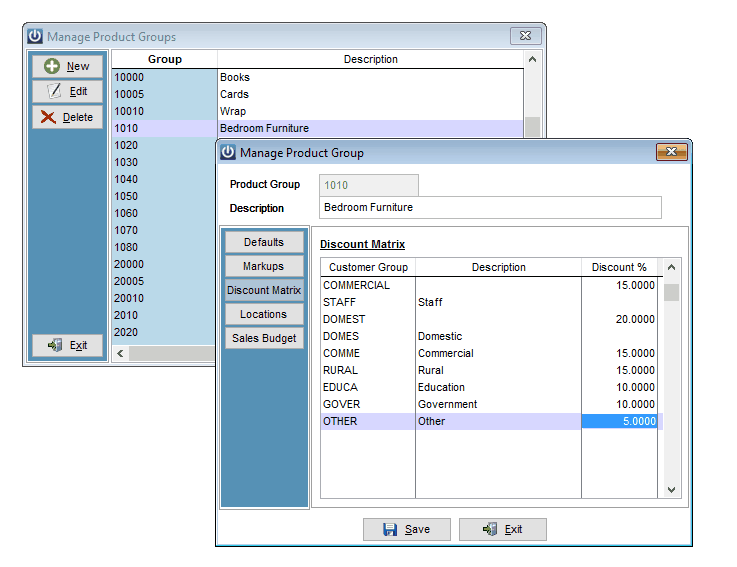
The Discount Matrix between Product and Customer Groups can be set here (also accessed through Manager Customer Groups).
The Locations section allows default Sales, Purchase and Stock GL IDs to be set per Location for the Product Group.
The Sales Budgets allows budgets to be set up and reported on the associated Product Group.

Manage Product Sub Groups
Setup of Product Sub Groups.
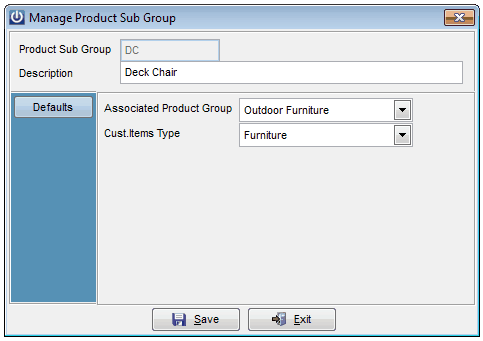
A Subgroup can be associated with all groups (by selecting **ALL Groups**) or a specific Group from the dropdown list. The Product entry screen checks the validity of the Sub Group when you leave the Group or Sub Group field. The Sub Group lookup in the Product entry screen only shows those which are valid for / associated with the Group the Product is setup against. The Swap Product Group utility will remove any invalid Sub Groups and report these on the exception report. Swap Sub Group only shows valid Sub Groups to swap to.
If the Associated Product Group selection is changed for the Sub Group there will a warning that there are Products which are assigned to this Sub Group but NOT assigned to the associated Group. Proceeding with the change will remove the Sub Group from these Products.
A default Customer Item type can be set against the Product Sub Group.
Manage Product Compatibilities
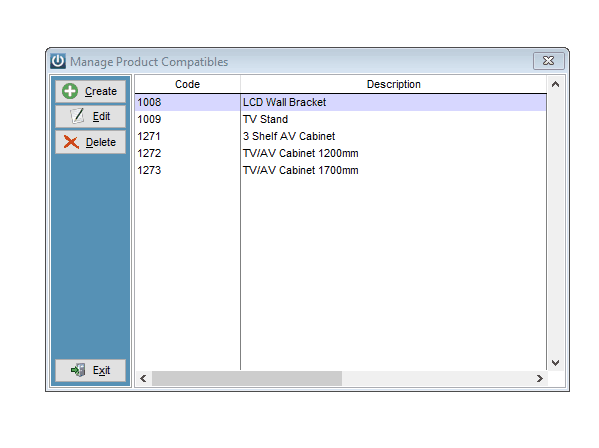
A list of compatible models may be set up and selected from at the time of creating or modifying an existing product code.
Manage Additional Price Levels
Allows creation of additional Price Levels. Once these are setup, prices can be added in the Products entry screen on the Pricing tab – Manage Additional Price Levels.
Manage Barcode Label Size
Allows setup of Barcode Label sizes and layouts including fields displayed. There are six standard layouts available. The size of the label can also be modified from the Help / Report/Label Editor menu.
Manage OPEA Providers
Before an OPEA format Pricebook can be imported, the discount structure for it must first be set up.
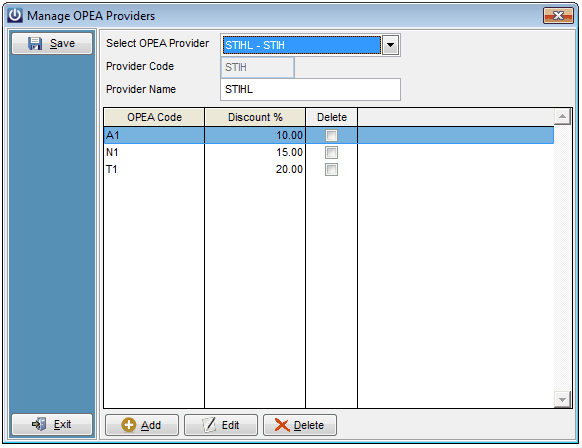
To set up a new OPEA provider select from the dropdown menu **New Provider**.
Enter the Provider Code supplied (this should be in the first column of the OPEA file) by the Supplier along with a Provider Name.
Enter the discount structure information supplied by the Provider by selecting the Add button then entering a discount code and corresponding percentage.
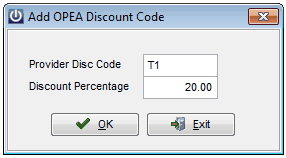
Once all Codes and discounts have been entered select Save.
To delete a Code, highlight it, select Delete (the Delete tickbox will be selected) then Save.
GL Cashbook
Manage Banking Groups
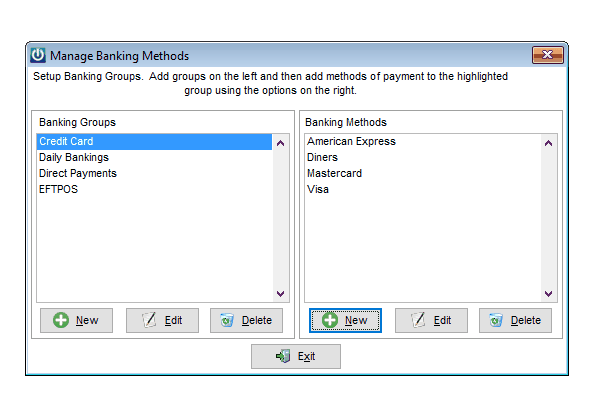
Infusion software offers the ability to setup an unlimited number of Banking Methods and Groups. Each Method may be assigned to a different Group. If DPS integrated EFTPOS is set up, when creating a new Method the following pop up will appear.
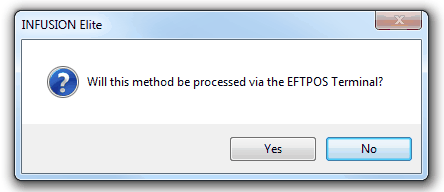
Selecting Yes will mean that when this method of payment is used for a POS sale the DPS EFTPOS software will display and step through its processes.
Manage Budget Types
Setup of Additional Financial Budget Types. Only the Code and Description are entered here. Once a new Budget has been created it can be set under Financials / Manage Budgets. Note *DEFAULT* is setup by default. This Budget Type cannot be deleted from the setup screen.
Job Management
Manage Job Departments
Allows setup of Departments to be used in Jobs. A default Sales GL code for the Department can be set.
Manage Job Status
Allows setup of Job Status. Active and Completed are loaded by default.

The colour the Status field displays as in the Manage Jobs screen can be set. Select the Change button then choose a colour from the palette for the Job Status. Select Save to save the settings.
To not have Jobs of a particular Status show in the Scheduler select the Exclude from Schedule tick box option.
Manage Job Types
Allows Job Types to be set up and managed.
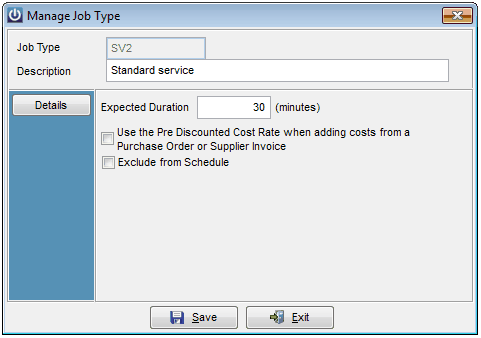
An Expected Duration can be set against the Job Type. This time is used to populate the Duration field in a Job when the Job is set to this Type.
Each Job Type can be set to Use the Pre Discounted Cost Rate when adding costs from a Purchase Order or Supplier Invoice. This setting can be changed per Job from the Invoice tab of the Modify Job screen.
To not have Jobs of a particular Type show in the Scheduler select the Exclude from Schedule tick box option.
Manage Schedule Centres
Allows for setup of Centres used in the Scheduler. Staff can be associated with a Centre and given rights to view a range of these (e.g. just their own) from their Scheduler screen.
Customer Items
Manage Customer Items Types
Setup of Customer Items Types. These are used to categorize types of Customer Items. An Item Type can be defined and up to 40 Custom Fields relating to it of type Text, Date, Number or Logical (True/False) specified.
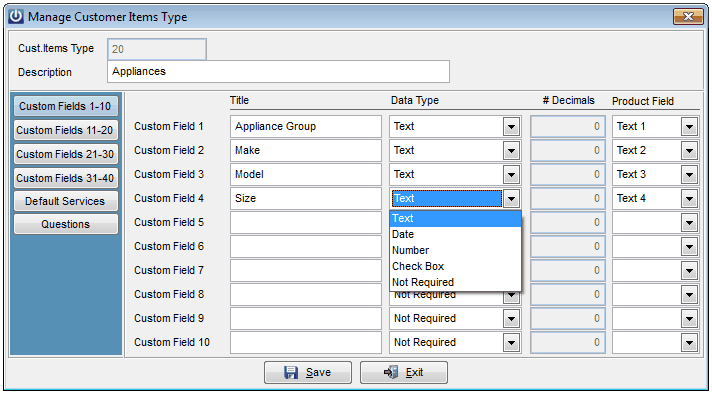
Each Custom Field can be linked to a Custom Field in a Product through the Product Field so when the Customer Item is created these fields will automatically be populated from the Product. Names used in setting up the Product Custom fields will display in the Product Field dropdown list.
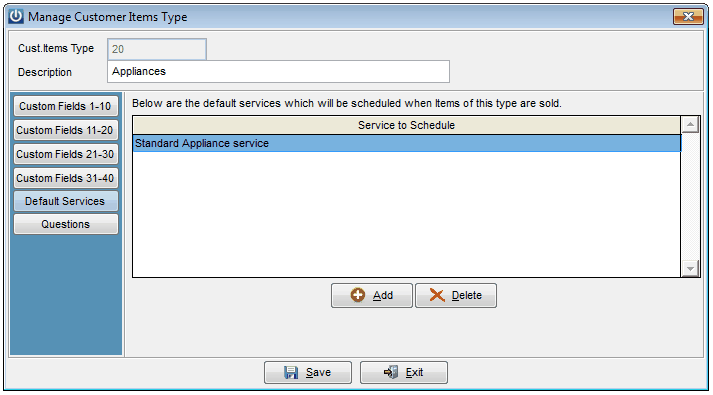
The Default Services section allows setup of Services that will automatically be scheduled against this type of Customer Item when it is sold.
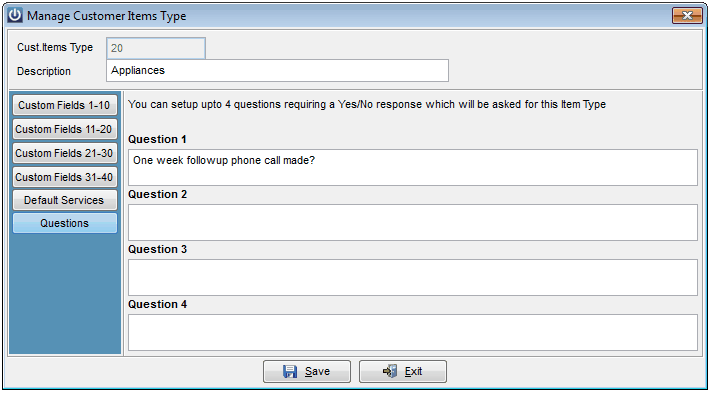
Four Questions can be set up to be asked relating to a Customer Item of this Type. These questions will display in the Details screen of the Customer Item so can be directed towards actions at the time of sale (e.g. "Training given?") or later (e.g. "Has a one week follow up call been made to check there are no issues?"). Responses to these questions need to be Yes or No.
Manage Customer Items Service Types
Setup of Customer Items Service Types. These are used to setup and describe the types of Services Customer Items can have set against them. A frequency for the Service can be set if required. A description field outlining details of the Service can be used.
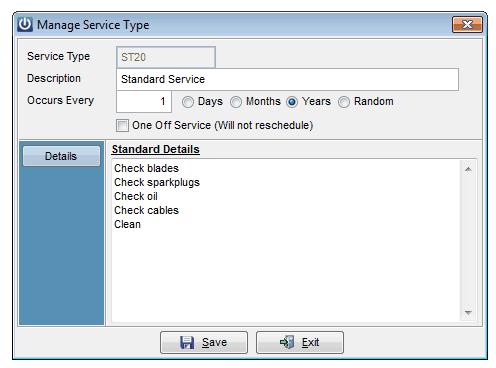
A One Off Service can be created. Once done, it will not reschedule like all other services.
Manage Customer Items Service Status
Setup of Customer Items Service Status Types. These are used to identify the status of a Customer Item Service Type. Note *ACTIVE* and *COMP* are setup by default. These Status Types cannot be deleted from the setup screen.
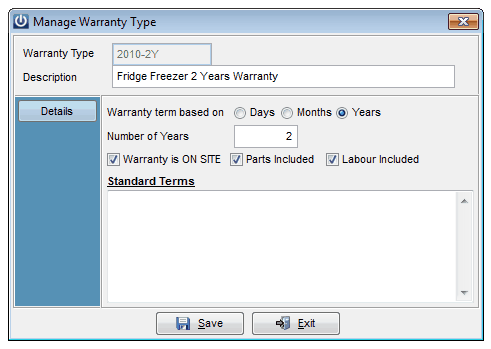
Manage Warranty Types
Setup of Customer Items Warranty Types. These are used to define any Warranties that Customer Items may be under once purchased. The Warranty Term and Details are setup and described here.
Import / Export
Manage Imports
Allows setup of standard import routines. (Requires purchase of the Import/Export additional module).
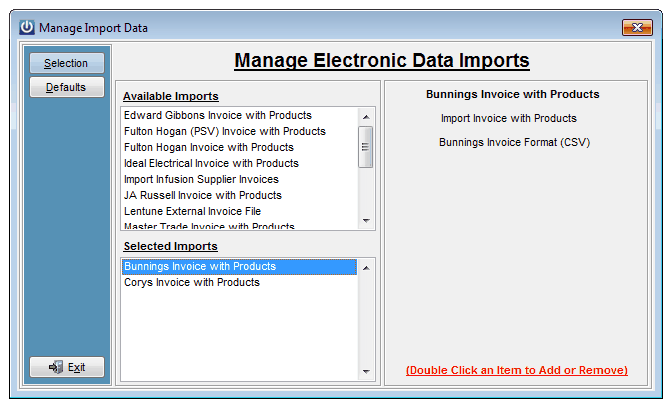
Double click on an Available Imports to move it in to the Selected Imports section. Selected imports will then be available for use from the Import/Export dropdown menu. The Defaults tab allows setup of any defaults relating to the highlighted import routine.
Options under the Defaults tab for Supplier Invoice imports are to Process Purchase Orders to Invoice when Receiving. Having this unchecked will mean the invoice is only processed to the Packing Slip stage so can be edited/checked.
For Job Management orders where no Job Number is entered when creating the order, there is an option to Use Order Number as Job Number.
Having the Don't Search Associated Supplier Pricebooks when Importing option ticked means that either a Product in the Infusion Product list the Supplier Invoice Product is linked to (through the Suppliers tab when setting up a Product) will be used or, if there is no link the MISC code will be used (because it is not).
Having it unticked means when an import is done the routine will firstly check to see if there is a Product - Supplier link as per above and if there is not, look through any Pricebooks for the Supplier and see if there is a match to the Product Code on the import file. If there is and it is linked to a Product in Infusion then the Infusion Product Code will be used.
With the above scenario, if there is no link between the Pricebook / Supplier Invoice Product Code and an Infusion Code, with the Create New Products when Associated Pricebook is present option ticked a new Product will be created in Infusion using the Pricebook/Invoice Product Code and the Pricebook Product settings (e.g. Cost, Pricing, Type, Group, Sub Group). If a Product with this Code already exists then a new one is not created and the MISC Product Code is used on the Invoice.
With the Create New Products when Associated Pricebook is not present option selected a new Infusion Product will be created for the Supplier Invoice Product being imported even if there is no Pricebook for the Supplier of the Product setup. In this scenario, for the setup of the new Product Code the Code, Description and Latest Cost from the Supplier Invoice file will be used along with the Default Sales, Purchase and Closing Stock GL IDs set up in Manage Financial Control Links. Product Type, Group and Sub Group settings will need to be manually set. If a Product with this Code already exists then a new one is not created and the MISC Product Code is used on the Invoice.
Manage Exports
Allows setup of standard Export routines. (Requires purchase of the Import/Export additional module).
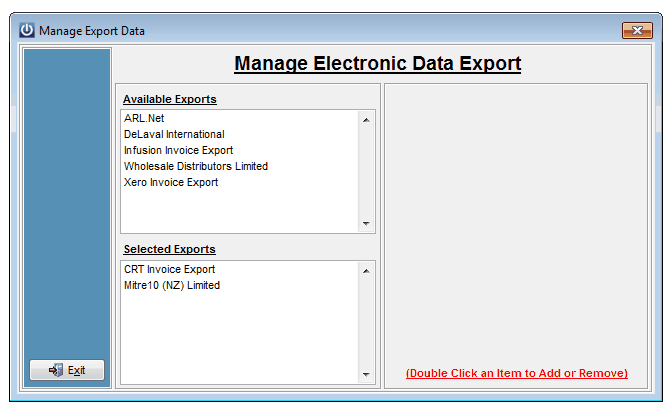
Double click on an Available Exports to move it in to the Selected Exports section. Selected exports will then be available for use from the Import/Export dropdown menu. The Defaults tab allows setup of any defaults relating to the highlighted export routine.
Contact Management
This option will only be available if the software has been licensed for the Contact Management module.
Manage Contact Management Contact Groups
Setup of Contact Groups (e.g. Sales, Credit Management) used in the Contact Management module.
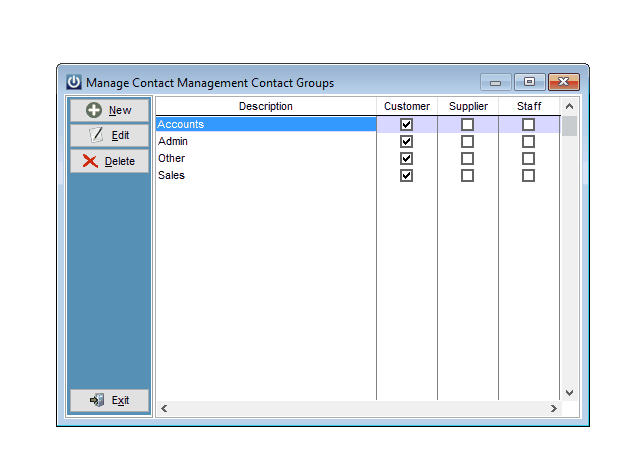
The One Contact management group may be set up, and then the user may select the modules to which it applies.
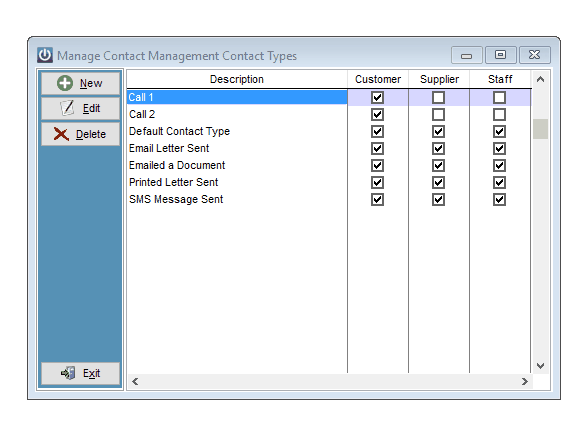
Manage Contact Management Contact Types
Setup of Contact Types (e.g. 1st call 2nd call, Quote Sent) used in the Contact Management module.
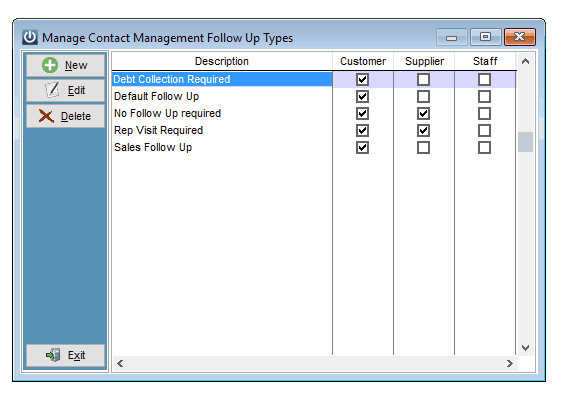
Manage Contact Management Follow Up Types
Setup of Follow Up Types used in the Contact Management module.
Rental / Hire
Manage Rental / Hire Item Types
Rental /Hire Types can have a Default Hire Period set against them. This value will be inherited by the Item if it is set to *Default*.
Thirty custom fields can be set up for each Type with each being able to be set to a Text, Date, Numeric or Check box format.
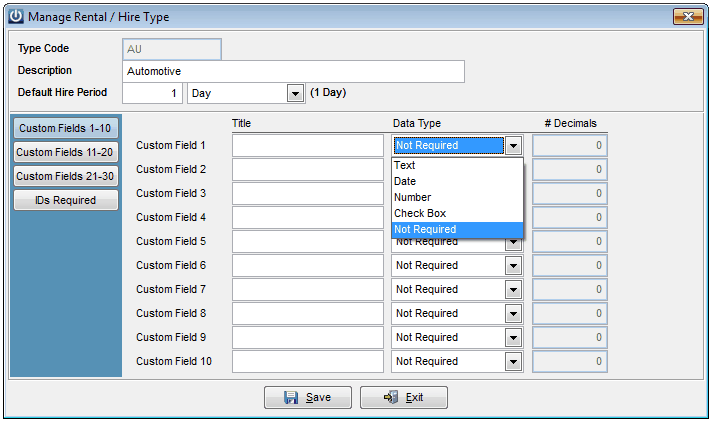
Any IDs that need to be presented when hiring this Rental /Hire Type can be specified in the IDs Required tab.
Manage Rental / Hire Item Groups
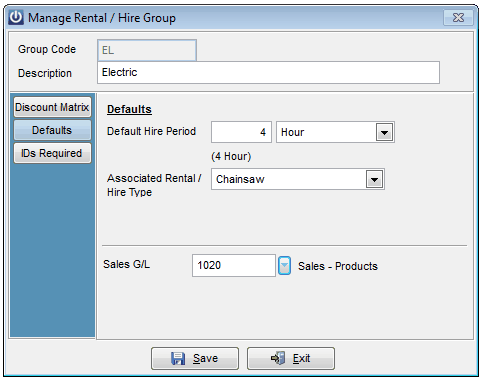
A Default Hire Period can be set against a Rental / Hire Item Group. This value will be inherited by the Item if it is set to *Default*.
Rental Hire Groups can be set to be associated with a Rental Hire Type. Having this association means only those Groups associated with the Type will display in the Group dropdown list in the Rental Item set up screen when the Type is set.
A default Sales GL ID can be set so that all Rental Hire items created in this Group will use this Sales GL ID.
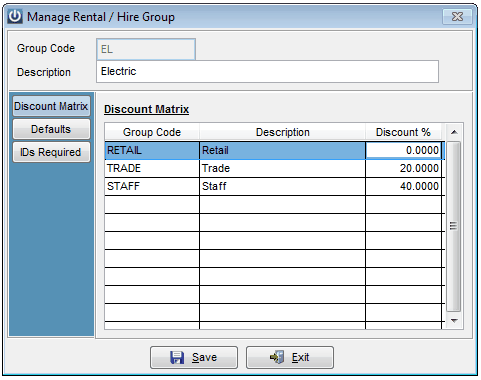
Any IDs that need to be presented when hiring this Rental /Hire Group can be specified in the IDs Required tab.
Manage Rental / Hire Item Sub Groups

A Default Hire Period can be set against a Rental / Hire Item Group. This value will be inherited by the Item if it is set to *Default*.
Rental Hire Groups can be set to be associated with a Rental Hire Group. Having this association means only those Sub Groups Groups associated with the Group will display in the Sub Group dropdown list in the Rental Item set up screen when the Group is set.
Any IDs that need to be presented when hiring this Rental /Hire Sub Group can be specified in the IDs Required tab.
IDs for Types, Groups and Sub Groups are cumulative while the priority for the Default Hire Period is Sub Group, Group then Type.
Manage Rental Hire Statuses
The Rental Hire Status is used to determine the availability of the item for hire.
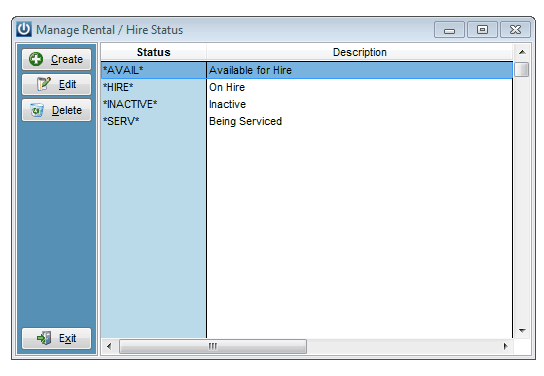
A number of preloaded Status options are available. These can be added to. A colour can be set against each Status. These can be viewed in the Manage Rental / Hire screen.
The Print a Service tracking card when an item is returned with this Status is used when an Rental / Hire item needs to be serviced each time it is returned from hire.
Other
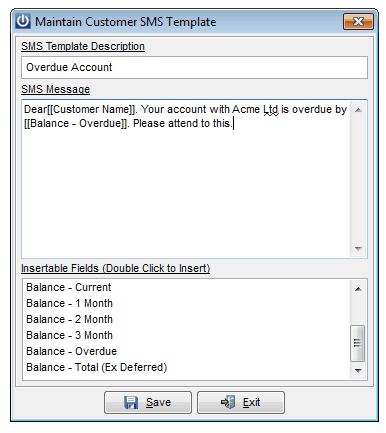
Manage SMS Templates
Allows set up templates used when sending a SMS / Text message through Infusion.
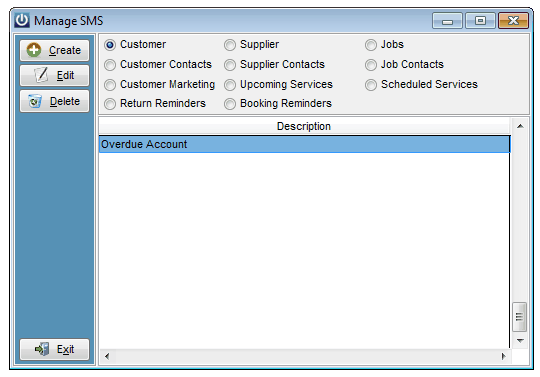
Templates are set up based on the type of information being sent. For example selecting Customer then Create will display a pop up box allowing use of only Customer related information. Enter an SMS Template Description then the message body inserting the relevant account specific information by double clicking on the appropriate entry in the Insert table Fields box. Select Save. The Template will now display (assuming SMS Messaging has been set up under Admin / Defaults / Manage SMS Defaults) as an Insert Message From Template option when sending an SMS message from a Customer account.
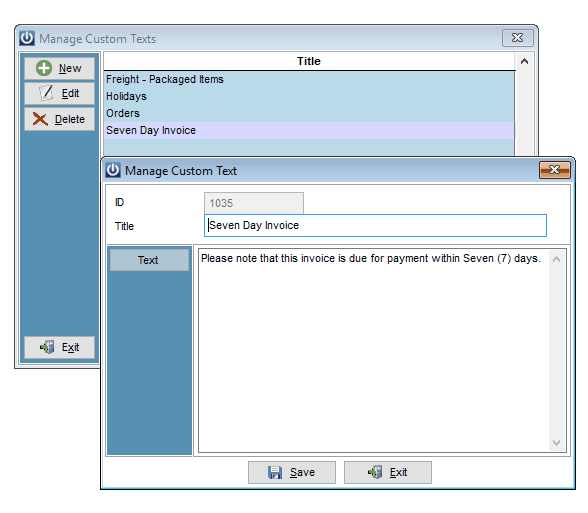
Manage Custom Text
Setup of Standard Descriptions. These can be used in a similar way to Products in that they can be added to Quotes, Invoices, Orders and Notes. They can also be inserted into various Notes fields. They allow standard text (e.g. warranty details) that is being entered regularly to be inserted or pasted into the relevant area by entering F4 when in the Code field then selecting the relevant Standard Description.
Manage ID Types
Forms of Customer ID can be setup.
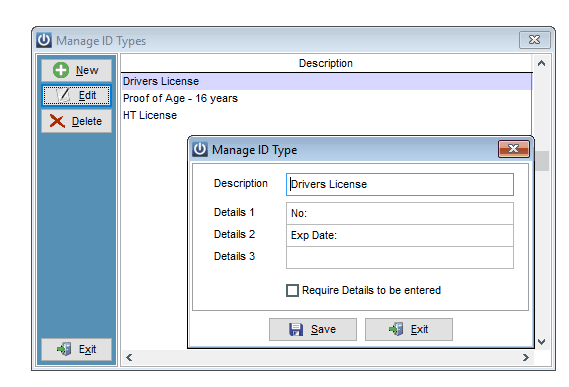
These are used mainly in the Rental / Hire module and when Items are Hired a list of required IDs will display. The data to be entered can be specified by entering titles into the three Details boxes. Select the Require Details to be entered option to ensure information is entered before a Hire can be processed.
Defaults
Manage System Defaults
Preferences Tab
Manage System Defaults
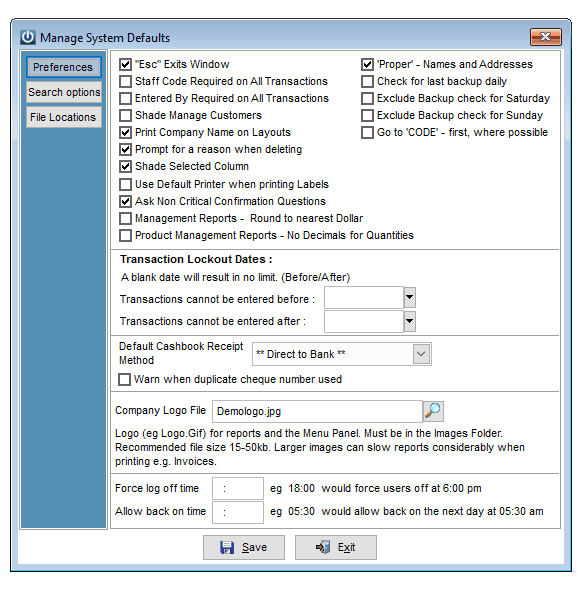
“Esc” Exits Window - allows you to press the Esc key to exit screens. Esc Exits Window.
Staff Code Required on All Transactions - forces the entry of a Staff Code before any transactions can be carried out (e.g Quoted By, Sold By).
Entered By Required on All Transactions - forces the entry of a Staff Code in to the Entered By field before any transactions can be carried out.
Shade Manage Customers - if selected the Manage Customers screen will have a coloured background to help distinguish it from the Suppliers screen. The colour is determined by your Windows Operating System setup.
Print Company Name on Layouts - allows documents set up in Admin / Layouts to have company defaults (from the licence defaults) printed on them Layouts.
Prompt for a reason when deleting - requires a reason to be entered when deleting a Customer, Supplier etc from the Deleting Menu.
Shade Selected Column - will shade the column selected in Customers, Suppliers, Products, Job Management, Fixed Assets or Financials screens.
The system can be set to Use Default Printer when Printing labels
Print Company Name on Layouts
There are a number of pop up questions throughout the software asking the user to confirm their actions before proceeding. The non critical instances of these can be suppressed by not having the Ask Non Critical Confirmation Questions option selected. By default this is selected. A non critical question is defined as one that will not require the restoration of a backup if the wrong option is selected.
Management Reports – Round to Whole dollar - selecting this option will round all dollar values on the cashbook and financial reports to the whole dollar, suitable for sites with larger values Product Management Reports can also be set to remove the decimals from the quantity fields on selected reports.
'Proper' - Names and Addresses - when typing in Customer and Supplier details to the Name, Address and Contact fields text will automatically be formatted with a capital letter at the beginning of each word.
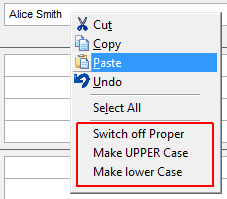
Right clicking on a field displays options available for formatting of the text in it.
Using the Check for Last backup Daily, Exclude Saturday, and Sunday options will force the system to check and see when the last backup was completed. If a backup was not completed on the previous day then the user will be presented with a message at the point of logging in reminding them that a backup has not been completed.
The Go To Code option applies to data entry screens such as the invoice, Quote, and Purchase order, when activated the first field that the cursor starts in will be the product code field rather than the account fields.
Transaction Lockout Date - allows for transactions prior to the first date and after the second date to not be entered into the system.
Default Cashbook Receipt Method - sets the most commonly used receipt method as a default method.
Warn when duplicate cheque number used - displays a warning message if a duplicate cheque number is entered into the system for Cashbook and Supplier payments.
Company Logo File is the logo file that will be used on Invoices, Quotes, Receipts, Statements or Purchase Orders and the Main Menu Panel on the left side of the screen with Infusion and must be in the Images folder of the Infusion install.
Having a Force Log Off time will terminate all open user sessions at this time.
Users can be locked out of the system till the Allow back on time.
Filtered Search Tab
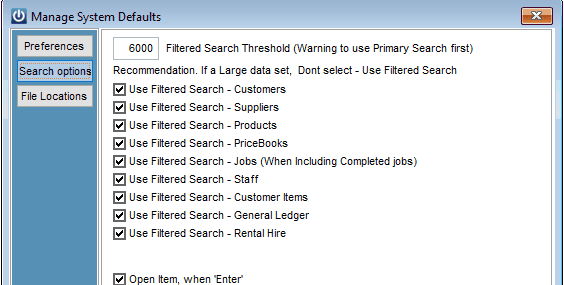
The Filtered Search Threshold value is used as a warning to encourage users to use the Primary search. If a Filtered search is done without the entry of any data into the Primary search field and the number of records in the searched list (e.g. Products) is above the threshold value red text of "Minimal or No Primary Search entered may hinder system speed" will display.
The default search method in the modules where filtered Searching is available can be set for each. If the option is unticked the Primary Search option will be set as the default.
Manage Financial Control Links
Allows setup of default GL IDs for Financial Control Links.
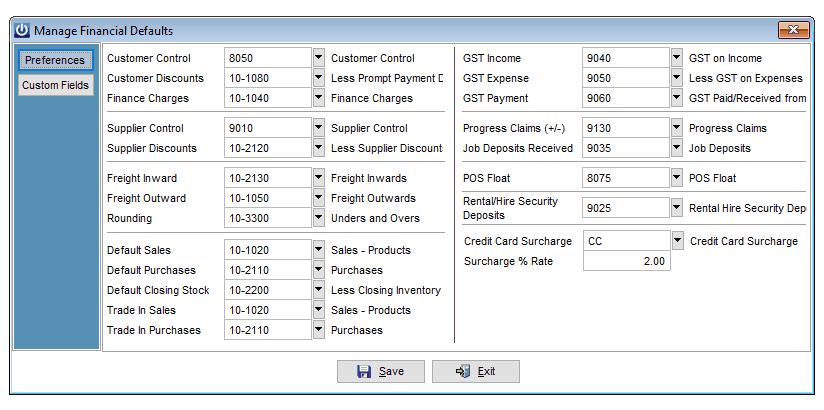
These will be used throughout the system when creating items and processing transactions. *NB: The Progress Claims GL ID must be GST Inclusive.
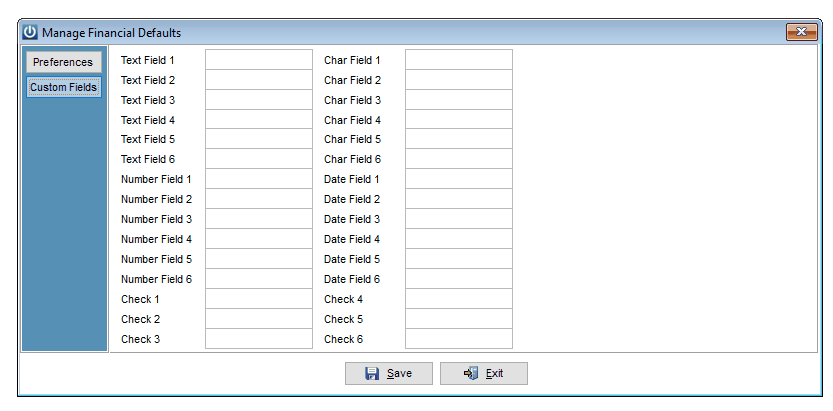
Custom Fields
Manage Staff Defaults
Allows setup of Custom Fields for Staff (six text, three number and three date fields).
Manage GST Defaults

Enter the GST Registration Number of the company along with the method of GST Payment (GST Basis). GST Rates need to also be set. The system has several default GST Rates and offers two additional user defined rates that need to be made Active to be used. The GST Codes are those used in the GST column of transaction screens.
Manage Customer Defaults
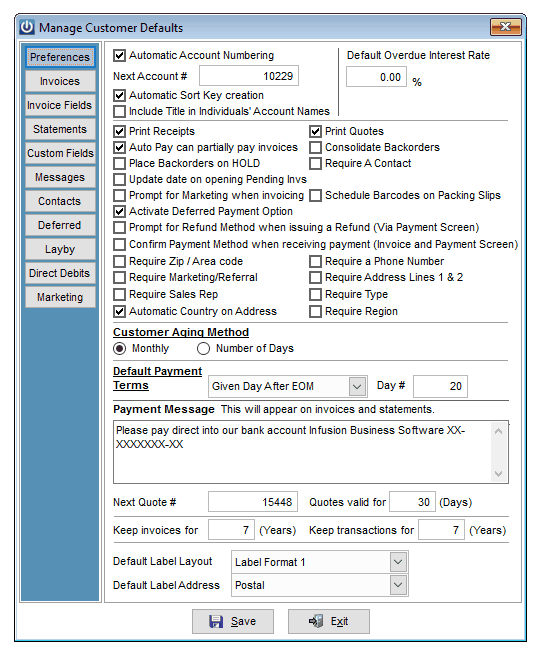
Preferences Tab
If Automatic Account Numbering is ticked, an Account Number will be assigned each time a new Customer is created. The Next Account # is displayed. This can be set to a particular value if account numbering is required to start from a certain number. If this is unticked, a new account number will need to be assigned each time a new Customer is created.
Select the Automatic Sort Key Creation option to have a Customer account Sort Key automatically be created based on the account title details. For the title of a Customer set up as an individual (e.g. Mr) to be included in their name on the Manage Customers screen select the Include Title in Individuals Account Names option.
If ticked, Print Receipts will print a Receipt when payment is received. This is a default setting and can be changed when receiving each payment.
Having Auto Pay can partially pay Invoices, if ticked, will allow Invoices to be partially paid as opposed to leaving the balance amount unallocated.
The Place Backorders on Hold option will place any Backorders on hold when created. This gives better manual control when releasing backorders.
The Update Date on Opening Pending Invoices, if ticked, will refresh the Invoice date to the day Pending Invoice is opened on. Be aware that this will also change the payment due date.
The Prompt for Marketing When Invoicing option, if selected, will display a pop up window allowing for selection of a Marketing Type relating to the Invoice being processed. A prompt is also displayed asking if the Customer is on a Newsletter Mailing List.
Selecting the Activate Deferred Payment option will allow Deferred Payments to be set up. Deferred Payments are available on both standard and POS (except Cash sales account) Invoices.
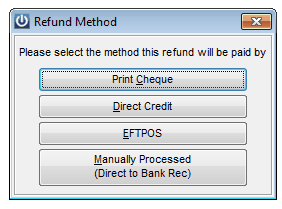
Having the Prompt for Refund Method when issuing a Refund (Via Payment screen) option selected displays a Refund Method box allowing selection of a method by which a refund will be given to a Customer. Using the Direct Credit method will add an entry to the Direct Credit batch.
When Customer payments are being processed a prompt can be set to appear confirming the payment method being used. This is activated by selecting the Confirm Payment Method when receiving payment (Invoice and payment screen) option.
The Require Zip / Area Code will force the user to supplier the Postcode at the time of creating a new Customer, or editing and existing record.
The options to Require Marketing Referral, Sales Rep, A Phone Number, Address Line 1 and 2, Type and Region will force the user to make sure that all required information is added at the time of creating a new customer or editing and existing record
Once the options are set the field will change colour indicating that it is mandatory.

If ticked, Print Quotes will allow for printing of a Quote when it is saved/created.
When Consolidate Backorders is ticked all items that have been on Backorder, and are now filled, will all be placed on a single Invoice for each Customer.
The Require a Contact Field will force the user to supply a customer contact if the Account type is an organisation.
If Schedule Barcodes on Packing Slips is ticked then upon processing of a Customer Invoice a prompt will appear asking to schedule barcodes for the Products being sold.
The Customer aging method will determine the aging the method for all new customers added.
The Default payment terms are used when a new Customer account is created.
The payment message is used to print on the footer of invoices and statements telling the customer your bank account number and providing instructions for the payment of their invoices.
The Next Quote # is used to set the next sequential number when creating a customer Quote - the Quotes are valid for is used to set the quote expiry date which prints on the customers copy.
The option to keep invoices For 7 years and keep Transactions for 7 years can be increased if required, but should not be reduced as it is a legal requirement for invoices to be kept for at least 7 years. This information is purged at the point of completing a financial year close off in the general ledger.
The default Customer Label may also be selected and set along with the Default Address to be used. These can be changed at the time of printing the labels if required.
Invoices Tab
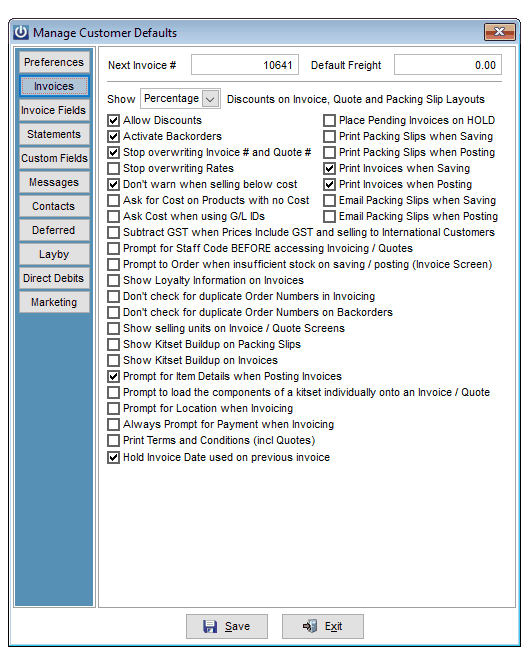
The Next Invoice # field indicates the number of the next Invoice to be generated.
An option is available for how Discounts are displayed on Invoices, Quotes and Packing Slips. They can be displayed as either Percentage or Dollar values of the item.
The Default Freight can be set and will automatically populate the freight field on all customer Invoices and POS Invoices.
The Allow Discounts option allows for discounts to be entered onto Quotes and Invoices.
The Activate Backorders option allows for Backorders to be created if insufficient stock is available. If this option is selected the Backorder column will be visible in the Invoice window.
The Stop Overwriting Invoice # option stops the Invoice Number from being overwritten when an Invoice is created.
Stop Overwriting Rates stops editing of Product Rates on Invoices and Quotes.
If the Don’t warn when selling below cost option isn’t selected, a pop up warning will appear when a Product is being sold at less than its Cost Price.
If the Ask for Cost on Products with no Cost option is selected it will prompt users for Cost on Products if not already set.
If the Ask Cost when using GL IDs option is selected, a pop up window will appear when entering a GL ID into the code field on an Invoice asking for a unit cost.
If the Subtract GST when Prices include GST and selling to International Customers tick box is selected GST will be removed from international transactions.
Selecting Prompt for Staff Code before accessing Invoicing / Quotes will require Users to input their Staff Code into a pop up box before they can access Invoices and Quotes.
Selecting Prompt to Order when insufficient stock on saving / posting (Invoice screen) will mean a pop up window will appear that will allow an Order to be created for Product if there is insufficient quantity on hand to fill the requirements of the Invoice.
Selecting Show Loyalty information on Invoices will display Loyalty information for the Customer on any invoices created.
Infusion can be set to override the default settings of Don’t check for duplicate Order Numbers in Invoicing and Don’t check for duplicate Order Numbers on Backorders.
The option to Show selling units on Invoice / Quote screens is available.
The components of Kitsets can be displayed in detail on Packing Slips and Invoices by selecting Show Kitset Buildup on Packing Slip and Show Kitset Buildup on Invoices.
Selecting the Prompt for Item details when Posting Invoice option will allow additional details for an Invoiced item set up as an Item Type to be entered against it when the Invoice is Posted.
The Prompt to load the components of a Kitset individually onto an Invoice / Quote option will allow for the components of a Kitset to added on to an Invoice or Quote and listed individually.
Selecting the Prompt for Location when Invoicing option will prompt for selection of a Location (assuming more than more are set up) for an Invoice to be set against.
Having the Always Prompt for Payment when Invoicing selected will mean a prompt will always display asking for a payment method when posting a non-POS invoice.
With the Print Terms and Conditions (incl Quotes) option selected Terms and Conditions can be printed with Invoices and Quotes. This requires a layout Terms to be saved to the Custom folder. A copy of the layout (.frt /.frx) files for this are in the Reports folder. Saving these to the Custom folder will allow the layout to be edited.
Hold Invoice date used on previous invoice – when selected the invoice date will default to that last used, suitable if you are batch loading previous days
The Place Pending Invoices on Hold option will place on Hold any Pending Invoice when they are created.
Selecting Print Packing Slip when Saving Print Packing Slip will give the option to print a Packing Slip when an Invoice is Saved.
Selecting Print Packing Slip when Posting will give the option to print a Packing Slip when Posting an Invoice.
Selecting Print Invoices when Saving will give the option to print an Invoice when it is Saved.
Selecting Print Invoices when Posting will give the option to print an Invoice when it is Posted.
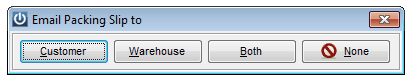
Selecting Email Packing Slips when Saving and Email Packing Slips when Posting and Print Invoices when Posting will give the option to email a packing Slip to either the Customer or the Location the Invoice is set against (both of which need to be set up for emailing) or both when the Invoice is Saved or Posted respectively. If a Pending Invoice is Saved again or Posted and the Packing Slip is sent again to the warehouse, the email will have a message in the body saying it had been previously sent and on what date. The Packing Slip email to the Location will bypass the email queue and be sent directly.
Invoice Fields Tab
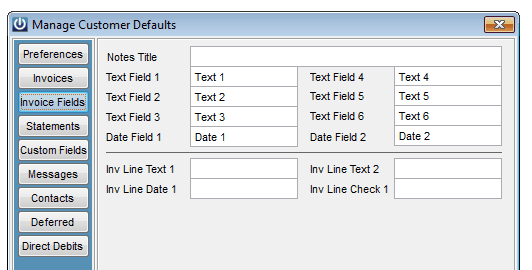
The Notes Title is the text at the top of any notes on a Quote or Invoice.
The Text and Date Fields are used on the Custom Fields section of Quotes and Invoices.
If any of Invoice Line Text 1, Invoice Line Text 2, Invoice Line Date 1 or Invoice Line Check 1 fields have text in them, a pop up box for each will appear with the text as the title for the box. This allows for extra information on Invoice and Quote lines.
Statements Tab
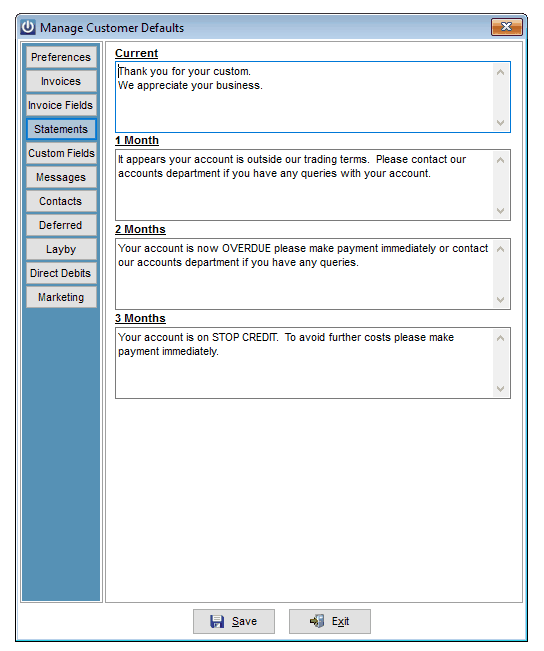
Setup of the message that will be placed on a Customer’s statement. Messages for each Ageing Period can be set up. The oldest Amount Due date on the balance will dictate which message is used.
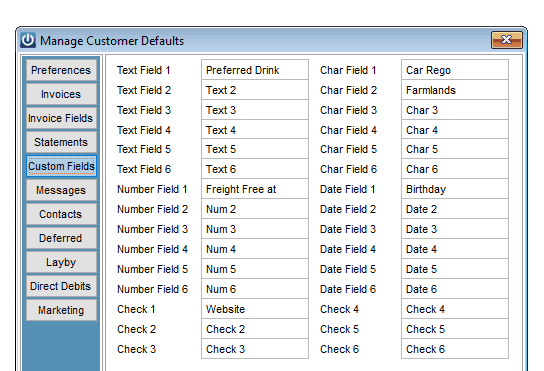
Custom Fields Tab
You can personalize the 30 Customer Custom Fields by changing the title.
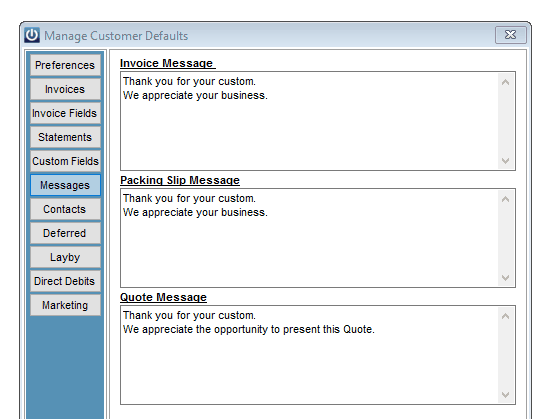
Messages Tab
Setup of Customer specific messages to go on to Invoices, Packing Slips and Quotes.
Contacts Tab
Setup of 15 user defined fields relating to Customer Contacts.
Deferred Tab
The Deferred Tab allows for the setup of text that will display in the Deferred Payment section of Quotes and Invoices.
Layby Tab
The Layby Tab should be used to store the terms and conditions which will be displayed on a customer’s Layby Invoice and Statement .
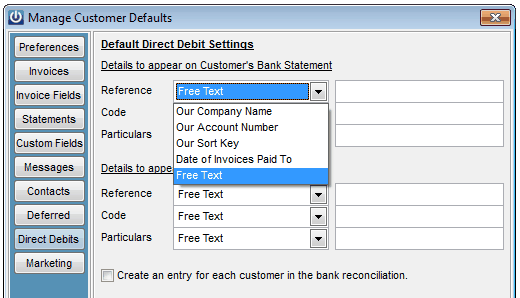
Direct Debits Tab
Contacts Setup of details to display on bank statements for Direct Debit payments. An option is also available to Create an entry for each Customer in the bank reconciliation for each payment made as opposed to one consolidated amount.
Marketing Tab
The Marketing Tab allows you to set up 18 different marketing groups. Indicating memberships, interests or specific company details.
This data is then available for export as part of the Email and Direct marketing export under the Electronic marketing menu.

Manage Supplier Defaults
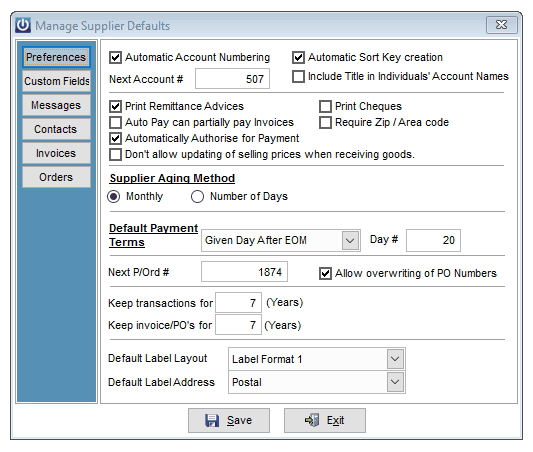
Preferences Tab
If Automatic Account Numbering is ticked, an Account Number will be assigned each time a new Supplier is created. The Next Account # is displayed. This can be set to a particular value if account numbering is required to start from a certain number. If this is unticked, a new account number will need to be assigned each time a new Supplier is created.
Select the Automatic Sort Key creation option to have a Supplier account Sort Key automatically be created based on the account title details. For the title of a Customer set up as an individual (e.g. Mr) to be included in their name on the Manage Customers screen select the Include Title in Individuals Account Names option.
If selected, Print Remittance Advices will print a Remittance Advice when payment is made. This is a default setting which can be changed when making each payment.
Having Auto Pay can partially pay invoices selected will allow Invoices to be partially paid as opposed to leaving the balance amount unallocated.
If Automatically Authorise for Payment is selected all Supplier Invoices will automatically be authorised for payment. (refer to Supplier Enquiry / Outstanding for authorising of Invoices).
Selecting Don’t allow updating of selling prices when receiving goods will stop the User from updating the sell price for a product when it is receipted in from an Order.
If selected, Print Cheques will allow for printing of a cheque when using cheque as the payment method.
The Supplier Aging Method allows balances to be displayed in either a specified number of Days or by Months.
Default Payment Terms are used when creating a new Supplier.
The Next P/Ord # Next Quote # field displays the number of the next Purchase Order to be generated.
Allow overwriting of PO numbers allows the User to overwrite Purchase Order numbers when an Order is created.
Options are available for the length of time Transaction History and Invoice / PO History are kept. This information is deleted when the financial year is rolled.
The default layout and address details used on Supplier Labels can be set from the Default Label Layout and Default Label Address dropdown boxes.
Custom Fields Tab
Setup of 30 Supplier Custom Fields.
Messages Tab
Setup of Supplier specific messages to go out on Purchase Orders and Remittance Advice.
Contacts Tab
Setup of 15 user defined fields relating to Supplier Contacts.
Invoices Tab
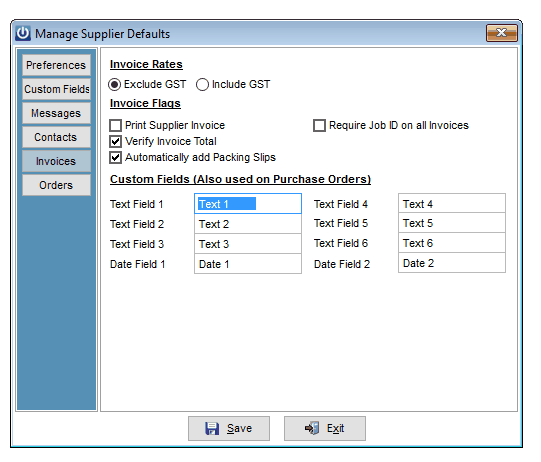
Invoice Rates can be set up to by default display to Exclude GST or Include GST.
Tick the Print Supplier Invoice box to print the Supplier Invoice each time an Invoice is processed.
Verify Invoice total will require the user to enter in the total of the invoice, and the software will not allow it to be processed until the totals match.
The automatically add packing slips will save the user time, when a supplier invoice is received independently of the packing slips the system will automatically add all associated packing slips to the invoice.
Selecting Require Job ID on all Invoices will mean all Supplier Invoices will need to have a Job ID entered against each line entry.
Titles for the Custom Fields on Invoices and Purchase Orders can be set from this screen.
Orders Tab
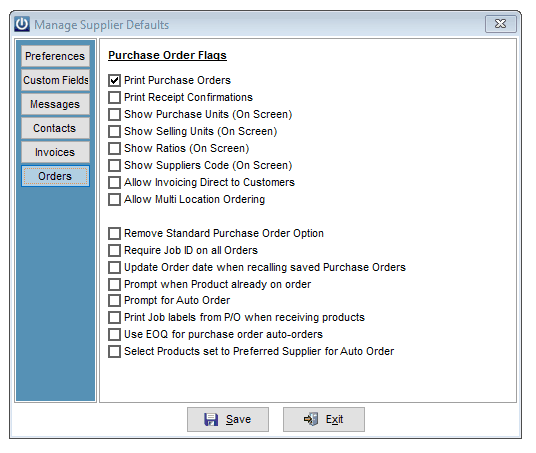
Selecting the Print Purchase Orders option will allow printing of a Purchase Order when the order is raised in Purchase Orders / Create Purchase Order.
The Print Receipt Confirmations option allows printing of a Receipt when an Order is Received into stock through Purchase Orders / Receive Products (From Order).
Show Purchase Units (On Screen), Show Selling Units (On Screen) and Show Ratios (On Screen) options will display the Purchasing (P/Unit) units, Selling (S/Unit) units and Ratios on Purchase Order and Receipt screens and printouts.
Selecting the Show Supplier’s Code (on Screen) option will display the Supplier’s Code (for the Supplier of this Order) on the entry screen for the items on a Purchase Order.
The Allow Invoicing Direct to Customers option allows purchased Products to be Invoiced directly to a Customer when receiving from the Purchase Order. When selected, an option to create a Customer Special Order will be given when a new Purchase Order is raised.
The Allow Multi Location Ordering option allows an Order to be raised for Product over Multiple Locations. When selected, an option to create a Multi Location Order will be given when a new Purchase Order is raised.
Selecting the Remove Standard Purchase Order option will mean only Purchase Orders of type Customer Special, Multi Location of Job Management (Elite version only) can be created.
The Require Job ID on all Orders option will not allow a Purchase Order to be processed unless a Job ID is entered per line item. This essentially forces all Orders to be of type Job Management.
Having the Update Order date when recalling saved Purchase Order selected will change the Order date of a saved Purchase Order to the current date when the Order is recalled.
Selecting the Prompt when Product already on order option will prompt when a Product is entered on the Purchase Order entry screen that it is already on order. If multiple locations are set up the message will indicate how many are on order on the location of the Purchase Order and how many are on order in total.
Print Job labels when receipting in products from purchase orders - if a purchase order was raised with a job ID then when the goods are brought in a label will be printed. This is used for assigned the correct parts to a job or for Customer Special Orders jobs.
Use EOQ on Purchase orders, once set the auto order will round an order up to the qty of the of the EOQ. If the system looking at the Min and max requires 10, but the EOQ is 12 then the system will order 12 on the Purchase order
Select products set to preferred supplier with Auto order, Setting this default will only include items where the supplier is recorded as the preferred supplier and will ignore items previously purchased, where the supplier is not recorded as the preferred supplier.
Manage Product Defaults
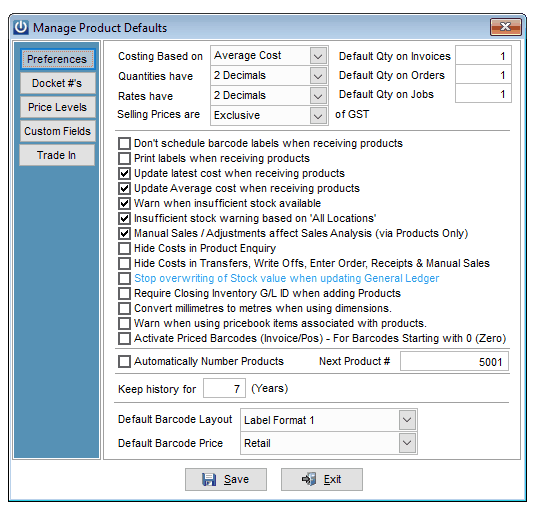
Preferences Tab
Costing Based on can either be Latest cost or Average cost. This will affect margins / markups and Sales Analysis figures.
Quantities have can be set from no decimal places to four decimal places.
Rates have can be set from no decimal places to four decimal places.
Selling Prices are can be either Exclusive or Inclusive of GST.
Default Qty on Invoice Default Qty on Orders, and the Default Qty on Jobs can be set to any number required. This is the quantity which will automatically be entered when creating Invoices and Orders.
The Don’t schedule barcodes when receiving product option allows barcodes not to be scheduled when Product is receipted in.
The Update latest cost when receiving products, Don’t update latest cost when receiving products field gives the option to update Product Latest costs when they are receipted in.
The Update Average cost when receiving products, Don’t update latest cost when receiving products field gives the option to update Product Average costs when they are receipted in.
When selected, the Warn when insufficient stock available option will display a pop up warning that there is not enough Product available for the intended transaction.
Having the Insufficient stock warning based on “All Locations” option selected will mean the Warn when insufficient stock available option will be based on the stock holding in all locations rather than just that set on the Invoice.
If the Manual Sales / Adjustments affect Sales Analysis (via Products Only) field is selected, manual sales and transfers will contribute to Sales Analysis figures.
An option is available to hide Costs (the Rate column) in the Product Enquiry screen by selecting Hide Costs in Product Enquiry.
Costs (the Rate column) can be hidden in the Transfers, Write Offs, Enter Order, Receipts and Manual screens through the Hide Costs the Transfers, Write Offs, Enter Order, Receipts and Manual option.
The Stop overwriting of Stock Value when updating General Ledger will stop manual adjustment of the Stock Value when updating it through Products / Utilities / Update Stock Value to GL.
If Require Closing Inventory GL when adding products has been selected a new Product will not be able to be saved unless a Closing Inventory GL has been entered.
The Convert millimetres to metres when using dimensions option allows entry of dimensions in Quotes and Invoices to be done in millimeters.
Having the Warn when using Pricebook items associated with Products option ticked will cause a pop up window to display in Quotes and Invoices warning that the Pricebook item has been linked to a current product and what that Product Code is.
Selecting the Activate Priced barcodes (Invoice/POS) – For barcodes Starting with 0 (Zero) option allows a barcode with the Product Code and Price in it to be scanned onto Standard and POS Invoices. The Product Code will be entered in to the Code field, the Price into the Price field and the quantity calculated by dividing the price by the unit Price of the product. The format of the barcode being read needs to be thirteen characters long with the first eight for the Product Code (the first of this being a Zero), the next four the Price and the last character the check digit.
Selecting Automatically Number Products will assign a system generated Product Number when a new Product is created.
Next Product # defines what the next generated product number will be when a Product is created.
Keep History For is the number of years historical Product financial data will be retained for.
The default Barcode layout and Price used on Barcode Labels can be set from the Default Barcode Layout and Default Barcode Price dropdown boxes.
Docket #’s Tab
Allows you to manually nominate the Next Transfer #, Next Write-off #, Next Manual Order #, Next Sales/Adj # and the Next Receipt #.
Price Levels Tab
Setup of the eight standard Price Level names used in Products.
Custom Fields Tab
Setup of the 30 Product Custom Fields.
Trade In Tab
Custom Fields
Setup of details relating to Trade In items. The Product Code Prefix for Trade In items can be set along with the Next Trade In number. The default setting for how the Trade In item is processed can be set.
Options are as follows:
- Create a Product for Sale.
- Do Not Create a Product.
- Create a Job for Refurbishment.
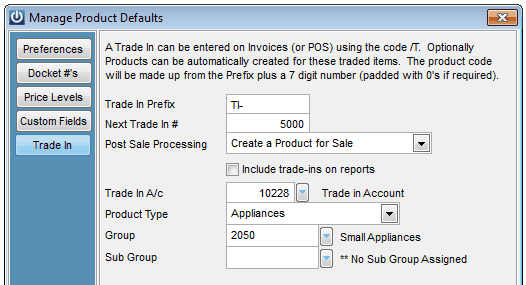
Select the Include Trade Ins on reports option to have Trade Ins included on Sales reports.
For the Create a Job for Refurbishment process to work a Trade In Account Customer must be set. This will be the account a Trade In type Job will be created for when the Invoice is Posted.
A Default Product Type, Group and Sub Group can be set for the Trade In item. These settings can be changed when the Trade In Invoice is being processed.
Manage Job Defaults
Preferences
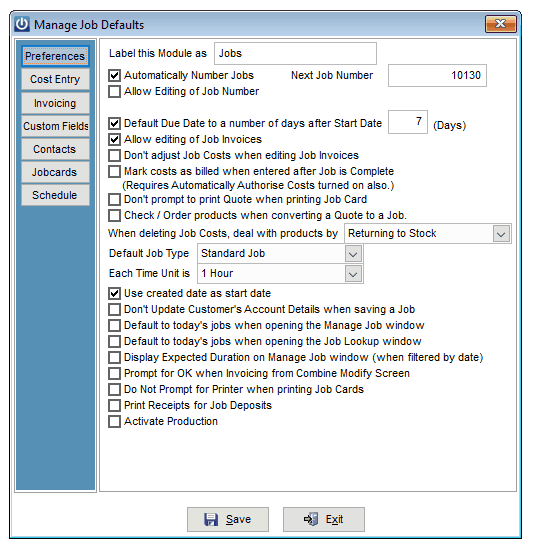
As the Job Management module can be used in a number of different environments its title can be changed by. Type the required title in to the Label this Module as field. The new label will display on the top menu bar and left hand control bar.
Automatically Number Jobs will assign a Job Number when a new job is created. The job number for the next job to be created is displayed in the Next Job Number box. If this is not ticked a Job Number will have to be entered manually when creating a Job.
Allow Editing of Job Number will allow a customized job number to be created. It allows set up of descriptive titles for the likes of Template and Recurring Jobs. Once this has been selected, when a Job is created a popup window will appear giving the user the opportunity to edit the Job number.
Having the Default Due Date to a Number of days after Start Date selected means the Due Date for a Job will be set as the entered number of days after the Start Date.
Allow Editing of Job Invoices will allow an existing Invoice created from a Job to be edited. Items added to a Job Invoice will by default be added on to the Job.
Having the Don’t adjust Job Costs when Editing Job Invoices selected allows Invoices created from Jobs to be edited and any additional items entered on to the Invoice not to be added back to the Job.
Mark costs as billed when entered after Job is Complete allows additional costs to entered on to the Job after it has been processed and completed. These costs will be marked as Billed. *Note – The Automatically Authorised Costs flag must be turned on also. This can be found under Manage Job Defaults / Cost Entry. With this option selected if the status of a Job is changed to Completed and there are unbilled costs these will be marked as billed when the Job is Saved.
Selecting the Don’t prompt to print Quote when printing Job Card will turn off the option to print a Quote associated with a Job when a Job Card is printed.
Having Check / Order products when converting a Quote to a Job selected will initiate a Purchase Order for items not in stock when converting a Quote to a Job.
An option is available to set the action for When deleting Job Costs, deal with products by Returning To Stock, Not Returning To Stock or prompt each time the action is taken.
A Default Job Type can be set for when a new Job is created.
The Each Time Unit is setting is for time clock entry with the quantity being entered onto a Job being the actual time (in hours) divided by the time unit (in hours).
Use Created Date as Start Date will set the start date of the Job to the date the Job is created.
Selecting the Don’t Update Customer’s Account Details when saving a Job will mean any changes made to the Customer’s details on a Job won’t update their Account details. Having it unselected will update any changes made to the Customer’s account.
The Manage Job screen and Job Lookup window can be set to Default to today’s jobs when opening the manage Job window and Default to today’s jobs when opening the manage Job Lookup window respectively.
If only today’s jobs are displayed in the Manage Job screen, a sum of the Duration time set against each can be displayed at the top of the screen by selecting the Display Expected Duration on Manage Jon window (when filtered by date) option.
An option is available to specifically Prompt for OK when Invoicing from Combine Modify screen. This will override the suppression of non-critical questions option in Manage System Defaults.
The Do Not Prompt for Printer when printing Job Cards option allows a Job Card to be printed to the default printer without prompting to select/confirm the printer.
Having the Print Receipts for Jobs Deposits option ticked will set the Print Receipt tick box to by default always be selected when processing a deposit for a Job.
Activate Production Once selected this will turn on extra fields for the job management screen
Cost Entry
Hold Job ID, Hold Cost Date, Hold Cost Code, Hold Department options will retain each of the previous Job Cost lines values for these fields when entering additional lines if selected.
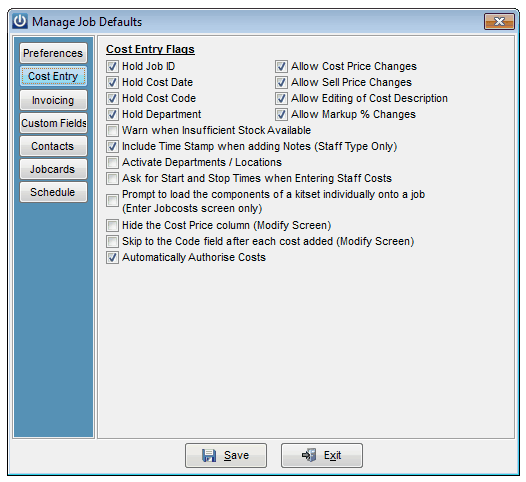
Allow Cost Price/Sell Price Changes will allow Unit Cost and Unit Sell fields to be edited.
Allow Editing of Cost Description allows the default text that appears for the Product Description to be edited.
Allow Markup % Changes allows for the Sell Rate to be changed once the Job Cost has been allocated to a Job.
Warn when Insufficient Stock Available will warn the user that a Product has insufficient stock should they enter a Product as a Job Cost where there is none in stock.
Include Time Stamp when adding Notes (Staff Type Only) will place a Time Stamp on any notes put in the “…” field for Staff Type Product Codes.
Activate Departments/Locations will make the Department and Locations drop down menus available on the Job Costs screen if selected.
Ask for Start and Stop Times when Entering Staff Costs will allow use of a 24 hour clock start/stop time when entering in Quantity of Staff Type Product Codes.
The Prompt to load the components of a Kitset individually on to a Job option will allow for the option to either add a Kitset Product Code or the components of the Kitset on to Job.
To hide the cost price column in the Modify Job screen select the Hide the Cost price column (Modify screen).
Selecting the Skip to the Code field after each cost added (Modify Screen) option will set the cursor to move from the Code field to the Code field in the next line after the Enter key is selected.
Automatically Authorise Costs will show the Costs as authorised in the Job Enquiry screen once they have been entered in and assigned to a Job.
Invoicing Tab
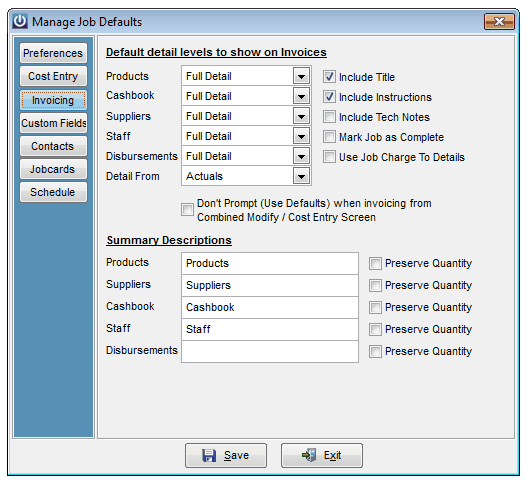
Default detail levels to show on Invoices allows for setting of the amount of detail that will display on a Job Invoice for each cost type.
The options for levels of detail are:
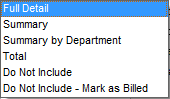
Full Detail – Every line will be displayed individually.
Summary – Only one Summary Line with a Total will be displayed for each Product code.
Summary by Department – If Departments are set up then a Summary line for each Department will be displayed.
Total – A Total Line will be shown for each Job Management Type.
Do Not Include – No details will flow through on the Invoice.
Do Not Include - Mark as Billed – No details will flow through however an enquiry will show these costs as being billed.
Options are available to include on the Invoice the Title, Instructions and Tech Notes from the Job.
The Job can be set to Mark Job as Complete when an Invoice is created.
By selecting the Use Job Charge To Details the Charge To details on the Job will be used as the address for the invoice to be sent to.
The Detail from field gives the option to have the Invoice display with either the Actual costs assigned to the Job or for the Quoted costs (if there is a Quote associated with the Job).
Selecting the Don’t Prompt (use Defaults) when invoicing from Combined Modify / Cost Entry screen option will mean there will be no prompt/opportunity to change the above layout settings when creating an Invoice form the Modify Job screen.
Summary Descriptions allows the title for each cost type that will appear on the Invoice to be changed.
By selecting Preserve Quantity the quantity of items summarized on a line will be retained as opposed to summarising them to a quantity of one (i.e. 1x).
Custom Fields
Allows setup of 20 Job Management Custom fields.
Contacts
Allows titles to be assigned to each of the Contacts assigned to a Job e.g. Site Manager, Accounts, etc.
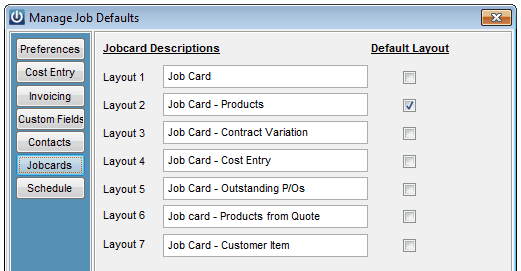
Job Cards
Five standard Job Card layouts are available one of which needs to be set as the default layout. The title to display when selecting a layout to print can be set here.
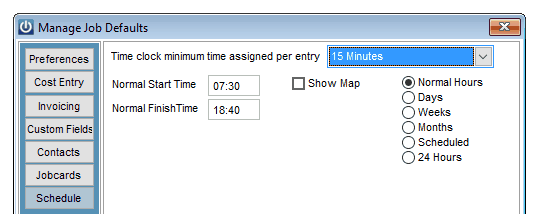
Schedule
The Time Clock minimum time assigned per entry option allows a minimum time entry to be set when Labour is assigned to a Job through Time Clock Entry.
Default settings for the Scheduler can be set up for the standard start and finish times for a working day, whether the header map will display along with the time frame scale.
Manage Survey Defaults
Preferences
Allows setup of whether Surveys are presented when Posting of POS Invoices and/or Saving and Posting of Customer Invoices.
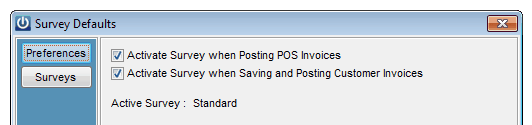
The currently Active Survey is displayed here.
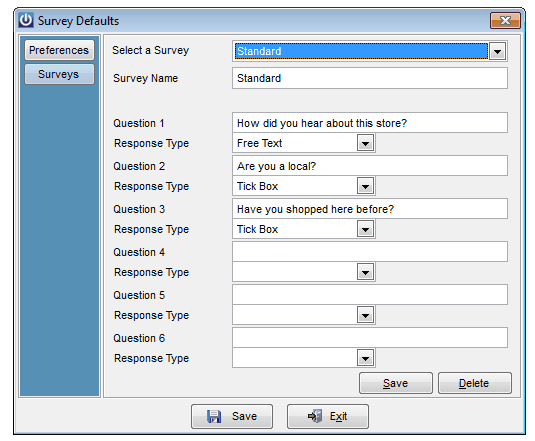
Surveys
Setup of Surveys and related questions. To create a new survey select from the top dropdown box **Create New Survey**. Enter in a new Survey Name then create up to six questions for the survey and setting a Response Type for each question.
Manage Customer Items Defaults
Allows setup of Customer Items defaults.

The Short and Long Descriptions are for setting up an overall description of the Items being managed.
The Next Service ID is the number of the next service for the Items.
Selecting the Use Service Due Date when creating a Service Event will use the Due Date as the date for the service as opposed to manually selecting it.
Selecting Assign Service to Staff Code assigned to Customer will assign the Service to the Sales Rep associated with the Customer.
With the Create Jobs for Service Events selected a Job will be created for scheduled services. This is only available in Elite.
The system can be set by selecting the Require Unique Serial Numbers for Items within each Type option to force that Serial Numbers for Customer Items within a Customer Item Type are unique.
The Prompt to attach a service to a Job if there is a service due within “XX” months allows an upcoming service (one due within the specified number of months) or one that has been missed to be associated with a Job.
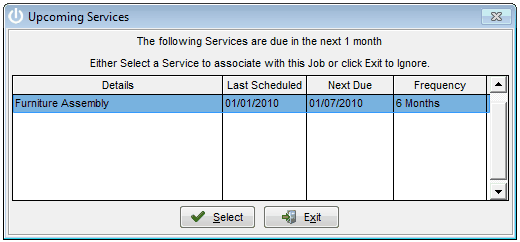
With this set a prompt will appear when the Customer Item dropdown box in the Job is selected allowing selection of any displayed Services. Having a value of 0 months will mean the system will not prompt.
Manage Rental / Hire Item Defaults
Allows setup of the defaults for the Rental Hire module.

Preferences
The default Module Name for the module is Rental / Hire but can be changed to a title more suitable to the business e.g. Suit Hire.
Having the Auto Number Items option ticked will mean when a Rental Hire item is created it will be created with the Next Auto Number value. All Hire items are added individually so if there are 35 items for the same sort each one must be set up individually.
By default the Name of Service (Repairs) field is titled Repairs. This can be changed to title more suitable to the module if required.
Infusion will produce a Hire document when an item is hired out. The title of this can be changed as required from the Hire Document Title field.
Infusion will produce a Return document when a hired item is returned. The title of this can be changed as required from the Return Document Title field.
For hire items returned late, a charge can be added. The Product Code used for this is set in the Late Return Product Code field.
The Rental Hire Agreement can have an Insurance cost added to it. The Product Code for this is set in the Insurance Product Code field.
The Early Return Leeway field allows a time frame within which the system will not calculate a credit if the goods are returned early.
The Dollar Value Leeway sets a minimum dollar value under which the system will not calculate a credit for goods returned early.
The unit Sales Analysis reporting will be expressed in for the hire of items can be set in the Sales Analysis Unit field.
The Default Selling Rate for items being hired can be set.
The number of trading hours in the day for the business can be set in the Number of Hours Per Day field.
The number of trading days in the week for the business can be set in the Number of Days Per Week field.
The number of trading days in the month for the business can be set in the Number of Days Per Month field.
Insurance can be set to calculate automatically based on the value of the Hire. This can be set under Default Insurance %.
To ensure a contact name is recorded for each Hire select the Require Contact when Hiring to Organisations option. This will allow selection from a list of Contacts already set against the Customer or addition of a new contact at the time.
If Hire Items are calculated to be returned at a time outside business hours then this time can be adjusted to the beginning of the next business day by selecting the option When a return time is after the closing hours, default to a return time of the beginning of the next business day.
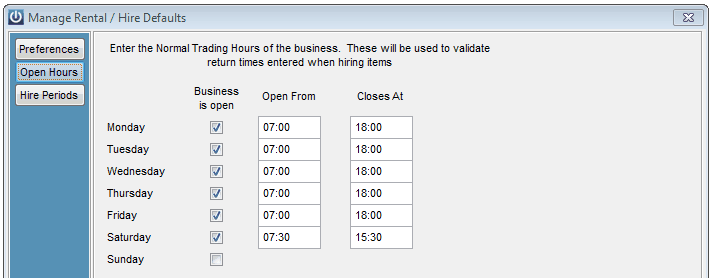
Open Hours
The days and hours of operation of the business can be set under the Open Hours tab. This information is used to calculate return dates, times and overdue fees.
Hire Periods
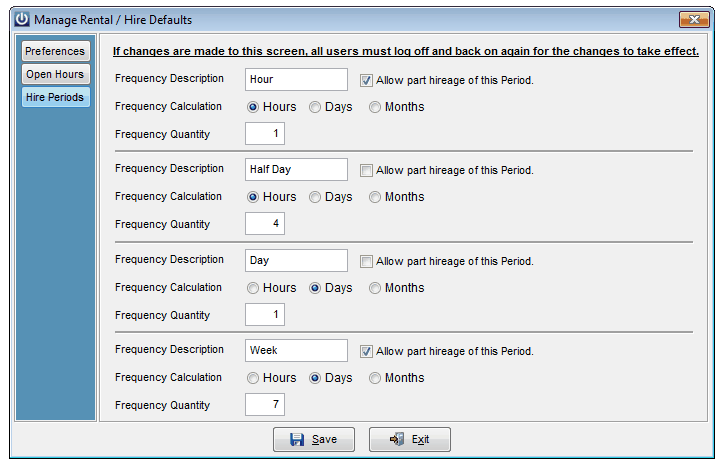
Four Hire Periods can be set up to be used when an item is Hired. For each, a Frequency Description is required e.g. Day. Each Description then needs a Frequency Calculation and Frequency Quantity to specify how long the Period is for. As an example a Half Day hire period would be set up with a Calculation of Hours and a Quantity of 4.
Selection of the Allow part hireage of this Period option allows fractions of Hire Period to be entered when creating a Hire (e.g. 0.75 Days) otherwise only whole quantities can be entered.
Manage Customer Loyalty Defaults
Allows setup of Customer Loyalty Scheme defaults. *Note - once activated the Loyalty Scheme can be retrospectively calculated using Admin / Other / retrospectively Activate Loyalty Scheme.

Turn the Loyalty Scheme on or off through Activate Customer Loyalty Scheme.
Choose whether the Loyalty calculations should include GST and Freight or not through Include GST in Loyalty calculation and Include Freight in Loyalty calculation.
The Loyalty Rewards Levels section determines what Reward a Customer will receive once they have reached the required Sales Value. In the example above Customers will receive $10 once they have spent $100, another $25 when they reach $200, another $70 when they reach $500 and $70 for every $500 spent thereafter as the Repeat option is ticked at this level.
Loyalty information shown on POS Dockets and Invoices can be set to Last Reward Value, Date Reward Calculated, Current Loyalty Value ($ Spent), Rewards Due (but not yet processed) and Next Reward Level (after rewards which are due). Whether Loyalty information is displayed on a POS Docket or Invoice is set under the respective POS and Customer defaults.
Manage SMS Defaults
Allows setup of SMS messaging to mobile numbers of Customers, Suppliers and Staff within Infusion. Contact Infusion Business Software Limited to have account set up to do this. Enter the account details and the mobile number any reply messages will go to.
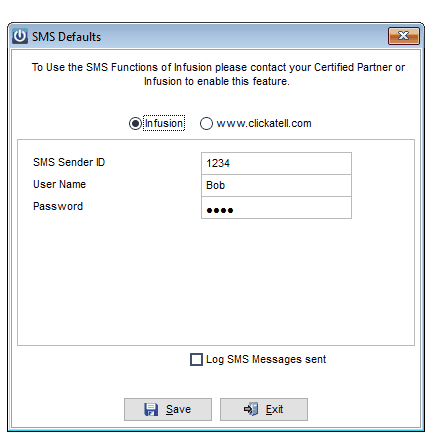
The are two options for SMS service providers, SMS Global and Clickatell. To have an account set up or details changed for either contact Infusion Business Software Limited. Entering in account details will activate all of the 'Send SMS' buttons next to mobile number fields throughout the software.
To track the SMS messages sent select the Log SMS Messages sent option and enter the number of days of logging required. The log can be viewed from under the Admin / Print SMS Audit Log menu.
Layouts
Each computer running Infusion can be setup to have its own settings for transaction documents. Layout settings are created per Terminal ID so are set per Infusion user.
Invoice, Packing Slip, Quote, Statement, Purchase Order Layout
Invoice Layout
Allows setup of the default printer, layout and number of copies printed for Invoices, Packing Slips, Quotes, Statements and Purchase Orders.
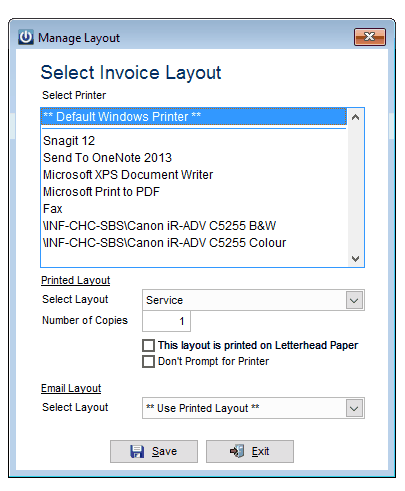
An option is available to print to letterhead paper. To bypass the printer prompt window select the Don’t Prompt for Printer option. A different layout for emailing can be specified.